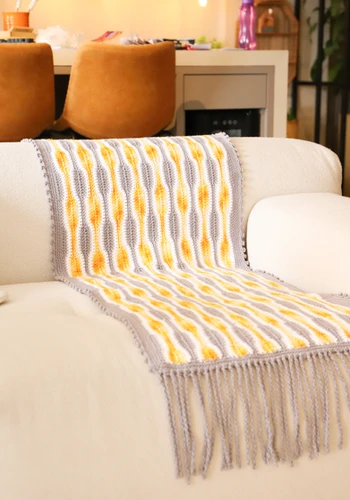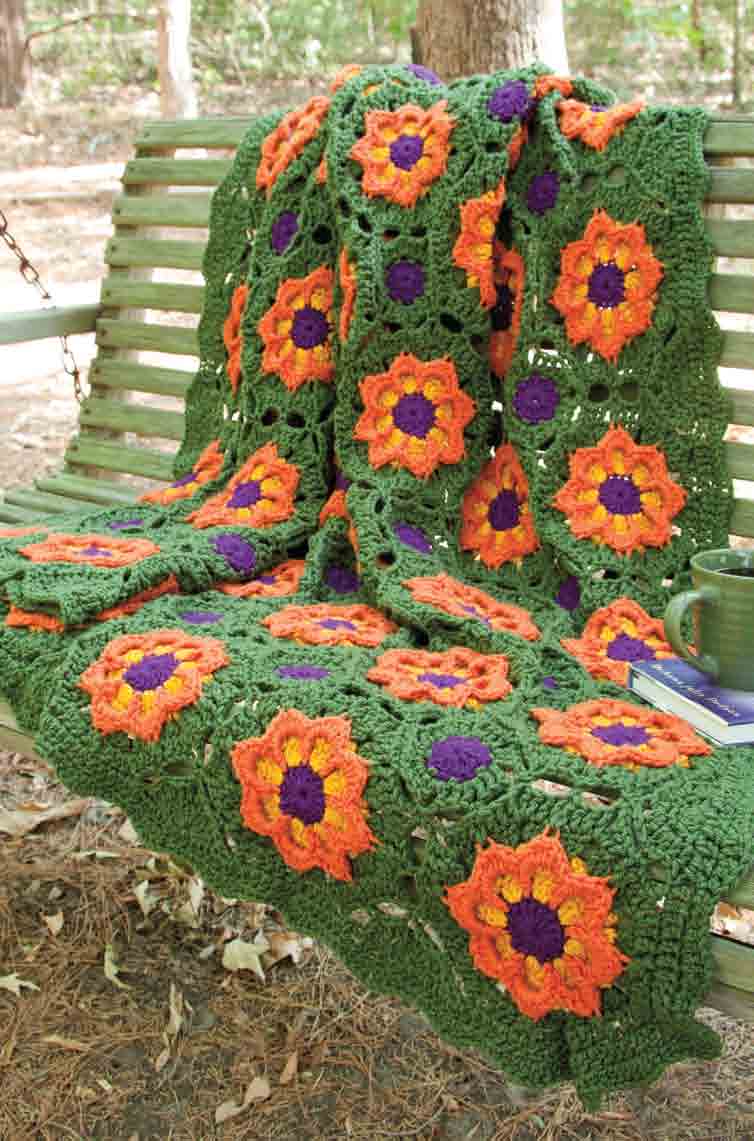
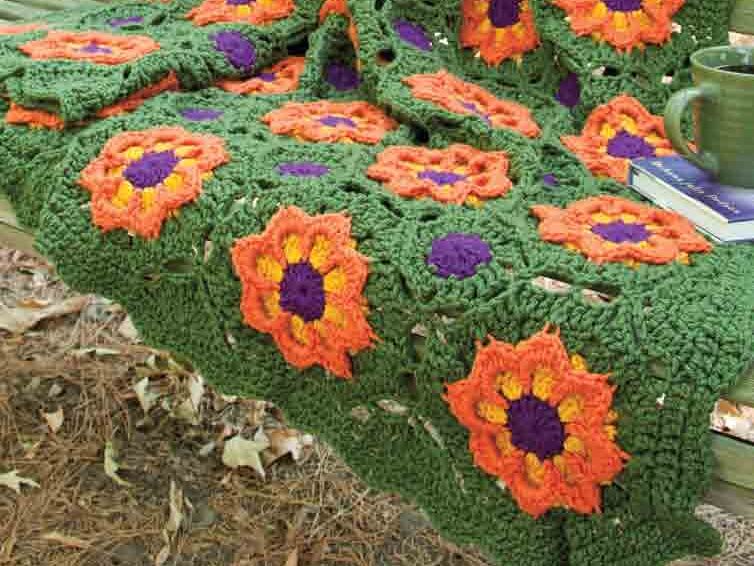
Crochet the Bold & Beautiful Winner’s Circle Flower Tiles Throw
What You’ll Need
Before we dive into the petals and join-as-you-go magic, here’s everything you’ll need to make your own Winner’s Circle Flower Tiles Throw:
- Yarn:
- 5 skeins of #0406 Medium Thyme (Color A) – main background color
- 2 skeins each of #256 Carrot (Color C) and #0321 Gold (Color B) – flower petals and accents
- 1 skein of #0776 Dark Orchid (Color D) – center of each flower
- Crochet Hook: Size I/9 (5.5 mm), or size needed to match gauge
- Yarn Needle: For weaving in ends (trust me, you’ll want a good one—there are a few!)
- Scissors
- Stitch Markers (optional): Helpful for marking the beginning of rounds
💡 Pro Tip: This pattern uses a join-as-you-go technique, so you’ll be connecting motifs as you crochet—no sewing at the end! Isn’t that a dream?
Crochet Abbreviations (US Terms)
Let’s make sure we’re on the same page with our stitch language:
- ch = chain
- sc = single crochet
- dc = double crochet
- sl st = slip stitch
- sk = skip
- lp(s) = loop(s)
- beg = beginning
- rnd(s) = round(s)
- sp(s) = space(s)
- MR = magic ring (not used here, but good to know!)
- back lps = back loops only (used in joining rounds)
Note: A ch-3 at the beginning of each round counts as the first dc unless otherwise stated. Always join with a slip stitch to the top of the beginning ch-3 unless instructed otherwise.
Finished Size & Gauge
- Finished Size: Approximately 50 x 65 inches – perfect for draping over a couch or bed
- Gauge: One Flower Motif = 7 inches in diameter
(Check your gauge with Color D, B, and C to ensure your flowers are the right size.)
🌸 Step-by-Step Flower Motif Instructions
This throw is made up of 48 flower motifs (6 rows of 8 motifs), joined as you go. We’ll start by making the First Flower Motif, then learn how to join additional motifs during Round 7.
Let’s begin with the center and work our way outward—petal by petal
🌺 First Flower Motif
We’ll start with Color D (Dark Orchid) for the center, then switch colors as we go.
Rnd 1 (Center):
With D, ch 4, join in 4th ch from hook to form a ring.
Ch 3 (counts as first dc), then work 15 dc in ring.
Join with sl st to top of beg ch-3.
👉 Fasten off.
(16 dc total)
Rnd 2 (Gold Base Layer):
Join B (Gold) in any stitch.
Ch 3, 2 dc in same stitch.
Ch 1, sk next stitch.
[3 dc in next stitch, ch 1, sk next stitch] 7 times.
Join with sl st to 3rd ch of beg ch-3.
👉 Do not fasten off.
(24 dc, 8 ch-1 spaces)
Rnd 3 (Prep for Petals):
Ch 3, dc in each of next 2 stitches.
Ch 3, sl st in next ch-1 sp.
Ch 3, [dc in each of next 3 stitches, ch 3, sl st in next ch-1 sp, ch 3] 7 times.
Join with sl st to 3rd ch of beg ch-3.
👉 Fasten off.
(24 dc, 16 ch-3 spaces)
Rnd 4 (Petals Begin – Carrot Color!):
Now we’ll work in front of Rnds 2 and 3, using the unworked dc from Rnd 1.
Join C (Carrot) with a sc in any unworked dc from Rnd 1.
Ch 7.
[Sc in next unworked dc, ch 7] 7 times.
Join with sl st to beg sc.
👉 Do not fasten off.
(8 sc, 8 ch-7 spaces – these are your petal arches)
Rnd 5 (Petal Shaping):
Ch 1.
In each ch-7 sp, work: (2 sc, 3 dc, 2 sc)
👉 Repeat 8 times (once in each space).
Join with sl st to beg sc.
👉 Fasten off.
(8 petals made!)
Rnd 6 (Thyme Border):
Join A (Medium Thyme) in the first stitch of any 3-dc group from Rnd 3.
Ch 3, 2 dc in same stitch.
Dc in next stitch.
3 dc in next stitch.
Ch 1, sk next 2 ch-3 sps.
[3 dc in next stitch, dc in next stitch, 3 dc in next stitch, ch 1, sk next 2 ch-3 sps] 7 times.
Join with sl st to 3rd ch of beg ch-3.
👉 Do not fasten off.
(56 dc, 8 ch-1 spaces)
Rnd 7 (Final Round – Not Joined Yet):
Ch 3, dc in next stitch, sk next stitch.
Working in back loops only (back lps):
(dc, ch 1, dc) in 4th stitch of corresponding petal from Rnd 5 and in next stitch of current round.
Sk next stitch, dc in each of next 2 stitches.
(dc, ch 3, dc) in next ch-1 sp.
Repeat from * around 7 more times.
Join with sl st to 3rd ch of beg ch-3.
Fasten off.
(64 dc)
Your first flower is complete! Set it aside—we’ll use it to join the next motifs.
Joining Flower Motifs (Rnd 7 – Join-as-You-Go)
This is where the magic happens! Instead of sewing motifs later, you’ll connect them during Round 7 using slip stitches into the previous motif.
Follow Rnds 1–6 exactly as above for each new flower.
Then, for Rnd 7 (Joining Round):
Ch 3, dc in next st, sk next st, working in back lps:
(dc, ch 1, dc) in 4th st of corresponding petal from Rnd 5 and in next st of current round.
Sk next st, dc in each of next 2 sts.Now, for joining:
In the next ch-3 sp:
(dc, ch 1, sl st in corresponding ch-3 sp of previous Flower Motif, ch 1, dc)*dc in each of next 2 sts on current rnd,
sk next st, working in back lps:
(dc, sl st in corresponding ch-1 sp of previous Flower Motif, dc) in 4th st of petal and next st of current rnd,
sk next st, dc in each of next 2 sts,
(dc, ch 1, sl st in corresponding ch-3 sp of previous Flower Motif, ch 1, dc) in next ch-3 sp,Repeat from * for each side that needs joining.
**dc in each of next 2 sts, sk next st, working in back lps:
(dc, ch 1, dc) in 4th st of petal and next st of current rnd,
sk next st, dc in each of next 2 sts,
(dc, ch 3, dc) in next ch-3 sp,Repeat from ** around.
Join with sl st to 3rd ch of beg ch-3.
👉 Fasten off.
💡 Tip: Refer to the Placement Diagram (mentioned in the original pattern) to arrange your 6 rows of 8 motifs. Start in one corner and build row by row, joining as you go
🌼 Filler Motif (Optional – For Edging or Gaps)
The original file cuts off, but mentions a Filler Motif starting with:
- Rnd 1: With D, ch 4, join in 4th ch from hook to form ring, ch 3… (rest of instructions not included)
Since the full filler motif isn’t provided, you may choose to:
- Use only the flower motifs in a grid.
- Add simple corner or border motifs later using thyme (A) to finish edges.
- Create a plain edging (e.g., sc or dc border) around the entire throw for a clean finish.
Assembly & Finishing Touches
Since this is a join-as-you-go design, your blanket will come together as you crochet—no sewing required! Just follow the joining method in Rnd 7 to connect motifs side-by-side and row-by-row.
Once all 48 motifs are joined:
- Weave in all loose ends using your yarn needle.
(Do this as you go to avoid a tangled mess at the end) - Lightly block your throw if desired, to even out stitches and open up the floral texture.
- Give it a gentle steam (avoid direct contact with acrylic yarn) to smooth any curling.