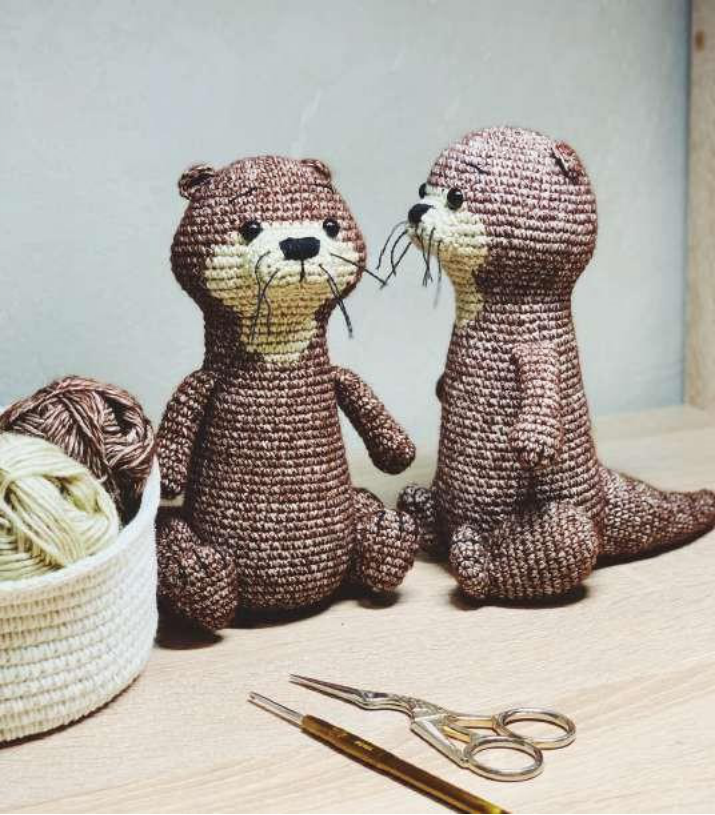
Crochet Otter Amigurumi Pattern
Materials
To crochet your charming otter, gather the following essential materials and tools:
- Yarn: YarnArt Denim Washed (Color 917 brown, Color 914 beige). You will need slightly more than one skein of brown yarn.
- Eyes: 8 mm toy safety eyes.
- Filler: Holofiber or synthetic stuffing.
- Crochet Hook: 2.1 mm.
- Scissors
- Sewing Needle

Finished Size
When using the specified materials, your finished crochet otter toy will be approximately 20 cm tall. This makes for a perfect handheld plushie!
Abbreviations
Familiarize yourself with these standard crochet abbreviations used throughout the pattern:
- MR: Magic Ring
- CH: Chain
- SC: Single Crochet
- HDC: Half Double Crochet
- DC: Double Crochet
- TR (or DTR): Treble Crochet (or Double Treble Crochet)
- INV DEC: Invisible Decrease
- INC: Increase (2 SC in one stitch)
- INC3: 3 SC in one stitch
- SL ST: Slip Stitch
- (12): Number of stitches in a row/round
- (2 rounds): Rounds without changes
- Example: 2 SC, 8 SC, 2 SC – 2 SC brown, 8 SC beige, 2 SC brown. This indicates color changes within a row.
Head and Body Instructions
Work the head and body in a continuous spiral using brown yarn, unless specified. Remember to stuff the piece as you go to maintain its shape.
- 6 SC in MR
- 6 INC (12)
- (1 SC, INC) × 6 (18)
- (2 SC, INC) × 6 (24)
- (3 SC, INC) × 6 (30)
- (4 SC, INC) × 6 (36)
- (5 SC, INC) × 6 (42)
- 42 SC
- (6 SC, INC) × 6 (48)
- Rounds 10-12: 48 SC (3 rounds without changes)
- Round 13 (Color Change – Beige for Muzzle Area): 3 SC, INC) × 3, 2 SC, 8 SC (beige), 2 SC, (INC, 3 SC) × 3, 12 SC (54)
- Round 14 (Color Change – Beige): 2 SC, (INC, 4 SC) × 2, INC, 2 SC, 12 SC (beige), 2 SC, (INC, 4 SC) × 3, 10 SC (60)
- Round 15 (Color Change – Beige): 16 SC, 16 SC (beige), 28 SC (60)
- Round 16 (Color Change – Beige): 15 SC, 18 SC (beige), 27 SC (60)
- Round 17 (Color Change – Beige): 15 SC, 18 SC (beige), 27 SC (60)

Eye Placement
This is the ideal time to insert the safety eyes:
- Place the 8 mm safety eyes in the 13th round of the head.
- Ensure there are 8 beige stitches between the eyes for proper spacing.
- Round 18 (Color Change – Beige): (3 SC, INV DEC) × 3, 18 SC (beige), (INV DEC, 3 SC) × 3, 12 SC (54)
- Round 19 (Color Change – Beige): (4 SC, INV DEC) × 2, 1 SC, 16 SC (beige), 1 SC, (INV DEC, 4 SC) × 2, 12 SC (50)
- Round 20 (Color Change – Beige): 6 SC, INV DEC, 4 SC, 3 SC, INV DEC, 4 SC (beige), INV DEC, 3 SC, 4 SC, INV DEC, 6 SC, INV DEC, 8 SC, INV DEC (44)
- Round 21 (Color Change – Beige): 5 SC, INV DEC, 5 SC, 10 SC (beige), 5 SC, INV DEC, 15 SC (42)
- Round 22 (Color Change – Beige): 1 SC, INV DEC, 5 SC, INV DEC, 2 SC, 3 SC, INV DEC, 4 SC (beige), 1 SC, INV DEC, (5 SC, INV DEC) × 2, 4 SC (36)
- Round 23 (Color Change – Beige): 10 SC, 8 SC (beige), 18 SC (36)
- Round 24 (Color Change – Beige): 10 SC, 9 SC (beige), 17 SC (36)
- Round 25 (Color Change – Beige): 10 SC, 9 SC (beige), 17 SC (36)
- Round 26 (Color Change – Beige): 11 SC, 7 SC (beige), 18 SC (36)
- Round 27 (Color Change – Beige): 13 SC, 4 SC (beige), 19 SC (36)
- Round 28: (11 SC, INC) × 3 (39)
- Rounds 29-31: 39 SC (3 rounds without changes)
- Round 32: (12 SC, INC) × 3 (42)
- Rounds 33-35: 42 SC (3 rounds without changes)
- Round 36: (13 SC, INC) × 3 (45)
- Rounds 37-39: 45 SC (3 rounds without changes)
- Round 40: (14 SC, INC) × 3 (48)
- Rounds 41–54: 48 SC (14 rounds without changes)
Finishing the Body (Tapering to the Tail)
Continue stuffing firmly as you decrease for the tail section.
- Round 55: (6 SC, INV DEC) × 6 (42)
- Round 56: (5 SC, INV DEC) × 6 (36)
- Round 57: (4 SC, INV DEC) × 6 (30)
- Round 58: (3 SC, INV DEC) × 6 (24)
- Round 59: (2 SC, INV DEC) × 6 (18)
- Round 60: (1 SC, INV DEC) × 6 (12)
- Round 61: 6 INV DEC (close opening) (6)
Fasten off, cut the yarn, and weave in the remaining tail to secure the opening.
Ears (Make 2)
Crochet two ears using brown yarn. These are worked in rows to create a distinct shape.
- 3 CH, 5 DC in the first chain, 2 CH, SL ST in the same chain.
Leave a long tail for sewing. You will attach these to the head later, using pins to ensure symmetrical placement.
Muzzle (Beige Yarn)
The muzzle is worked in rows using beige yarn. This piece gives character to your otter’s face.
- 7 CH, starting from the 2nd chain from hook: INC, 4 SC, INC3, 5 SC (14)
- 2 INC, 4 SC, 3 INC, 4 SC, INC (20)
- (1 SC, INC) × 2, 4 SC, (1 SC, INC) × 3, 5 SC, INC (26)
- 26 SC
Cut the yarn, leaving a long tail for sewing. Lightly stuff the muzzle before sewing it onto the head. Once sewn, you’ll embroider the facial details.
Muzzle Embroidery
Using black thread, embroider the nose, eyebrows, and whiskers to bring your otter’s face to life.
- Nose: Create a small triangle shape with about 5 stitches.
- Whiskers: Embroider 3-4 long stitches on each side of the muzzle.


Front Paws (Make 2)
Crochet two front paws using brown yarn in a spiral. Lightly stuff as you go.
- 6 SC in MR
- 6 INC (12)
- (5 SC, INC) × 2 (14)
- Rounds 4-5: 14 SC (2 rounds)
- (5 SC, INV DEC) × 2 (12)
- (4 SC, INV DEC) × 2 (10)
- Rounds 8-15: 10 SC (8 rounds)
Fasten off, leaving a tail for sewing. Embroider small claws onto the paws before or after sewing them to the body.

Back Paws (Make 2)
Crochet two back paws using brown yarn in a spiral. These are slightly larger for stability.
- 4 CH, starting from the 2nd chain from hook: 1 INC, 1 SC, 3 SC in one stitch, 2 SC (8)
- 3 SC in one stitch, 3 SC, 3 SC in one stitch, 3 SC (12)
- 1 SC, 2 INC, 4 SC, 2 INC, 3 SC (16)
- Rounds 4-6: 16 SC (3 rounds without changes)
- 3 SC, 1 INV DEC, 6 SC, 1 INV DEC, 3 SC (14)
- 2 SC, 1 INV DEC, 5 SC, 1 INV DEC, 3 SC (12)
- 12 SC
- 6 INV DEC (close opening)
Fasten off and leave a long tail for sewing. Lightly stuff before sewing.

Hips (Make 2)
Crochet two hip pieces using brown yarn to give the otter its distinctive sitting shape. Stuff firmly.
- 6 SC in magic ring (6)
- 6 INC (12)
- (1 SC, 1 INC) × 6 (18)
- (8 SC, 1 INC) × 2 (20)
- (8 SC, 2 INC) × 2 (24)
- (10 SC, 2 INC) × 2 (28)
- Rounds 7-10: 28 SC (4 rounds without changes)
- 9 SC, 2 INV DEC, 10 SC, 2 INV DEC, 1 SC (24)
- 8 SC, 2 INV DEC, 12 SC (22)
- 7 SC, 2 INV DEC, 11 SC (20)
- 6 SC, 2 INV DEC, 10 SC (18)
- (1 SC, 1 INV DEC) × 6 (12)
Fasten off, leaving a long tail for sewing. Ensure these are stuffed well to help the otter sit steadily.
Tail (Brown Yarn)
The otter’s tail is crocheted in a spiral and stuffed as you go. This piece adds balance and character.
- 6 SC in MR (6)
- 6 SC (6)
- (1 SC, 1 INC) × 3 (9)
- Rounds 4-6: 9 SC (3 rounds)
- (2 SC, 1 INC) × 3 (12)
- Rounds 8-11: 12 SC (4 rounds)
- (3 SC, 1 INC) × 3 (15)
- Rounds 13-16: 15 SC (4 rounds)
- (4 SC, 1 INC) × 3 (18)
- Rounds 18-19: 18 SC (2 rounds)
- (2 SC, 1 INC) × 6 (24)
- Rounds 21-23: 24 SC (3 rounds)
- (5 SC, 1 INC) × 4 (28)
- Rounds 25-27: 28 SC (3 rounds)
- Round 28 (Shaping): 12 SC, 1 HDC, (1 DC, 1 TR, 1 DC) in one stitch, 1 HDC, 13 SC, SL ST
Fasten off, leaving a long tail for sewing. Ensure the tail is stuffed evenly for a good curve.


Full Otter Assembly Guide
Follow these steps carefully to assemble your crochet otter. Remember to stuff all parts *before* sewing them, and use the same brown yarn for all seams.
Assembly Order:
-
Head + Body
Sew the head to the body, carefully aligning Round 16 of the head with Round 35 of the body. Ensure it’s centered along the back and use pins for symmetry before sewing permanently.
-
Muzzle
Sew the muzzle along its contour to the head. Start by securing the center of the top part. After sewing, embroider the nose and whiskers with black thread as described in the muzzle instructions.
-
Paws
Front Paws:
Sew the front paws to Round 39 of the body. Position them slightly inwards, as if the otter is “holding” something. Maintain a distance of approximately 5 cm between the paws.
Back Paws:
First, attach the hip pieces to Rounds 24-28 of the body, ensuring they are symmetrical. Then, sew the back paws to the hips at a 45° angle. Double-check for symmetry!
-
Tail
Sew the tail between Rounds 13-17 of the body. Position it to the side, giving it a gentle arch. For added durability, make two circles of stitches when attaching.
-
Ears
Sew the ears between Rounds 15-19 of the head, with approximately 3 cm distance between them. Gently bend the tips of the ears forward for a cute expression.
Important Nuances for Assembly:
- All seams should be made with the same brown thread for a cohesive look.
- Always stuff parts firmly BEFORE sewing them to the main body.
- Use 8 mm safety eyes as specified.
- Embroider claws onto the paws after they have been sewn to the body for easier positioning.
Final Finishing Touches:
- Carefully check all seams for strength and security.
- Gently fluff the yarn fibers with your fingers to soften the toy’s texture.
- Adjust the muzzle embroidery slightly if needed to give your otter the desired expression.
- For an extra fluffy appearance, lightly brush the toy with a soft brush.
Your finished crochet otter should sit steadily on its own. If you find the toy tips over, consider adding more stuffing to the hip areas or adjusting the angle at which the back paws are attached.
Tips for Beginners
Crocheting amigurumi, like this adorable otter, involves several techniques that can be mastered with practice. Here are a few tips to help you:
- Read Through: Always read the entire pattern before you start. This helps you understand the flow and anticipate any complex steps.
- Tension is Key: Consistent tension keeps your stitches even and prevents gaps where stuffing might show. If your stuffing shows, try using a smaller hook size.
- Invisible Decrease: The invisible decrease (INV DEC) is crucial for amigurumi as it creates a neater seam, especially important on visible parts like the head.
- Stuffing Firmly: For amigurumi that holds its shape well, stuff firmly and evenly. Use small clumps of filler to avoid bumps.
- Pinning for Symmetry: Before sewing any parts, pin them in place and check from all angles to ensure they are symmetrical and positioned correctly.