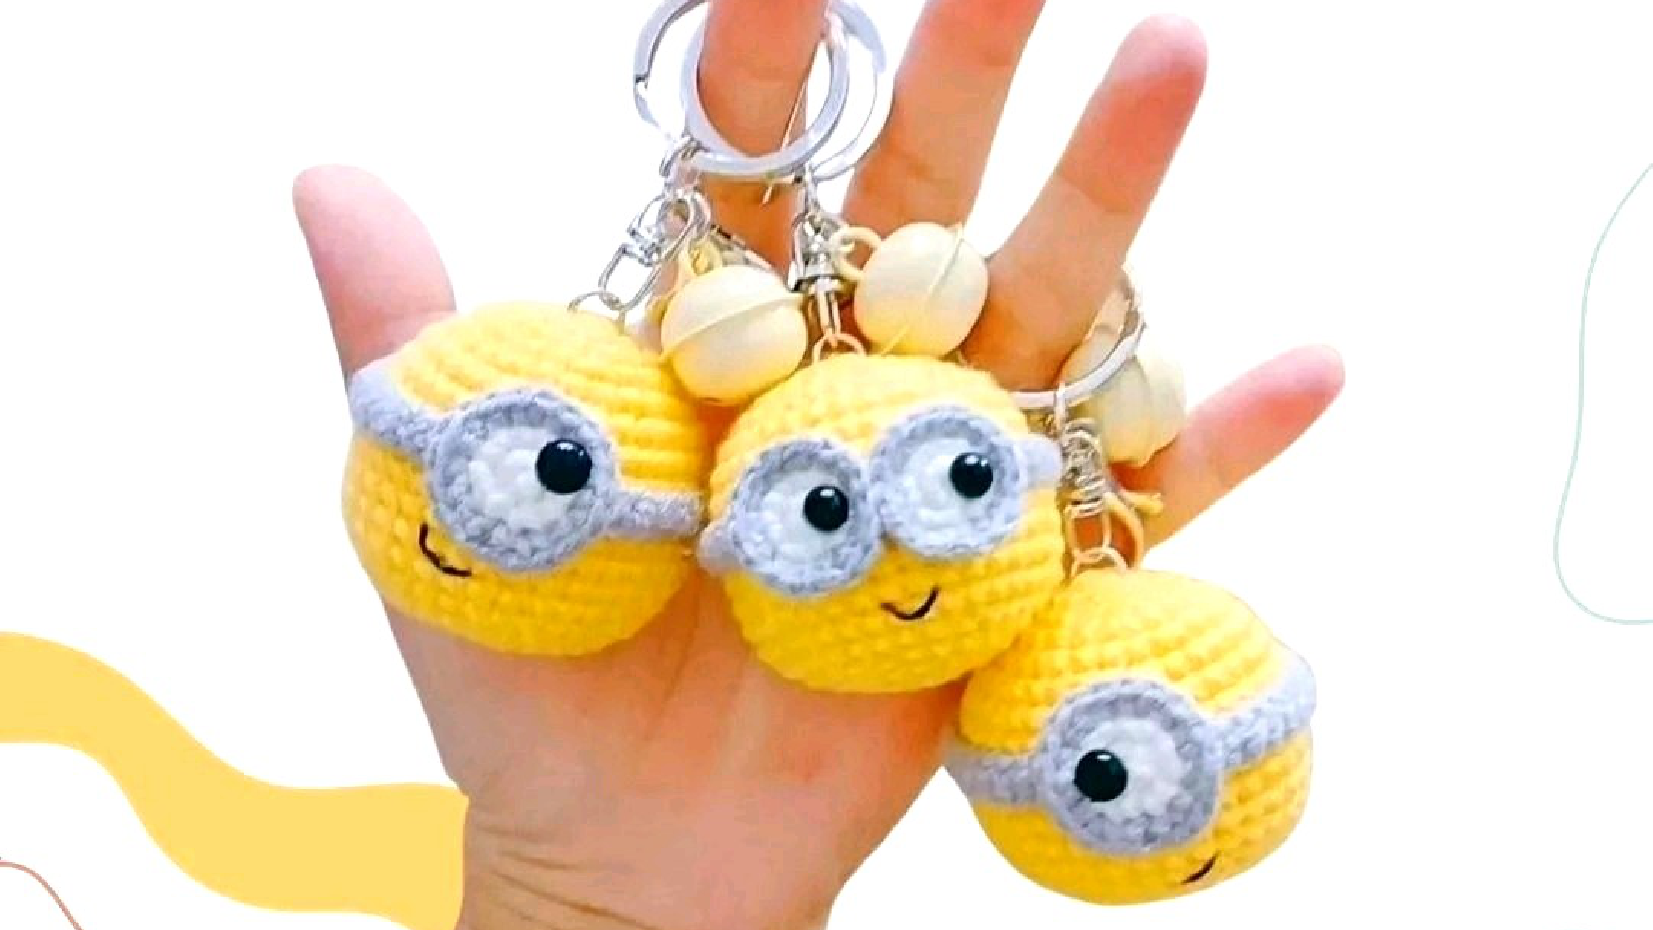
Crochet Minion Keychain Pattern
Materials
To crochet your adorable Minion keychains, gather the following:
- Yellow Yarn (8/6 weight)
- White Yarn (8/3 weight)
- Grey Yarn (8/3 weight)
- Black Yarn (for embroidery – 4 strands recommended)
- Black Beads (for eyes)
- Crochet Hook (size not specified, choose one appropriate for your yarn weight to achieve a tight amigurumi fabric)
- Stuffing (fiberfill)
- Tapestry Needle
- Scissors
- Fabric Glue or Hot Glue Gun
- Keychain Ring (optional, for assembly)
Abbreviations
This crochet pattern uses standard amigurumi abbreviations:
- Sc: Single Crochet
- Inc: Increase (2 single crochets in the same stitch)
- Dec: Decrease (single crochet 2 together)
- MR: Magic Ring
- Ch: Chain
- x6: Repeat the instruction in parentheses 6 times
Gauge
Gauge is not provided for this Minion keychain pattern. We recommend adjusting your hook size to ensure a tight fabric, preventing stuffing from showing through.
Finished Size
The finished size is suitable for a charming crochet Minion keychain, though exact dimensions are not specified. It will be compact and perfect for attaching to keys or bags.
Instructions
Follow these step-by-step instructions to create the individual parts of your Minion keychain.
Crocheting the Minion Body (Ball)
Using Yellow Yarn (8/6 weight), you will make three identical body pieces for your Minion keychains.
- Round 1: 6 Sc in a MR (6 stitches)
- Round 2: 6 Inc (12 stitches)
- Round 3: (1 Sc, Inc) x6 (18 stitches)
- Round 4: (2 Sc, Inc) x6 (24 stitches)
- Round 5: (3 Sc, Inc) x6 (30 stitches)
- Round 6: (4 Sc, Inc) x6 (36 stitches)
- Rounds 7-14: 36 Sc (8 rounds of single crochet)
- Round 15: (4 Sc, Dec) x6 (30 stitches)
- Round 16: (3 Sc, Dec) x6 (24 stitches)
- Round 17: (2 Sc, Dec) x6 (18 stitches)
- Round 18: (1 Sc, Dec) x6 (12 stitches)
- Round 19: 6 Dec (6 stitches)
Fasten off, leaving a long tail for closing. Stuff firmly with fiberfill as you crochet, especially before the opening gets too small. Close the remaining hole with your tapestry needle, weaving through the front loops of the last 6 stitches and pulling tight. Weave in the end.
Make 3 identical pieces in yellow yarn.
Crafting the Minion Eyes
You will create the white part of the eyes with white yarn and the goggle rim with grey yarn.
White Eye Base (Make 1 or 2, depending on your Minion design)
Using White Yarn (8/3 weight):
- Round 1: 6 Sc in a MR (6 stitches)
- Round 2: 6 Inc (12 stitches)
Fasten off, leaving a tail for weaving in or attaching. Repeat for a second eye if making a two-eyed Minion.
Grey Goggle Rim (Make 1 or 2, depending on your Minion design)
Using Grey Yarn (8/3 weight):
- Round 3: (1 Sc, Inc) x6 (18 stitches)
Fasten off, leaving a tail for attaching. This grey round will form the rim around the white eye base.
Once crocheted, carefully glue a small black bead in the center of each white eye piece to create the pupil. Arrange the beads to give your Minion the expression you desire, whether it’s happy, surprised, or mischievous!
Creating the Minion Band
The band serves as the goggle strap for your Minions.
Using Grey Yarn (8/3 weight):
- Chain 45 stitches.
- Starting in the second chain from the hook, Sc in each chain across (43 Sc total).
Fasten off and weave in the ends. This band is designed to fit around a single eye Minion. If you are making a two-eyed Minion, you may need to adjust the chain length to fit the width of the two eyes side-by-side.
Assembly and Finishing Steps
Now it’s time to bring your Minions to life by assembling all the crocheted pieces.
- Attach Eyes: Position the finished eyes (white base with black bead and grey rim) onto the yellow body. Use fabric glue to secure them firmly. For one-eyed Minions, place a single eye centrally. For two-eyed Minions, place two eyes close together.
- Add the Band: Wrap the crocheted grey band around the Minion’s head, positioning it over the eyes. Glue the ends of the band together at the back of the Minion’s head to secure it. Adjust the tightness of the band as needed.
- Embroider the Mouth: Using 4 strands of black yarn and a tapestry needle, embroider a mouth onto your Minion. A simple curved line often works best to capture their iconic expressions.
- Final Touches: Securely weave in any remaining loose yarn ends. If you’re making a keychain, attach a keychain ring to the top of the Minion’s head.
Tips for Beginners
Don’t be intimidated by these adorable Minion keychains! They are crafted from simple amigurumi pieces and are not difficult to make, even for those new to crochet. The key is to keep your stitches consistent and tight to create a neat, durable fabric for your amigurumi toys.
- Practice Basic Stitches: If you’re new to crochet, practice single crochet, increases, and decreases until you feel comfortable.
- Count Your Stitches: Always count your stitches at the end of each round to ensure your piece is growing correctly.
- Use a Stitch Marker: A stitch marker is invaluable for keeping track of the start of your rounds when working in continuous spirals.
- Stuff Firmly: For amigurumi, stuffing firmly and evenly helps your finished piece hold its shape.
- Don’t Rush the Assembly: Take your time with gluing and embroidering. These details make a big difference in the final look of your crochet Minion.
Enjoy creating these fun Minion keychains! They make fantastic gifts or charming additions to your own accessories.