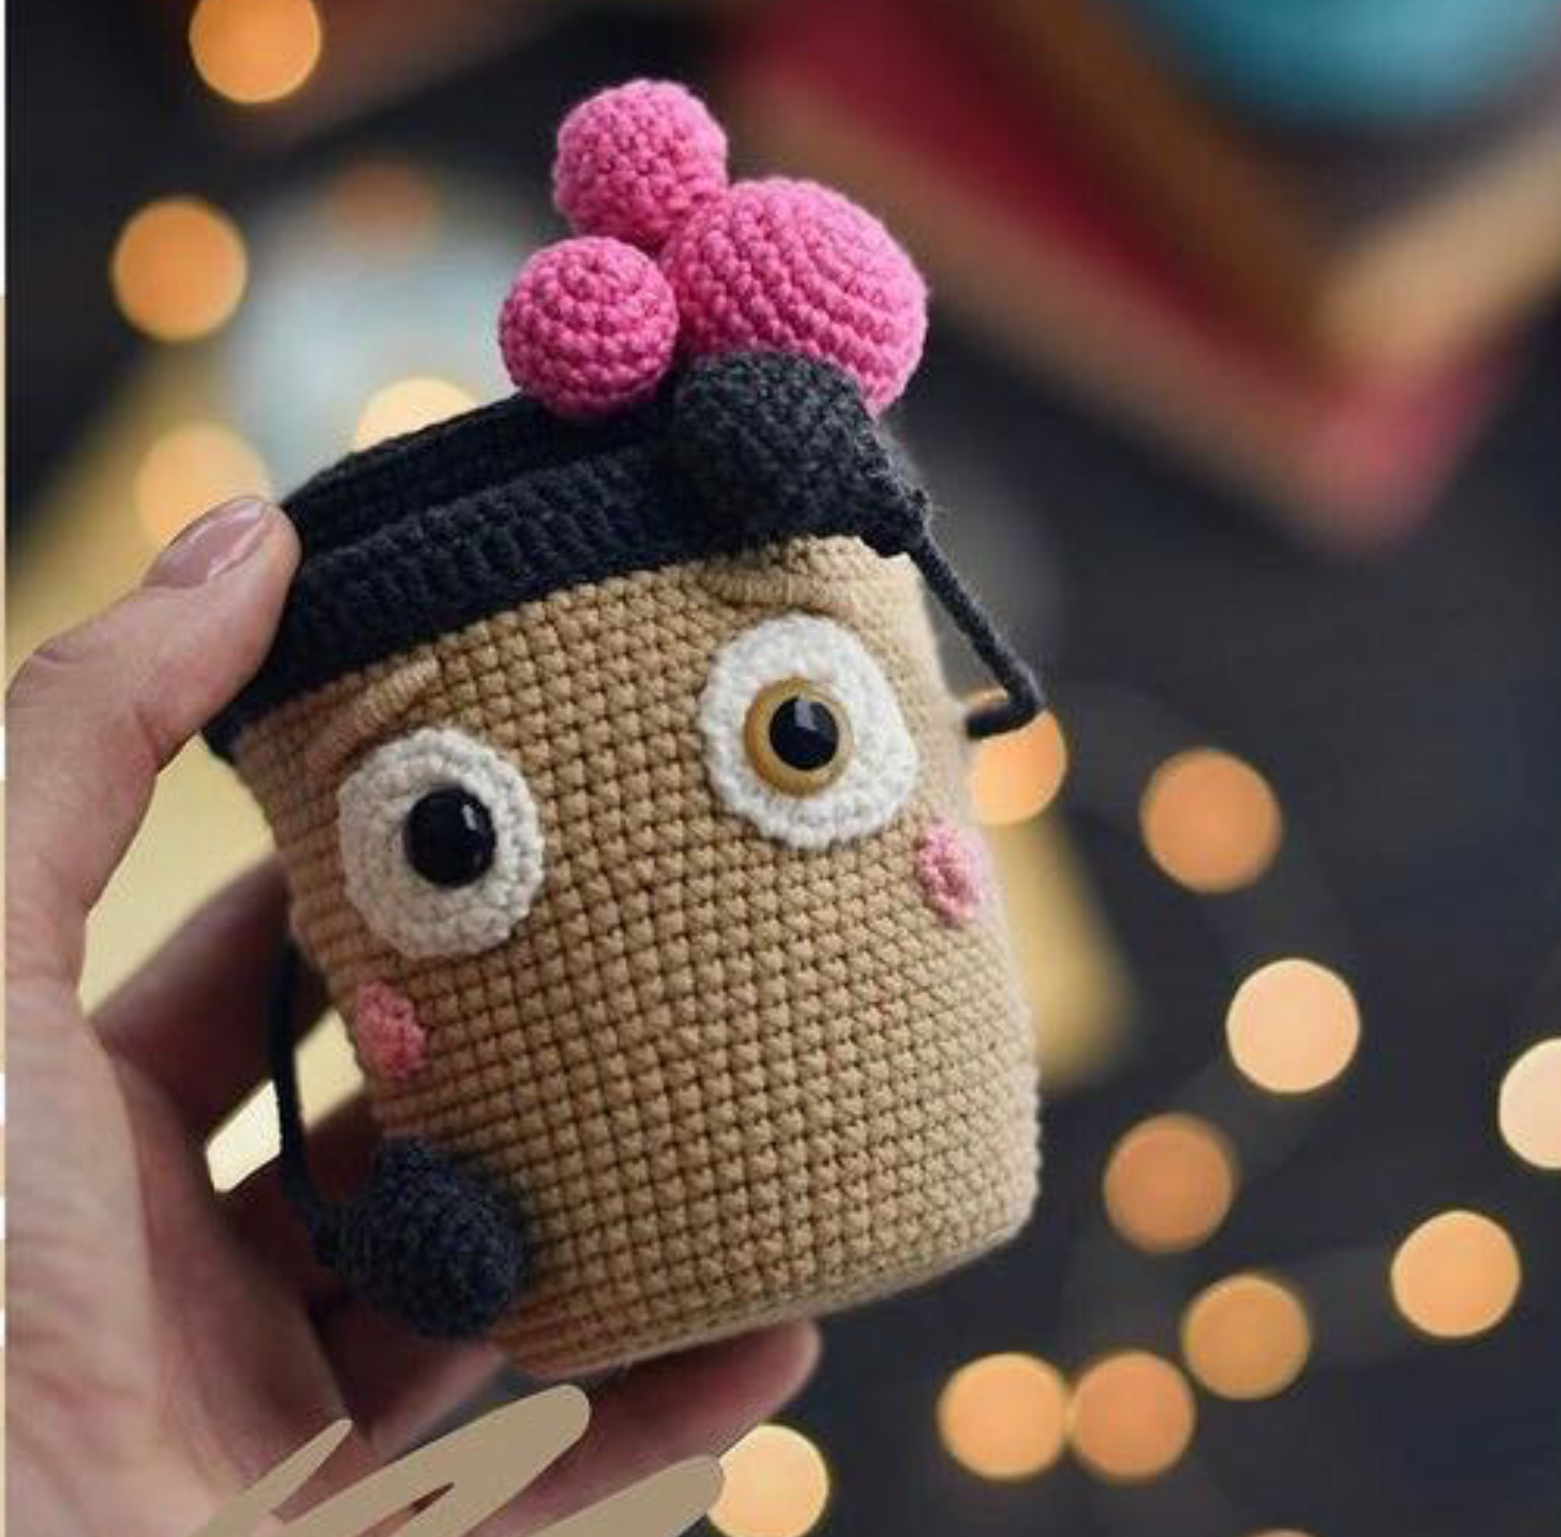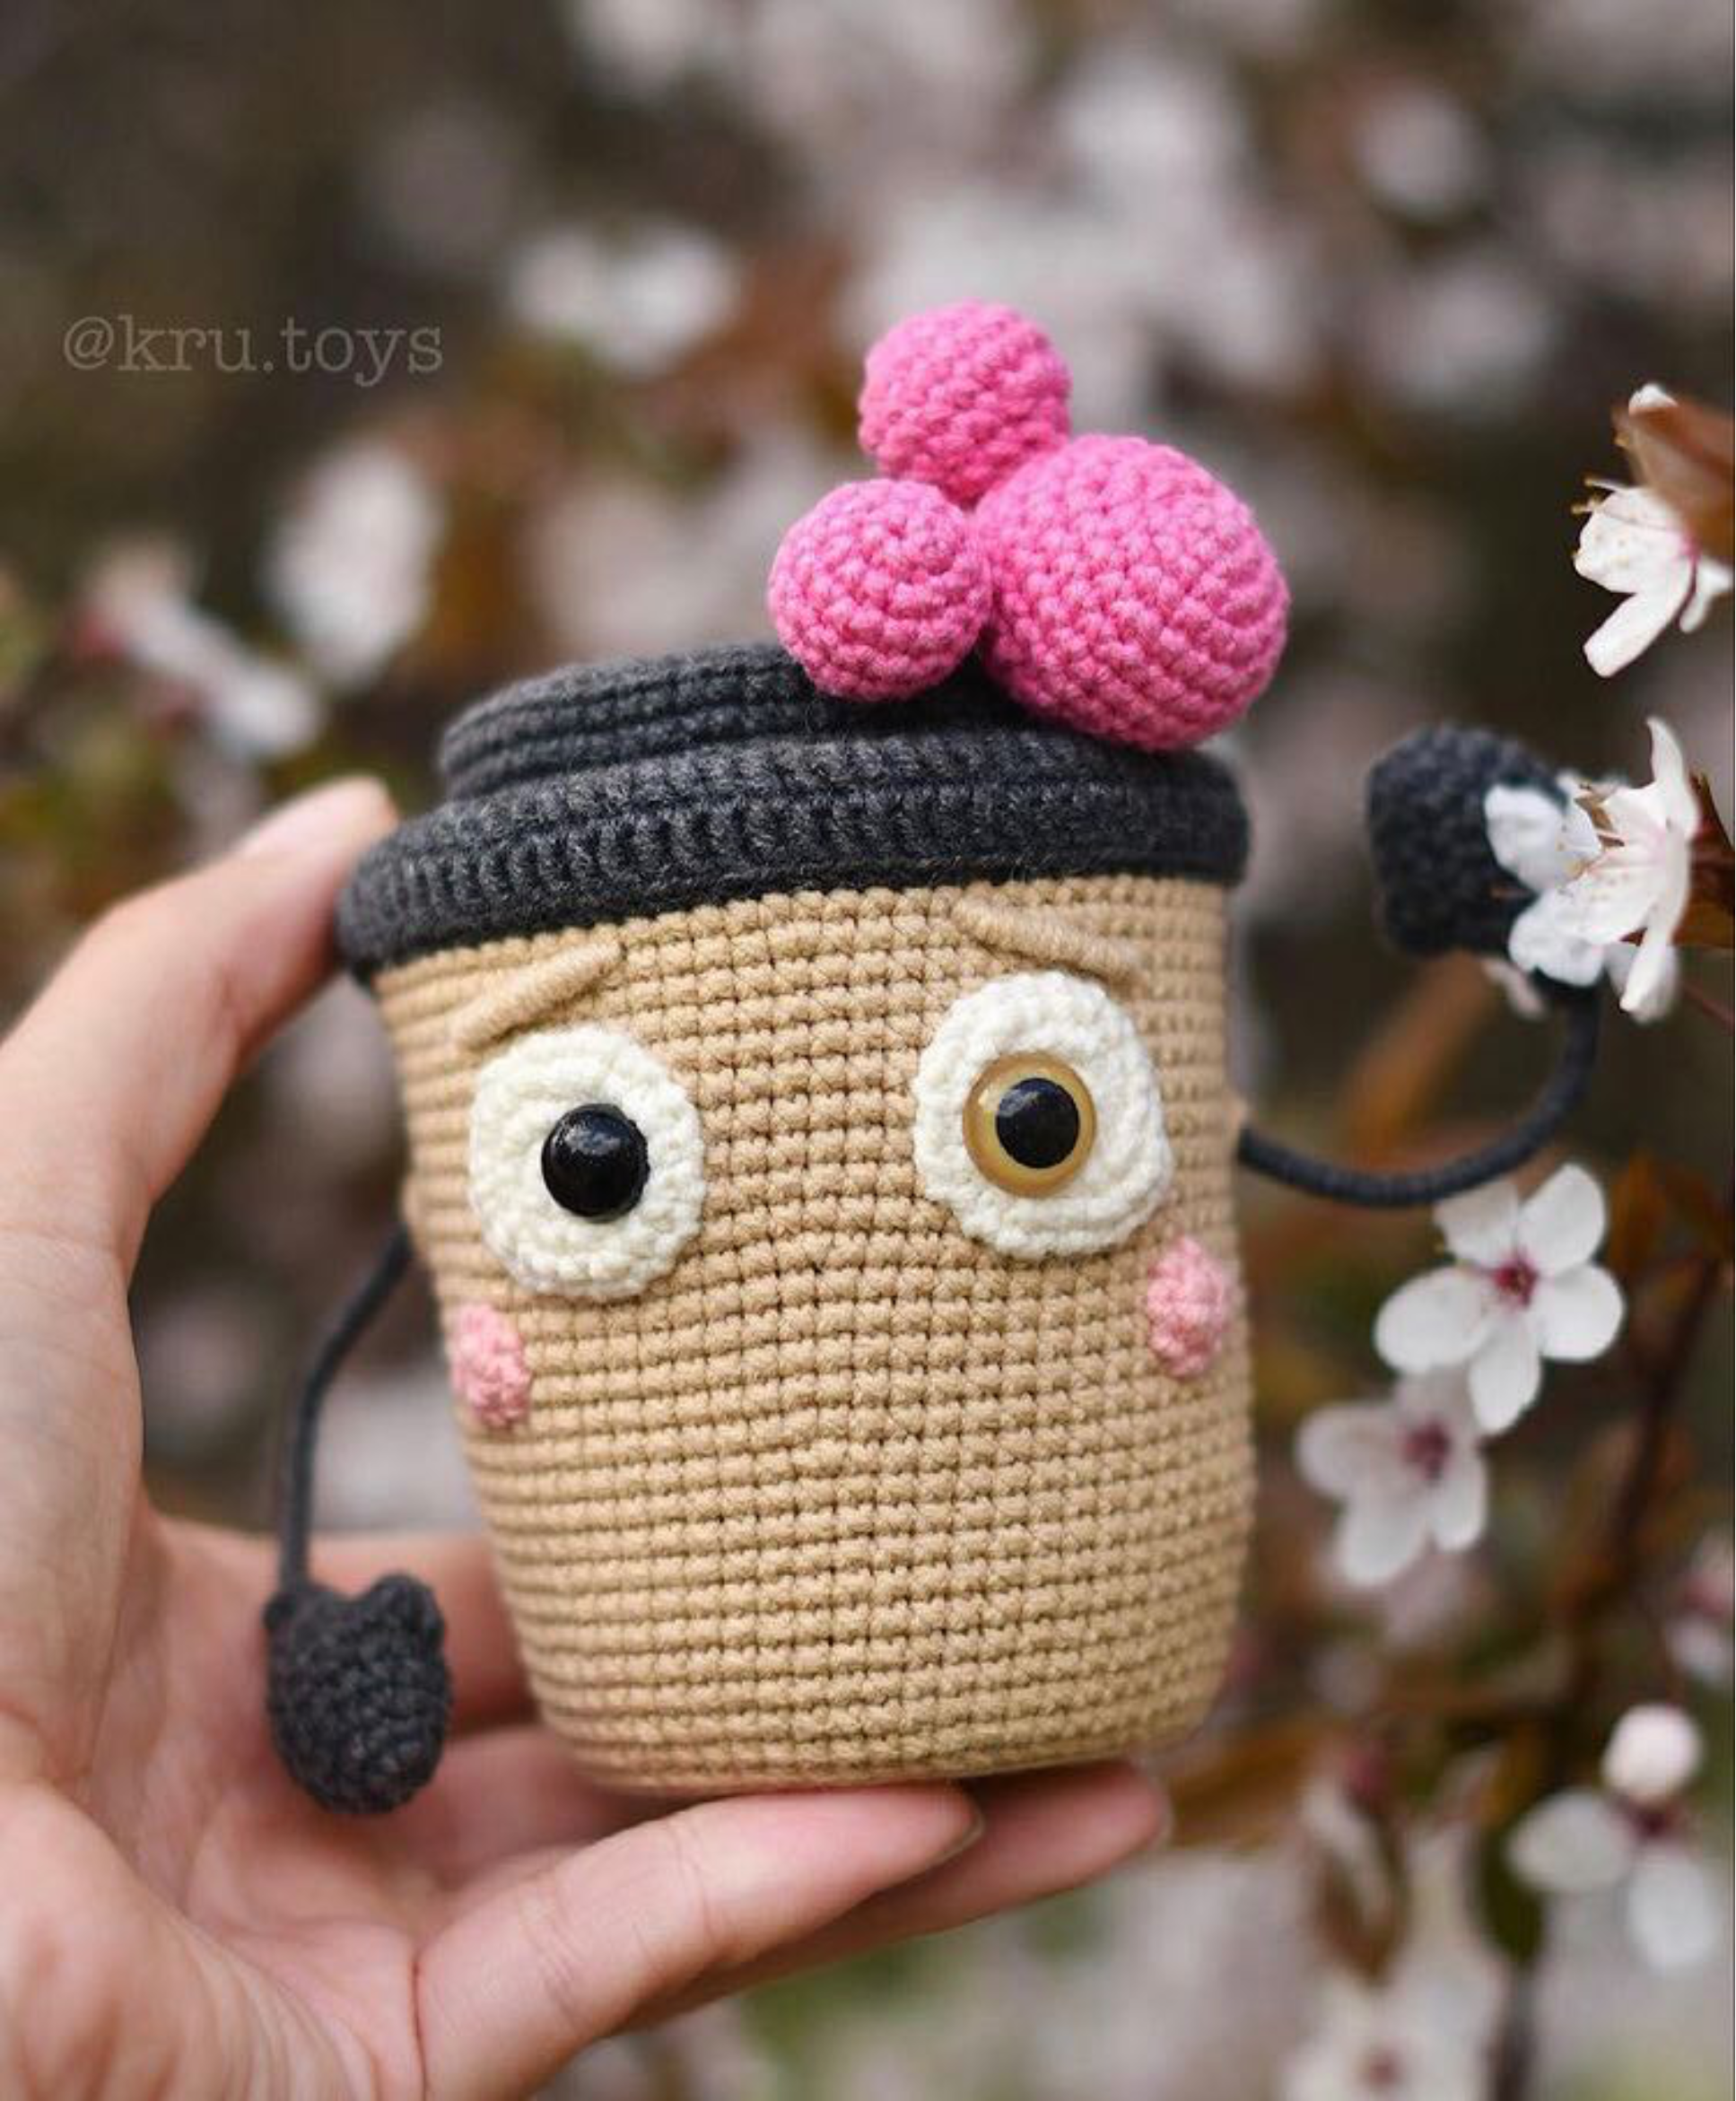
Crochet Bubble Raff Amigurumi Pattern
Materials
To crochet your adorable Bubble Raff coffee cup toy, you’ll need the following materials:
- **Yarn for the Body:** Beige yarn (e.g., Gazzal Jeans 1106 or YarnArt Jeans 07)
- **Yarn for the Lid and Handles:** Black yarn (e.g., YarnArt Jeans 28 or 53)
- **Yarn for the Eyes:** White yarn (e.g., YarnArt Jeans 01 or 62)
- **Yarn for the Bubbles:** Pink yarn (e.g., YarnArt Jeans 42)
- **Yarn for the Cheeks:** Light pink yarn (e.g., YarnArt Jeans 78)
- **Crochet Hook:** Clover 2 mm or 1.75 mm, or a hook suitable for your chosen yarn to achieve a tight fabric.
- **Wire for Handles:** Diameter of 0.45 mm.
- **Safety Eyes:** 10 mm (2 pieces).
- **Tapestry Needle:** With a blunt end for sewing.
- **Stitch Markers:** To keep track of your rounds.
- **Pins:** For securing pieces during assembly.
- **Cardboard or Polymer Material:** For the bottom and lid inserts.
- **Clear Super Glue:** For securing wire and inserts.
- **Plaster Tape:** For wrapping wire.
- **Filler:** Polyester fiberfill or similar stuffing material.
Please note: The listed materials are recommendations from the original designer. You can substitute materials, but be aware that changes may alter the final look and size of your finished crochet toy.
Abbreviations
This crochet pattern uses US terminology. Familiarize yourself with these common abbreviations:
- **sc:** single crochet
- **dec:** decrease (single crochet 2 stitches together)
- **inc:** increase (2 single crochet in one stitch)
- **sl st:** slip stitch
- **tch:** turning chain
- **ch:** chain
- **BLO:** crochet into back loops only
- **FLO:** crochet into front loops only
- **st, sts:** stitch, stitches
- **hdc:** half double crochet
- **dc:** double crochet
- **MR:** magic ring (also known as magic circle or adjustable ring)
- **B:** bobble (4 hdc with a common top)
Crochet Pattern Instructions
Let’s begin crafting your adorable coffee cup! This pattern involves several distinct parts, starting with the main body.
Body
Using beige yarn, create the main cup shape.
- Start with 8 sc in MR (8 stitches)
- 8 inc (16)
- (sc, inc)*8 (24)
- (2 sc, inc)*8 (32)
- (3 sc, inc)*8 (40)
- (4 sc, inc)*8 (48)
- (7 sc, inc)*6 (54)
- (8 sc, inc)*6 (60)
- BLO: 60 sc (60)
- Rows 10-12: 60 sc (60) – 3 rows
- (inc, 29 sc)*2 (62)
- 62 sc (62)
- (inc, 30 sc)*2 (64)
- Rows 16-18: 64 sc (64) – 3 rows
- (15 sc, inc)*4 (68)
- Rows 20-24: 68 sc (68) – 5 rows
- (16 sc, inc)*4 (72)
- Rows 26-33: 72 sc (72) – 8 rows
- (17 sc, inc)*4 (76)
- Rows 35-38: 76 sc (76) – 4 rows. At the end of row 38, change yarn to black.
- (37 sc, inc)*2 (78)
- BLO: (11 sc, dec)*6 (72)
- (7 sc, dec)*8 (64)
- BLO: 64 sc (64)
Eyes (Make 2)
Using white yarn, craft the base for the safety eyes.
- 8 sc in MR (8) – If you plan to insert safety eyes through the center of this white part, do not tighten the magic ring too much.
- 8 inc (16)
- (sc, inc)*8, sl st (24)
Cut the yarn, leaving a long tail for sewing.
Handles (Make 2)
These sturdy handles incorporate wire for structure.
Wire Preparation:
Cut 2 pieces of wire, each 15 cm long. Bend one end of each piece into a small loop. Wrap the entire length of each wire piece (especially the joint where it bends) with plaster tape. Try to wrap the wire as thinly as possible to ensure it fits easily into the crocheted hands.
Crochet the Handle Covers:
Using black yarn, crochet around the prepared wire.
- 6 sc in MR (6)
- 6 inc (12)
- (3 sc, inc)*3 (15)
- Rows 4-5: 15 sc (15) – 2 rows
- B (bobble stitch), 14 sc (15)
- (3 sc, dec)*3 (12)
- (sc, dec)*4 (8) – At this point, insert the prepared wire piece into the crocheted handle and lightly stuff the hand part.
- BLO: (2 sc, dec)*2 (6)
Leave a long tail (approximately 30 cm) and cut the yarn.
After completing row 9, apply a small amount of clear super glue to the exposed wire, then tightly wrap it with the remaining long yarn tail. This secures the wire and provides a finished look. Wrap about 5-6 cm of the wire. Repeat this process for the second handle.
Next, rejoin the black yarn to the front loop of the 8th row of the handle and crochet 8 sc. Cut and hide the yarn end. This creates a neat cuff at the base of the handle.
Bottom Insert
Trace the outline of the bottom of your crocheted cup onto cardboard or polymer material. Cut out this circle. If you intend to wash the toy, use polymer material, as cardboard will be damaged by water. Place this firm insert inside the cup before you begin stuffing the body. You can add a small amount of glue to the piece to prevent it from shifting.
Eye and Arm Attachment
Now is the time to secure the safety eyes and position the arms before stuffing the cup completely.
Insert the safety eyes between rows 28 and 29 of the body, through both the white eye part and the main body fabric. Position them approximately 12 stitches apart. For added security, after snapping the fasteners on the safety eyes, you can carefully melt the plastic posts with a household lighter and press them flat. Be extremely cautious not to burn yourself or the yarn.