Crochet a Blooming Summer Top: Free Hepatica Granny Top Pattern
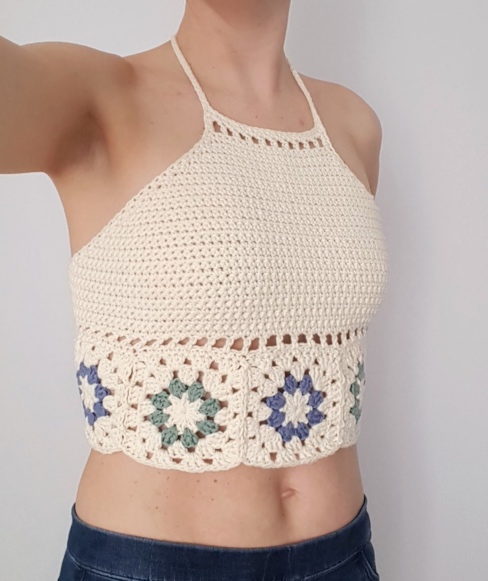
Hello, beautiful maker! Is there anything more joyful than combining the timeless charm of granny squares with a fresh, modern garment? If you’re dreaming of a summer top that’s equal parts nostalgic and stylish, you’ve found your next perfect project: the Hepatica Granny Top.
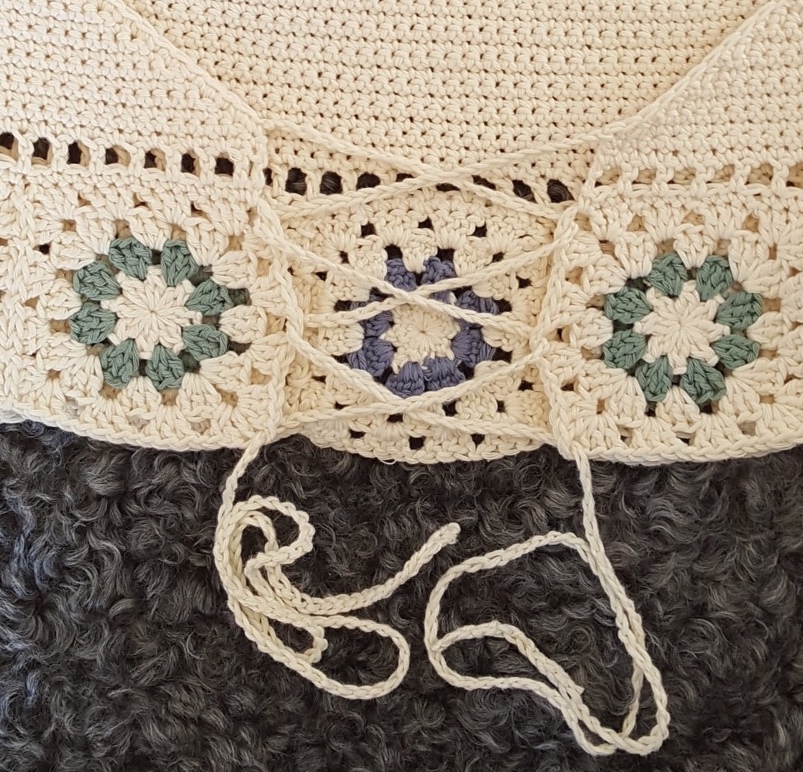
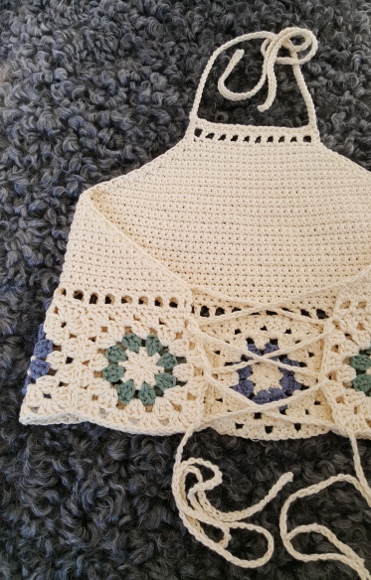
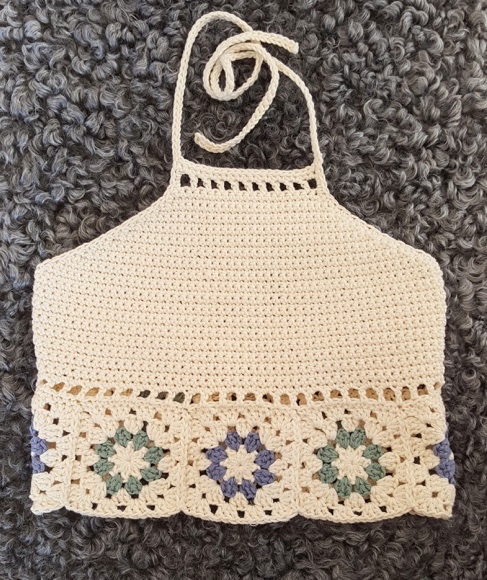
This delightful halterneck top is as fun to make as it is to wear. It begins with a simple row of gorgeous, floral-inspired granny squares—the designer was reminded of the delicate Anemone hepatica, a spring flower, hence the lovely name. These squares form the lower, flowy part of the top. From there, you’ll build up a fitted bodice in solid single crochet, creating a flattering silhouette that ties at the back for a customizable fit.
The magic of this pattern is in its simplicity and flexibility. You decide the size by the number of squares you start with (7 for S/M, 8 for M/L), and the back ties ensure it can accommodate many shapes comfortably. It’s a fantastic project for crocheters who have mastered granny squares and are ready to take the exciting leap into garment-making. The construction is straightforward, and the result is a unique, handmade piece that whispers of sunny meadows and leisurely days.
Designed by Anna Erlandsson and offered as a free pattern, it’s a generous gift to the crafting community. All she asks in return is that if you share your beautiful creation on social media, you tag her @hooked_by_anna so she can admire your work!
So, gather your soft cotton yarn in creamy white and pretty accent colors, pick up your 4.5 mm hook, and let’s crochet a top that’s sure to become a warm-weather favorite.
Materials & Tools
- Yarn: Approximately 300 meters of Worsted/Aran weight cotton yarn.
- Sample Yarn: Julie by Falkgarn.
- Colors Needed: Main Color (MC) – Ecru/Cream (approx. 3 skeins). Contrast Colors (CC) – Blue and Green (approx. 1 skein each).
- Crochet Hook: 4.5 mm (US Size 7).
- Notions: Darning needle for weaving ends, scissors.
- Optional: Blocking mats to shape your squares and finished top.
Sizes & Gauge
- Sizes: The top is very adjustable! The pattern provides guidance for:
- S/M: Fits chest measurement up to 90 cm / 35 inches. Uses 7 granny squares.
- M/L: Fits chest measurement ~95-105 cm / 37-41 inches. Uses 8 granny squares.
- Finished Fit: The top is elastic and ties at the back. The solid bodice height is about 20 cm (8″) for the 7-square version and 25 cm (10″) for the 8-square version.
- Gauge (Very Important!):
- One Granny Square = 10 x 10 cm / 4 x 4 inches.
- Solid Sc Fabric: 14 sc x 18 rows = 10 x 10 cm / 4 x 4 inches.
Crochet Abbreviations (US Terms)
- st: Stitch
- sl st: Slip Stitch
- sc: Single Crochet
- ch: Chain
- ch-sp: Chain Space
- dc: Double Crochet
- sk: Skip
- n: Next
- 2sc tog / 2dc tog: Single or Double Crochet Decrease (work two stitches together)
Step-by-Step Instructions
Part 1: Making the Granny Squares
Make 7 squares for S/M or 8 squares for M/L.
Round 1 (MC – Cream): Start with a Magic Ring. Ch 2, dc into ring (counts as first 2dc tog). Ch 1. [Work (2dc tog, ch1) into the ring] 7 more times. Sl st to first st to join. (You should have 8 “petals” of 2dc tog, separated by 1 ch). Fasten off.
Round 2 (CC – Blue or Green): Join CC in any ch-1 space. Ch 3 (counts as first dc), 2 dc in same space. Ch 1. [3 dc in next ch-1 space, ch 1] around. Sl st to top of starting ch-3 to join. (8 groups of 3 dc). Fasten off.
Round 3 (MC – Cream): Join MC in any ch-1 space between dc groups. Ch 5 (counts as dc + ch 2), 3 dc in same space. Ch 1. *3 dc in next ch-1 space, ch 1. In the next ch-1 space (this is your first corner), work (3 dc, ch 2, 3 dc, ch 1).* Repeat from * two more times. 3 dc in next ch-1 space, ch 1. 2 dc in the starting ch-1 space. Sl st to 3rd ch of starting ch-5 to join. Your circle is now a square with corner shells.
Round 4 (MC – Cream): Sl st into the next corner ch-2 space. Ch 3 (counts as first dc), (dc, ch 2, 3 dc, ch 1) in the same corner space. *3 dc in next ch-1 space, ch 1. 3 dc in next ch-1 space, ch 1. In next corner ch-2 space, work (3 dc, ch 2, 3 dc, ch 1).* Repeat from * two more times. 3 dc in next ch-1 space, ch 1. 3 dc in next ch-1 space, ch 1. Dc in the starting corner space. Sl st to top of starting ch-3 to join. Fasten off.
Joining: Sew or crochet your squares together along their edges to form one long horizontal strip. Place them right side up. You can join them as you go in the final round or seam them afterward.