Amigurumi Raindrop Rainy Pattern
Materials
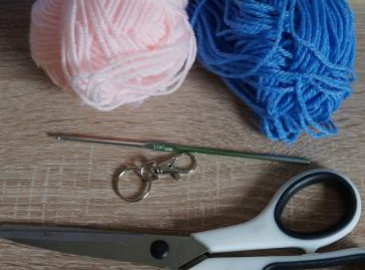
To craft your very own charming Raindrop Rainy keychain, gather these essential supplies:
- Yarn: Fine (US) / Sport (UK) / 200m~50g (EU) weight yarn, similar to Zeeman Supersoft. You will need one skein each of blue and pink, plus a small amount of black yarn for facial details.
- Crochet Hook: Size C (US) / 11 (UK) / 3.0mm (EU).
- Scissors: Essential for cutting yarn.
- Sewing Needle: A yarn needle for weaving in ends and assembling your amigurumi pieces.
- Filler Cotton: Polyester fiberfill to give your raindrop its soft, plush shape.
- Stitch Marker: To help you keep track of your rounds, especially when working in continuous spirals.
- Key Ring with Chain: To transform your finished raindrop into a functional and adorable keychain.
- Optional: Safety Eyes: If you prefer to use plastic safety eyes instead of embroidering the eyes with black yarn.
Abbreviations (US Terminology)
This crochet pattern utilizes standard US crochet terminology. Here is a handy list of abbreviations used:
- sc: Single Crochet
- inc: Increase (crochet 2 single crochets in the same stitch)
- dec: Decrease (single crochet 2 stitches together)
- rd: Round
- st(s): Stitch(es)
- magic ring: Adjustable ring, also known as a magic circle
Finished Size
Upon completion, your delightful Raindrop Rainy keychain will measure approximately 4 inches tall. This makes it an ideal size for a bag charm, a cute addition to your keys, or a heartwarming handmade gift.
Crochet Instructions: Raindrop Rainy Keychain
Let’s dive into creating your cute raindrop! This amigurumi pattern is worked in continuous rounds unless otherwise specified, ensuring a seamless finish.
Cheeks (Make 2)
Using your pink yarn, you will crochet two small, round cheeks. Remember to leave a long tail on each for easy attachment later.
- Starting Round: Create a magic ring and work 6 single crochets into it. (6 sc)
- Round 1: Work an increase in every stitch around. You should now have 12 single crochets. (12 sc)
Once Round 1 is complete, cut your yarn, leaving a generous long tail for sewing the cheek onto the raindrop body. Fasten off.
Raindrop Body
Now, using your blue yarn, you will crochet the main body of the raindrop. Continue to work in continuous rounds, using a stitch marker to keep your place.
-
- Starting Round: Begin with a magic ring and work 6 single crochets into it. (6 sc)
-
- Round 1: Increase in every stitch around. (12 sc)
- Round 2: Work 1 sc, then increase in the next stitch. Repeat this sequence 6 times. (18 sc)
- Round 3: Work 2 sc, then increase in the next stitch. Repeat this sequence 6 times. (24 sc)
- Round 4: Work 3 sc, then increase in the next stitch. Repeat this sequence 6 times. (30 sc)
- Round 5: Work 4 sc, then increase in the next stitch. Repeat this sequence 6 times. (36 sc)
- Round 6: Work 5 sc, then increase in the next stitch. Repeat this sequence 6 times. (42 sc)
- Rounds 7-11: Crochet 1 single crochet in every stitch around for 5 rounds. (42 sc per round)
- Round 12: Work 5 sc, then decrease the next two stitches together (dec). Repeat this sequence 6 times. (36 sc)
- Rounds 13-14: Crochet 1 single crochet in every stitch around for 2 rounds. (36 sc per round)
- Round 15: Work 4 sc, then decrease the next two stitches together (dec). Repeat this sequence 6 times. (30 sc)
- Rounds 16-17: Crochet 1 single crochet in every stitch around for 2 rounds. (30 sc per round)
- Round 18: Work 3 sc, then decrease the next two stitches together (dec). Repeat this sequence 6 times. (24 sc)
- Rounds 19-20: Crochet 1 single crochet in every stitch around for 2 rounds. (24 sc per round)
- Round 21: Work 2 sc, then decrease the next two stitches together (dec). Repeat this sequence 6 times. (18 sc)
- Rounds 22-23: Crochet 1 single crochet in every stitch around for 2 rounds. (18 sc per round)
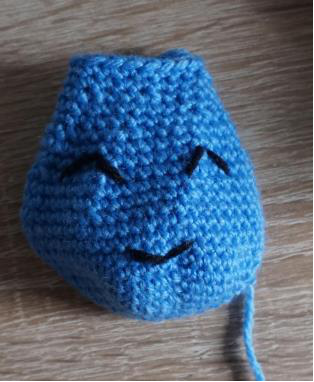
Assembly and Finishing
Now comes the exciting part – bringing your Raindrop Rainy to life with its sweet face and proper stuffing!
-
- Embroider Face: At this stage, before closing the raindrop further, embroider the eyes and mouth using your black yarn. If you opted for safety eyes, insert them now according to their instructions.
-
- Attach Cheeks: Using the long tails left on the pink cheeks, carefully sew them onto the raindrop body, positioning them symmetrically below the eyes.
-
- Stuff the Raindrop: Begin firmly stuffing the raindrop with your filler cotton. Ensure it’s evenly distributed to create a smooth, appealing shape. Don’t overstuff, but make sure it’s plump.
-
- Continue Raindrop Body (Closing):
- Round 24: Work 1 sc, then decrease the next two stitches together (dec). Repeat this sequence 6 times. (12 sc)
- Rounds 25-26: Crochet 1 single crochet in every stitch around for 2 rounds. (12 sc per round)
At this point, add a little more stuffing to ensure the figure is nicely plump and holds its shape well.
- Round 27: Decrease each two stitches together (dec). Repeat this sequence 6 times. (6 sc)
- Round 28: Work 1 sc, then decrease the next two stitches together. Then work 1 sc, and decrease the next two stitches together. (4 sc)

Fasten off and weave in any remaining yarn tails, carefully closing the small opening at the top.
- Attach Key Ring: Using a sewing needle and a piece of blue yarn (or one of the remaining tails), securely sew the key ring with its chain to the very top of the raindrop. Ensure it’s firmly attached for durability.
- Continue Raindrop Body (Closing):
Your Raindrop Keychain is Finished
Congratulations! You have successfully crocheted your adorable Raindrop Rainy keychain. This handmade amigurumi project is perfect for personalizing your belongings or gifting to friends and family. Enjoy your delightful new creation!