How to Crochet a Cute Amigurumi Bunny: A Complete Step-by-Step Guide
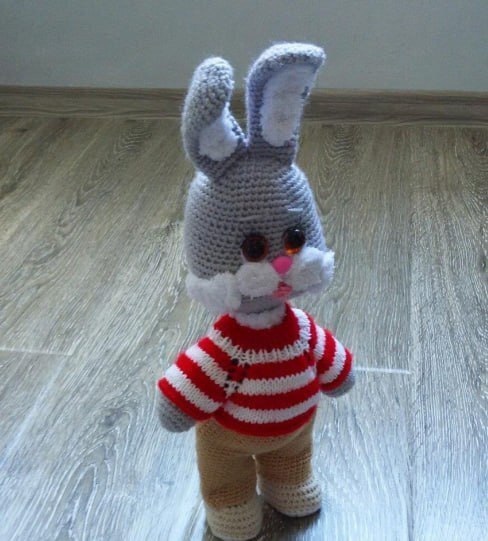
There is nothing quite as heartwarming as a handmade stuffed animal. Whether you are looking to create a unique gift for a baby shower, a charming nursery decoration, or a new companion for a child, this adorable bunny pattern is the perfect project. This bunny, standing approximately 14 inches tall, features a soft grey body, expressive eyes, and a tiny, adorable outfit consisting of striped sweater and little trousers.
This tutorial is designed to be beginner-friendly, guiding you through the process of creating a high-quality amigurumi character. While the main body and clothing are crocheted, we have also included instructions for a tiny hand-knit sweater to give your bunny that extra touch of homemade charm!
Materials & Abbreviations
Materials Needed
- Yarn (Medium weight/Worsted):
- Grey yarn (for the main body, ears, arms, and legs)
- White yarn (for the face details, ear trim, tail, sweater accents, and collar)
- Beige or Light Beige yarn (for the pants and shoe accents)
- Red and White yarn (for the striped sweater)
- Pink yarn (for the tiny mouth)
- Hooks: 1.7mm (for the main body) and 3.0mm (for smaller details).
- Knitting Needles: 2.5mm (for the tiny sweater).
- Stuffing: Poly-fill or synthetic batting.
- Safety Eyes: Brown, approximately 8-10mm.
- Face Details: Pink yarn for the nose, eyelashes, and glue gel for assembly.
- Stability Hack: A wooden skewer and a cocktail straw (to help the head stand upright).
- Extras: A large-eye sewing needle and a piece of cardboard (for the shoe soles).
Abbreviations (US Crochet Terms)
- ch: chain
- sc: single crochet
- inc: increase (2 sc in one stitch)
- dec: decrease (sc 2 together)
- hdc: half double crochet
- dc: double crochet
- MR: magic ring
- st(s): stitch(es)
Step-by-Step Instructions
The Ears (Make 2)
We will start with the grey yarn to create the main shape of the ears.
- Round 1: 6 sc in a MR (6)
- Round 2: 6 inc (12)
- Round 3: (1 sc, inc) x 6 (18)
- Round 4: (2 sc, inc) x 6 (24)
- Rounds 5-7: 24 sc (3 rounds)
- Round 8: (6 sc, dec) x 3 (21)
- Rounds 9-11: 21 sc (3 rounds)
- Round 12: (5 sc, dec) x 3 (18)
- Rounds 13-22: 18 sc (10 rounds)
Fasten off, leaving a long tail for sewing. Next, we create the white trim.
White Ear Trim (Make 2)
Using white yarn, chain 8. Starting from the 2nd ch from the hook: 2 inc, 4 sc, 4 sc in the last ch, 4 sc, 2 inc. Fasten off, leaving a tail.
The Face Details
The face is what brings your bunny to life! Assemble these parts carefully.
The Mouth
Using pink yarn, work 6 sc in a MR. In the next round, work in the opposite direction, increasing evenly to reach 10 sc. Fasten off, fold in half, and sew onto the face between rows 23-24, just below the cheeks.
The Cheeks (Make 2)
Using white yarn, work 6 sc in a MR. Fasten off, leaving a tail for sewing.
Cheek Trim (Make 2)
Using white yarn, chain 8. Starting from the 2nd ch from the hook: 2 inc, 4 sc, 4 sc in the last ch, 4 sc, 2 inc. Fasten off, leaving a tail.
Neck Collar
Using white yarn, chain 13. Starting from the 2nd ch from the hook, work 12 dc. Fasten off.
The Head and Body
The head and body are worked as one continuous piece using grey yarn. This creates a seamless, sturdy look.
- Round 1: 6 sc in a MR (6)
- Round 2: 6 inc (12)
- Round 3: (1 sc, inc) x 6 (18)
- Round 4: (2 sc, inc) x 6 (24)
- Round 5: (3 sc, inc) x 6 (30)
- Round 6: (4 sc, inc) x 6 (36)
- Round 7: (5 sc, inc) x 6 (42)
- Round 8: (6 sc, inc) x 6 (48)
- Round 9: (7 sc, inc) x 6 (54)
- Rounds 10-19: 54 sc (10 rounds)
- Round 20: 18 sc, 6 inc, 6 sc, 6 inc, 18 sc (66)
- Rounds 21-24: 66 sc (4 rounds)
- Round 25: (9 sc, dec) x 6 (60)
- Round 26: (8 sc, dec) x 6 (54)
- Round 27: (7 sc, dec) x 6 (48)
- Round 28: (6 sc, dec) x 6 (42)
- Round 29: (5 sc, dec) x 6 (36)
- Round 30: (4 sc, dec) x 6 (30)
- Round 31: (3 sc, dec) x 6 (24)
Note: At this point, start stuffing the head with poly-fill. You may also want to attach the safety eyes (around row 16) and add your facial details/ears now.
- Round 32: (2 sc, dec) x 6 (18)
- Round 33: (1 sc, inc) x 6 (12)
- Rounds 33-35: 12 sc (3 rounds). Insert your wooden skewer/straw here for stability.
Continue to the neck and body by attaching the collar and then continuing with the following:
- Round 36: (2 sc, inc) x 6 (18)
- Round 37: (3 sc, inc) x 6 (24)
- Round 38: (4 sc, inc) x 6 (30)
- Round 39: (5 sc, inc) x 6 (36)
- Round 40: (6 sc, dec) x 6 (42)
- Rounds 41-49: 42 sc (9 rounds)
- Round 50: (2 sc, dec) x 6, then 24 sc (48)
- Rounds 51-52: 48 sc (2 rounds)
- Round 53: (6 sc, dec) x 6 (42)
- Round 54: (5 sc, dec) x 6 (36)
- Round 55: (4 sc, dec) x 6 (30)
- Round 56: (3 sc, dec) x 6 (24)
- Round 57: (2 sc, dec) x 6 (18)
Stuff the body firmly. Continue decreasing to close the bottom.
- Round 58: (1 sc, dec) x 6 (12)
- Round 59: 6 dec (6)
Arms (Make 2)
Using grey yarn:
- Round 1: 6 sc in a MR (6)
- Round 2: 6 inc (12)
- Round 3: (1 sc, inc) x 6 (18)
- Round 4: (5 sc, inc) x 3 (21)
- Rounds 5-10: 21 sc (6 rounds)
- Round 11: (5 sc, dec) x 3 (18)
- Rounds 12-13: 18 sc (2 rounds)
- Round 14: (4 sc, dec) x 3 (15)
- Rounds 15-16: 15 sc (2 rounds)
- Round 17: (3 sc, dec) x 3 (12)
- Rounds 18-19: 12 sc (2 rounds)
- Round 20: 6 dec (6)
Legs & Shoes (Make 2)
Start with white yarn to make the “shoes.”
- Round 1: Chain 8. Starting from 2nd ch: inc, 5 sc, 5 sc in the last ch, 5 sc, inc (38)
- Round 2: 2 inc, 4 sc, hdc, 5 inc, hdc, hdc, 4 sc, 2 inc (38)
- Round 3: (1 sc, inc) x 2, 4 sc, hdc, (hdc, inc, hdc) x 5, hdc, 4 sc, (1 sc, inc) x 2 (38)
Cut the yarn and switch to beige.
- Round 4: 38 sc through the back loops only.
- Rounds 5-7: 38 sc.
Insert a small cardboard circle into the bottom of the shoe to create a sole.
- Round 8: 4 sc, dec, 1 sc, dec, 2 sc, 8 dec, 2 sc, dec, 1 sc, dec, 4 sc (26)
- Round 9: 5 sc, (dec, 1 sc) x 6, dec, 5 sc (21)
- Round 10: 7 sc, 4 dec, 7 sc (18)
Switch to grey yarn for the rest of the leg.
- Round 11: (4 sc, dec) x 3 (15)
- Round 12: 15 sc
- Round 13: (2 sc, dec) x 3 (12)
- Round 14: 12 sc
- Round 15: (5 sc, inc) x 2 (14)
- Round 16: 14 sc
- Round 17: (6 sc, inc) x 2 (16)
- Round 18: 16 sc
- Round 19: (7 sc, inc) x 2 (18)
- Rounds 20-25: 18 sc
- Round 26: (1 sc, dec) x 6 (12)
- Round 27: 6 dec. Fasten off.
Tail
Using white yarn:
- Round 1: 6 sc in a MR (6)
- Round 2: (1 sc, dec) x 2 (4) (Note: Pattern indicates 12, but for a tail, a small sphere is better. Adjust to your preference.
- Round 3: 4 sc. Fasten off.
The Pants
Using beige yarn, we will work in rows to create the base, then join it.
- Foundation: Chain 12 + 1 ch.
- Round 1: 12 sc, turn.
- Rounds 2-9: 1 ch, 12 sc, turn (creating a rectangle).
- Rounds 10-12: 12 sc, then chain 40 and join to the first stitch to form a circle (52 stitches total).
- Rounds 11-30: 52 sc.
To create the legs: For the first leg, work 10 sc, then skip 26 stitches and place your marker. Work 26 sc for the next 9 rounds. Repeat for the second leg on the skipped stitches.
Straps: Chain 26. Starting from the 2nd ch, work 25 dc. Fasten off and sew to the waist.
The Striped Sweater (Knitting)
Using red and white yarn (alternating every 4 rows), work a raglan sweater.
- Setup: Cast on 40 stitches. Work 8 rounds of 1×1 ribbing (knit 1, purl 1).
- Raglan Increases: Use a pattern of “knit, yarn over (raglan), knit” to create the sleeve shaping. The number of knit stitches between the yarn overs will increase every two rounds (e.g., 5 knit, raglan, 9 knit, raglan…).
- Finishing: Cast off the sleeves and join them to the body. Work a few more rows of the main body pattern to complete the length.
Finishing
Assembly is the most important part of amigurumi! Use your large-eye needle and the leftover tails from your yarn to sew the pieces together in this order:
- Attach the ears to the top of the head.
- Sew the white cheek trim and the pink mouth onto the face.
- Attach the safety eyes at row 16, ensuring they are level.
- Sew the white collar around the neck.
- Attach the arms to the sides of the body.
- Sew the legs to the bottom of the body.
- Attach the pants and the tiny sweater.
- Finally, sew the little white tail to the back between rows 50-54.
Tips
- Tension is Key: Keep your stitches tight so that the stuffing does not peek through the holes.
- Use Stitch Markers: When working in rounds, it is very easy to lose your place. Always use a marker!
- Stuffing Technique: Stuff the head firmly before starting the neck to ensure the head doesn’t wobble, but don’t overstuff the neck or it may become difficult to attach the collar.
- Stability: Don’t skip the wooden skewer trick! It makes a huge difference in how the bunny sits on a shelf.