Crochet Watermelon Socks Pattern: A Fun and Colorful Tutorial
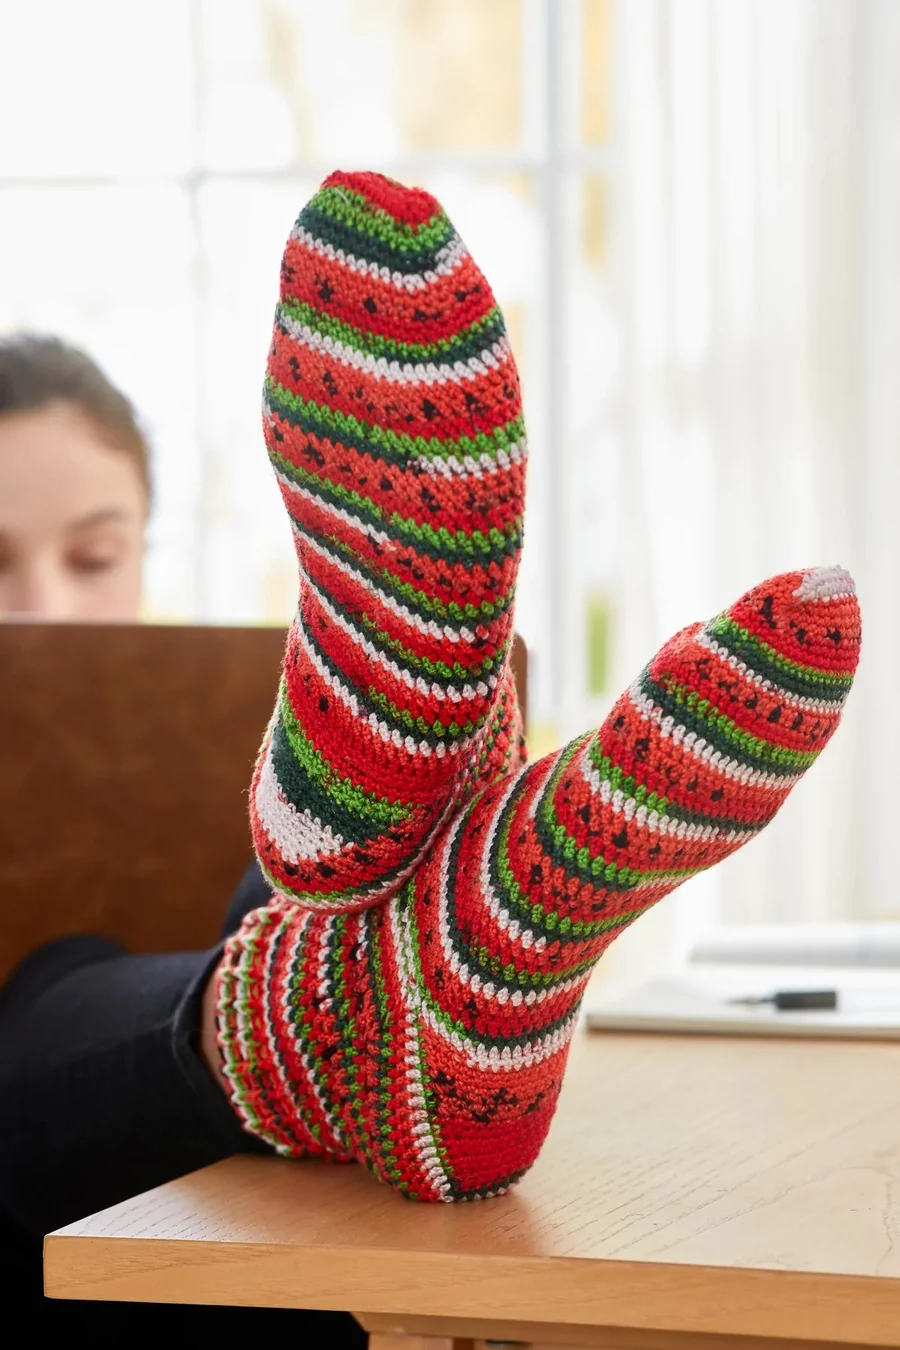
Looking for a project that adds a pop of color to your wardrobe? These vibrant Watermelon Socks are the perfect blend of cozy and whimsical. Whether you are looking to make a unique gift or treat yourself to some handmade footgear, this pattern is designed to be accessible for crocheters who are ready to try their hand at socks.
Crocheting socks can feel intimidating, but the secret lies in the construction. This pattern uses a combination of single crochet and extended single crochet to create a fabric that has the right amount of stretch and durability. One key tip for the perfect fit: crochet your socks about 10-20% smaller than your actual foot circumference. This ensures they stay snug on your feet and don’t slide down during the day.
Materials & Abbreviations
Before you start, gather your supplies. To get the “watermelon” look, choose a variegated yarn with reds, greens, and blacks, or a multi-colored yarn that mimics the fruit’s palette.
Supplies Needed
- Yarn: Approximately 470 yards of a medium-weight acrylic or acrylic-blend yarn (approx. 2 balls of 50g/235yd yarn).
- Hook: US Size C-2 (2.75 mm) or a size that helps you achieve the correct gauge.
- Notions: Tapestry needle for weaving in ends and three stitch markers (two of one color, one of a contrasting color).
Gauge
Checking your gauge is essential for socks to ensure they fit correctly. If your swatch is too large, try a smaller hook; if it is too small, try a larger one.
- Extended Single Crochet (esc): 26 sts x 24 rounds = 4″
- Single Crochet (sc): 26 sts x 32 rounds = 4″
Abbreviations (US Terms)
- beg: beginning
- ch: chain
- dc: double crochet
- dec’d: decrease(d)
- esc: extended single crochet
- Fpdc: front post double crochet
- Bpdc: back post double crochet
- inc’d: increase(d)
- lp(s): loop(s)
- meas: measures
- pm: place marker
- rem: remaining
- rep: repeat
- rnd(s): round(s)
- sc: single crochet
- sc2tog: single crochet 2 together
- sl st: slip stitch
- st(s): stitch(es)
- yo: yarn over
Step-by-Step Instructions
The socks are worked in four main sections: the toe, the foot, the heel, and the leg/cuff. The toe and foot are worked in continuous rounds, while the cuff is joined with a slip stitch.
Part 1: The Toe
We begin by creating an oval base for the toe. Use your contrasting stitch marker to mark the start of the first round and move it up as you go. Use the other two markers to identify the sides of the toe box.
Round 1: Chain 8 (11, 14, 15). Working in the back bumps of the chain, sc in the 2nd ch from the hook. Place your contrasting marker here. Sc in each remaining ch across. Place a marker (pm) in the last st to mark the side of the toe box. Now, rotate the piece and work in the unused loops on the opposite side of the foundation chain. Sc in the next 7 (10, 13, 14) unused loops. Place a marker (pm) in the last sc to mark the other side of the toe box. Do not join. Total: 14 (20, 26, 28) sc.
Round 2 (Increase): 2 sc in the next sc (move contrasting marker to the first sc of the 2-sc group). Sc in each st until you are one st away from the next marker. 2 sc in the next sc, sc in the marked sc (move marker to the sc just made), 2 sc in the next sc. Sc in each st until you are one st away from the marked sc, 2 sc in the next sc, sc in the marked sc (move marker to the sc just made). Total: 18 (24, 30, 32) sc.
Round 3 (Increase): Repeat Round 2. Total: 22 (28, 34, 36) sc.
Round 4 (Increase): Repeat Round 2. Total: 26 (32, 38, 40) sc.
Round 5: Sc in the next sc (move contrasting marker to the sc just made). *Sc in each sc to the next marked sc, sc in the marked sc (move marker to the sc just made). Repeat from * once more. Total: 26 (32, 38, 40) sc.
Rounds 6-13 (13, 13, 15): Repeat Rounds 4 and 5 four (four, four, five) times. Total: 42 (48, 54, 60) sc.
Part 2: The Foot
Remove your stitch markers. We will now switch to the extended single crochet (esc) to provide a bit more length and flexibility to the fabric.
Round 1: Esc in each st around. Total: 42 (48, 54, 60) esc.
Repeat Round 1 until the piece measures 6 (7, 8, 9) inches from the toe, or until the piece aligns with your ankle bone. To ensure the heel is positioned correctly, lay the piece flat so the side edges of the toe box are vertical. End your last round so the final stitch sits at the fold of the side edge.
Part 3: The Heel
The heel is worked in rows rather than rounds to create a cup shape.
Heel Turn:
Row 1 (WS): Ch 1 (does not count as a stitch), sc in the next 20 (22, 26, 28) sts. Leave the remaining sts unworked. Turn.
Row 2 (RS): Ch 1, sc2tog over the first 2 sts, sc in each remaining st across. Turn. (1 st decreased).
Row 3 (WS): Ch 1, sc2tog over the first 2 sts, sc in each remaining st across. Turn. (1 st decreased).
Next Rows: Repeat the last 2 rows until 8 (8, 10, 10) sts remain, ending on a WS row.
Last Row (RS): Ch 1, sc in each st across. Do not turn. Total: 8 (8, 10, 10) sc.
Heel Flap: Now we return to working in joined rounds.
Setup Round (WS): Evenly space 14 (16, 18, 18) sc sts along the row ends of the left side edge of the Heel Turn. Sc in the first unworked esc of the instep, pm in the sc just made. Sc in each of the next 21 (25, 27, 31) unworked esc, pm in the last sc made. Evenly space 14 (16, 18, 18) sc sts along the row ends of the right side edge of the Heel Turn. Join to the first sc of the Last Row of the Heel Turn. Total: 58 (66, 74, 78) sc.
Decrease Round: Ch 1, esc in each st until 1 st before the marked st, sc2tog over the next st and marked st, pm in the sc just worked. Esc in each st to the next marked st, sc2tog over the marked st and the next st. Esc in each remaining st around. Join to the beginning ch-1. (2 sts decreased).
Repeat Decrease Round until 42 (48, 54, 60) sts remain.
Part 4: The Leg and Cuff
Leg:
Round 1: Ch 1, esc in each st around, join to the beginning ch-1. Total: 42 (48, 54, 60) esc.
Repeat Round 1 until the leg measures 2.5 inches.
Cuff:
Round 1: Ch 2 (counts as dc). *Fpdc around the next esc, Bpdc around the next esc. Repeat from * around, join to the 2nd ch of the beginning ch-2.
Round 2: Ch 2, *Fpdc around the next Fpdc, Bpdc around the next Bpdc. Repeat from * around, join to the 2nd ch of the beginning ch-2.
Repeat Round 2 until the cuff measures 1.5 inches.
Finishing
Once your cuff is the desired length, fasten off your yarn. Use your tapestry needle to weave in all remaining ends securely on the inside of the sock so they don’t come loose during wear.
Tips for Success
- Managing the “Oval” Toe: When working the first round of the toe, remember that you are working around both sides of the foundation chain. Using markers is critical here so you don’t lose track of where the “sides” of the foot are.
- Understanding Post Stitches: For the cuff, remember that a Front Post Double Crochet (Fpdc) goes around the post of the stitch from the front, while a Back Post Double Crochet (Bpdc) goes from the back. This creates the stretchy, ribbed effect.
- Customizing Length: The foot and leg lengths are adjustable. If you prefer a knee-high sock or a shorter ankle sock, simply add or subtract rounds of the extended single crochet in the leg section.
- Tension Matters: Because socks need to be dense enough that your toes don’t poke through but stretchy enough to get over your heel, keep your tension consistent throughout the project.