Stitch Your Way to Cuteness: The Easy Baby Corgi Amigurumi Pattern
How to Crochet a Cute Baby Corgi: Step-by-Step Amigurumi Pattern
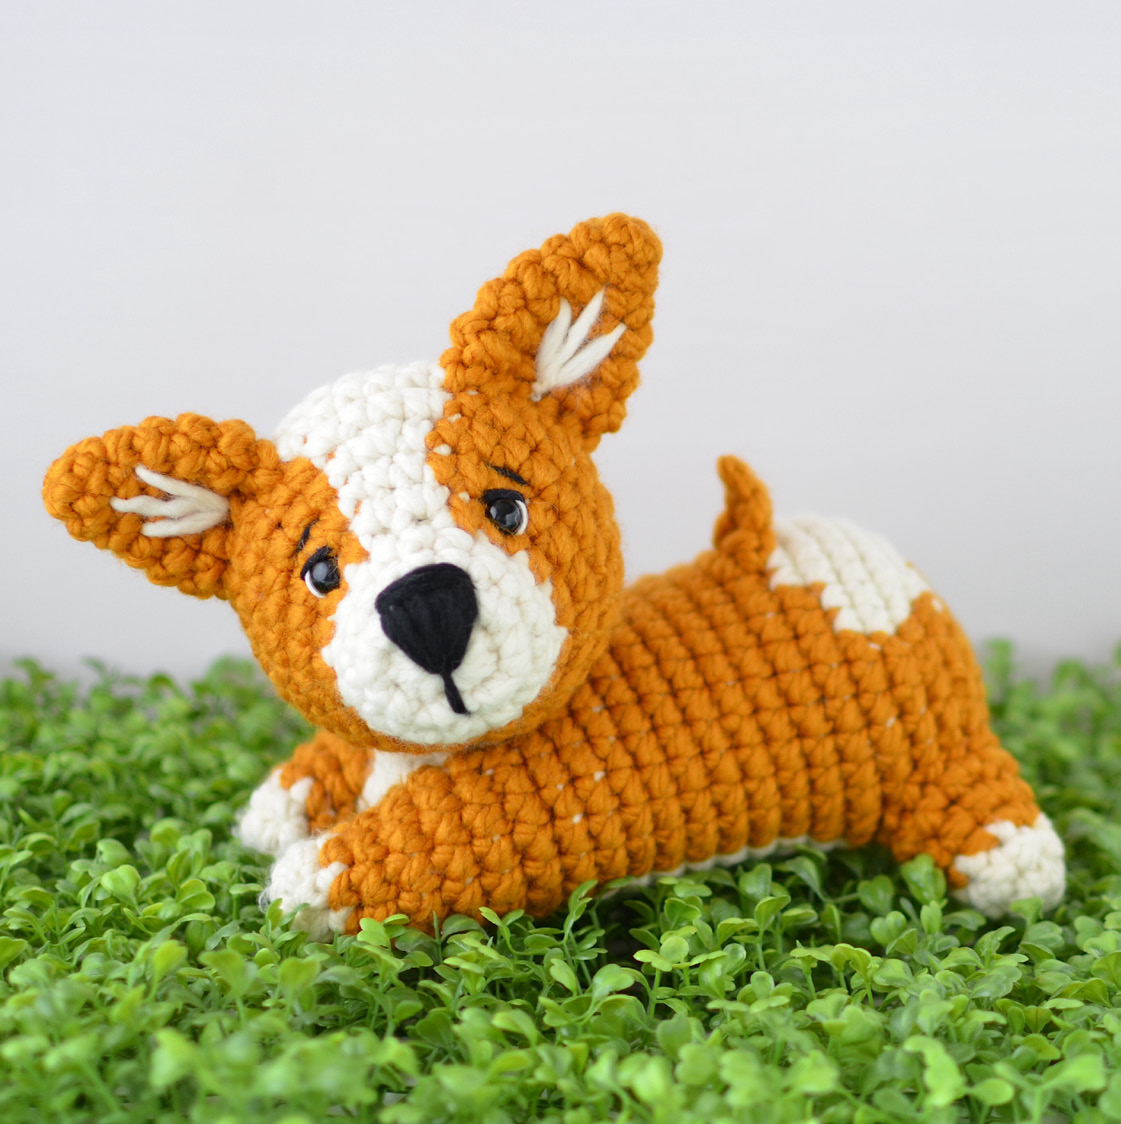
Looking for a cozy and adorable project? This Baby Corgi crochet pattern is perfect for beginners and experienced makers alike. With its chunky texture and signature Corgi proportions, this little pup makes a wonderful gift or a cute addition to your handmade collection.
Project Overview
Skill Level: Easy
Finished Size: Approximately 7.5 inches tall and 10.5 inches long.
Materials Needed
- Yarn: Super bulky weight yarn in two colors:
- Color A: White
- Color B: Orange/Tan
- Crochet Hook: 7 mm
- Stuffing: Fiberfill stuffing
- Eyes: One pair of 10mm black plastic safety eyes
- Embroidery: Small amount of black yarn or floss, and white embroidery floss
- Tools: Large-eyed blunt needle, scissors
Abbreviations (US Terms)
- ch: chain
- dc: double crochet
- hdc: half double crochet
- sc: single crochet
- sl st: slip stitch
- st(s): stitch(es)
- rnd(s): round(s)
- rep: repeat
- RS: right side
- WS: wrong side
Special Techniques
sc2tog: Single crochet 2 stitches together. Insert hook into next stitch and draw up a loop twice, yarn over and draw through all 3 loops on hook.
Magic Ring: Wrap yarn around your index finger. Insert hook into the ring, yarn over, and draw up a loop. Slip the ring off your finger and work the first round of stitches into the ring.
Invisible Join: After the last stitch of a round, drop the loop from the hook. Insert hook from the wrong side to the right side in the first stitch of the round and pull up a loop. Chain 1 and continue with the next instruction.
Pattern Instructions
Front Legs and Body
First Front Leg
Using Color A, create a magic ring.
Rnd 1: Work 6 sc in ring; invisible join.
Rnd 2: Ch 1, sc in each st around, change to Color B; invisible join.
Rnd 3: With Color B, ch 1, (sc in next 2 sts, 2 sc in next st) twice; invisible join (8 sc).
Rnd 4: With Color B, ch 1, (sc in next 3 sts, 2 sc in next st) twice; invisible join (10 sc).
Fasten off.
Second Front Leg
Repeat the steps for the first leg, but change to Color A in the last stitch of Round 4. Do NOT fasten off.
Joining the Legs
Rnd 5: With Color A still attached to the 2nd leg, ch 3. With Color B, sl st in the first st of the last round of the first leg, ch 1, sc in the same st and in the next 9 sts of the first leg. With Color A, working in the back bumps of the ch-3, hdc in the next 3 ch. With Color B, sc in the first st of the second leg following the ch-3 and in the next 9 sts. With Color A, hdc in each ch of the ch-3 between legs; invisible join (26 sts). Do NOT fasten off.
The Body
Rnd 6: Color A, ch 1, 2 sc in first st; Color B, sc in next 8 sts; Color A, 2 sc in next st, sc in next 3 sts, 2 sc in next st; Color B, sc in next 8 sts; Color A, 2 sc in next st, sc in next 3 sts; invisible join (30 sc).
Rnds 7-8: Color A, ch 1, sc in next 3 sts; Color B, sc in next 7 sts; Color A, sc in next 7 sts; Color B, sc in next 8 sts; Color A, sc in next 5 sts; invisible join.
Rnd 9: Color A, ch 1, sc in next 3 sts; Color B, sc in next 22 sts; Color A, sc in next 5 sts; invisible join.
Rnds 10-16: Color A, ch 1, sc in next 4 sts; Color B, sc in next 21 sts; Color A, sc in next 5 sts; invisible join.
Begin stuffing the body.
Rnd 17: Color A, ch 1, sc in next 4 sts; Color B, 2 sc in next st, sc in next 9 sts, 2 sc in next st, sc in next 9 sts, 2 sc in next st; Color A, sc in next 5 sts; invisible join (33 sc).
Rnd 18: Color A, ch 1, sc in next 3 sts; Color B, sc in next 11 sts; Color A, sc in next 5 sts; Color B, sc in next 10 sts; Color A, sc in next 4 sts; invisible join.
Rnd 19: Color A, ch 1, sc in next 2 sts; Color B, sc in next 10 sts; Color A, sc in next 9 sts; Color B, sc in next 9 sts; Color A, sc in next 3 sts, change to Color B; invisible join.
Rnd 20: Color B, ch 1, sc in next 12 sts; Color A, sc in next 9 sts; Color B, sc in next 12 sts; invisible join.
Rnd 21: Color B, ch 1, sc in next 10 sts, sc2tog, sc in next st; Color A, sc in next 8 sts; Color B, sc2tog, sc in next 8 sts, sc2tog; invisible join (30 sc).
Rnd 22: Color B, ch 1, (sc in next 3 sts, sc2tog) twice, sc in next 3 sts; Color A, sc2tog, sc in next 3 sts, sc2tog; Color B, (sc in next 3 sts, sc2tog) twice; invisible join (24 sc).
Cut Color A. Work the remaining rounds with Color B only.
Rnd 23: Ch 1, *sc in next 2 sts, sc2tog; repeat from * around; invisible join (18 sc).
Rnd 24: Ch 1, *sc in next st, sc2tog; repeat from * around; invisible join (12 sc).
Finish stuffing.
Rnd 25: Ch 1, *sc2tog; repeat from * around; invisible join (6 sc).
Fasten off, leaving a long tail. Thread the tail through the top of the last round, pull tight to close, and knot securely.
The Head
Using Color A, create a magic ring.
Rnd 1: Work 8 sc in ring; invisible join.
Rnd 2: Ch 1, 2 sc in each st around; invisible join (16 sc).
Rnd 3: Ch 1, sc in each st around; invisible join.
Rnd 4: Ch 1, sc in each st around, change to Color B; invisible join.
Rnd 5: Color B, ch 1, (sc in next st, 2 sc in next st) 3 times, sc in next st; Color A, 2 sc in each of next 2 sts; Color B, (sc in next st, 2 sc in next st) 3 times, sc in next st; invisible join (24 sc).
Rnd 6: Color B, ch 1, (sc in next 2 sts, 2 sc in next st) 3 times, sc in next 2 sts; Color A, sc in next 3 sts; Color B, (sc in next 2 sts, 2 sc in next st) 3 times, sc in next st; invisible join (30 sc).
Rnd 7: Color B, ch 1, sc in next 14 sts; Color A, sc in next st, 2 sc in next st, sc in next st; Color B, sc in next 13 sts; invisible join (31 sc).
Rnd 8: Color B, ch 1, sc in next 14 sts; Color A, 2 sc in next st, sc in next 2 sts, 2 sc in next st; Color B, sc in next 13 sts; invisible join (33 sc).
Rnd 9: Color B, ch 1, sc2tog, sc in next 12 sts; Color A, sc in next 7 sts; Color B, sc in next 12 sts; invisible join (32 sc).
Rnd 10: Color B, ch 1, sc in next 13 sts; Color A, sc in next 7 sts; Color B, sc in next 12 sts; invisible join.
Insert plastic safety eyes between Rounds 5 and 6, about 7 stitches apart. Begin stuffing.
Rnd 11: Color B, ch 1, sc in next 13 sts; Color A, sc2tog, sc in next 3 sts, sc2tog; Color B, sc in next 12 sts; invisible join (30 sc).
Rnd 12: Color B, ch 1, (sc in next 4 sts, sc2tog) twice, sc in next 2 sts; Color A, sc in next 2 sts, sc2tog; Color B, (sc in next 4 sts, sc2tog) twice; invisible join (25 sc).
Cut Color A. Work remaining rounds with Color B only.
Rnd 13: Ch 1, *sc in next 3 sts, sc2tog; repeat from * around; invisible join (20 sc).
Rnd 14: Ch 1, *sc in next 2 sts, sc2tog; repeat from * around; invisible join (15 sc).
Finish stuffing.
Rnd 15: Ch 1, *sc in next st, sc2tog; repeat from * around; invisible join (10 sc).
Fasten off, leaving a long tail to close the opening.
Back Legs (Make 2)
Using Color A, create a magic ring.
Rnd 1: Work 6 sc in ring; invisible join.
Rnd 2: Ch 1, sc in each st around, change to Color B; invisible join.
Cut Color A. Work remaining rounds with Color B only.
Rnd 3: Ch 1, (sc in next 2 sts, 2 sc in next st) twice; invisible join (8 sc).
Rnd 4: Ch 1, (sc in next 3 sts, 2 sc in next st) twice; invisible join (10 sc).
Rnd 5: Ch 1, (sc in next 4 sts, 2 sc in next st) twice; invisible join (12 sc).
Fasten off, leaving a long tail for sewing. Stuff the legs.
Ears (Make 2)
Using Color B, create a magic ring.
Rnd 1: Work 5 sc in ring; invisible join.
Rnd 2: Ch 1, 2 sc in first st, sc in next 4 sts; invisible join (6 sc).
Rnd 3: Ch 1, (sc in next 2 sts, 2 sc in next st) twice; invisible join (8 sc).
Rnd 4: Ch 1, (sc in next 3 sts, 2 sc in next st) twice; invisible join (10 sc).
Rnd 5: Ch 1, (sc in next 4 sts, 2 sc in next st) twice; invisible join (12 sc).
Rnd 6: Ch 1, sc in each st around; invisible join.
Fasten off, leaving a long tail for sewing.
Tail
Using Color B, ch 4.
Rnd 1: Sl st in 2nd ch from hook, hdc in next ch, dc in next ch (3 sts).
Fasten off, leaving a long tail for sewing.
Finishing and Assembly
Using your blunt needle and the yarn tails, assemble the Corgi as follows:
- Eyes: Use white floss to embroider small curves along the outer edges of the safety eyes. Use black floss to embroider curves along the upper edges and add straight stitches for eyebrows.
- Nose: Use black yarn or floss to embroider a nose between Rounds 1 and 3 of the head.
- Ears: Embroider straight lines on the ears using Color A. Sew the ears to the top of the head between Rounds 8 and 10, approximately 7 stitches apart.
- Legs: Sew the back legs to the body between Rounds 18 and 23.
- Tail: Sew the tail to the body between Rounds 16 and 17.
- Head: Sew the head securely to the body.
Weave in all remaining ends and trim carefully.
Safety Note
Warning: This item is a decorative piece and is not a toy. Never leave a baby or small child unattended with this project, as safety eyes and small parts can be hazardous