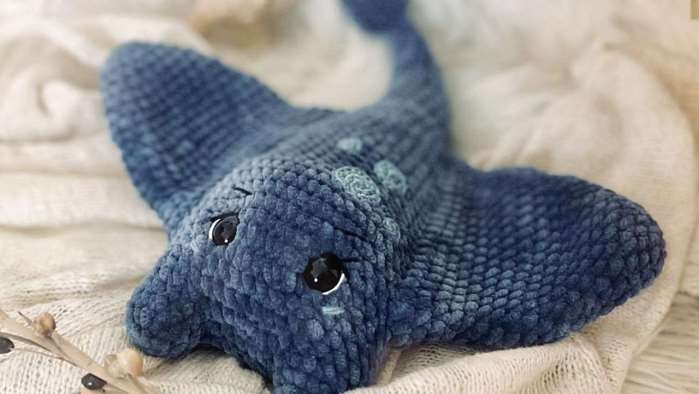
Dive into Adorable: The Stingray Amigurumi Crochet Pattern
Hello, sweet hooksters! Are you ready to dive into the deep blue sea and meet a new friend? Today, I am absolutely thrilled to share a pattern that is as unique as it is adorable—the Stingray! With his graceful fins, sweet embroidered face, and that charmingly long tail, he’s sure to float right into your heart.
When I first saw this pattern, I knew it had to be shared with our cozy crochet community. Stingrays are such fascinating creatures—they glide through the ocean like gentle birds of the sea, and there’s something so serene and peaceful about them. This little guy captures that calm, friendly spirit perfectly. He’s cuddly, he’s quirky, and he’s guaranteed to bring smiles to everyone who meets him.
This pattern is a wonderful adventure for adventurous beginners and intermediate crocheters. We’ll be working with two different yarn weights (a cozy chenille and a smooth cotton) to create different textures and details. The construction is fascinating too—we start by joining two separate pieces to form the body, then work our way down through the tail, creating little “bumps” along the way. And those side fins? They’re worked in beautiful color blocks and attached separately, giving our stingray his signature graceful shape.
Whether you’re making this for an ocean-obsessed child, a nursery mobile, or just because you love unique amigurumi, this stingray is sure to become a treasured friend. So grab your hooks and let’s make a splash
Materials & Tools
Yarn:
- Main Body: Gründl Funny Uni (100% polyester, 120 m/100 g) in Denim (color 30) – 50 g
- Underside & Accents: LEAMI Chenille Soft UNI (100% polyester, 120 m/100 g) in Gray (color 108) – 25 g
- Head Details: Schachenmayr Catania (100% cotton, 125 m/50 g) in Denim (color 421) – small amount
Hooks:
- 4.0 mm hook (for the chenille/polyester yarns)
- 2.5 mm hook (for the Catania cotton details)
Other Supplies:
- 16 mm safety eyes
- Fiberfill stuffing
- White and black embroidery thread (for facial details)
- Tapestry needle for sewing and embroidery
- Stitch markers
- Pins for positioning
- Scissors
Note: Unless otherwise stated, all pieces are worked in a continuous spiral. Side fins and details are sewn on later.
Abbreviations (US Terms)
- sc: single crochet
- inc: increase (2 sc in one stitch)
- dec: decrease (single crochet 2 together)
- sl st: slip stitch
- ch: chain
- st(s): stitch(es)
- rnd: round
- (…)*6: repeat instructions in parentheses 6 times
Let’s Begin! The Stingray Pattern
Body (Worked from the Nose Down to the Tail)
We’ll start by creating two small pieces that will be joined to form the stingray’s head and body shape.
First Piece (make 1):
- Rnd 1: With gray yarn, 6 sc in a magic ring. (6)
- Rnd 2: 6 inc. (12)
- Rnd 3: 12 sc. (12)
Finish this piece with 1 sl st, cut the yarn, and set aside.
Second Piece (make 1):
- Rnd 1: With gray yarn, 6 sc in a magic ring. (6)
- Rnd 2: 6 inc. (12)
- Rnd 3: 12 sc. (12)
Do not cut the yarn on this piece—we’ll continue with it!
Joining the Pieces:
- Rnd 4: Ch 6. Insert your hook into the first stitch of the first piece, work 12 sc across the first piece. Then work 6 sc along the chain (one in each ch). Continue onto the second piece, working 12 sc around it. Finally, work 6 sc along the other side of the chain. (36)
Rnd 5: 30 sc, 6 sc. (36) The pattern notes this as a separate round, but it may be a continuation—just keep your stitch marker in place and work evenly around.
Rnd 6: 29 sc, 7 sc. (36)
Rnd 7: 1 sc, 7 sc, inc, 1 sc repeat from * 5 more times, 8 sc, 8 sc. (42)
Rnd 8: 2 sc, 31 sc, 9 sc. (42)
Rnd 9: 3 sc, 29 sc, 10 sc. (42)
Rnd 10: 4 sc, 27 sc, 11 sc. (42)
Rnd 11: 5 sc, 25 sc, 12 sc. (42)
Rnds 12-14: 6 sc, 24 sc, 12 sc. (42) (3 rounds)
Rnd 15: 6 sc, 3 sc, dec, 1 sc repeat from * 5 more times, 3 sc, 12 sc. (36)
Rnds 16-23: 6 sc, 18 sc, 12 sc. (36) (8 rounds)
At this point, after Rnd 9 (so between Rounds 9 and 10 of the body), insert the safety eyes. They should be positioned with about 8 visible stitches between them.
Rnd 24: 6 sc, 1 sc, dec, 5 sc repeat from * 1 more time, 1 dec, 1 sc, 12 sc. (33)
Rnd 25: 2 sc, 1 dec, 2 sc, 15 sc, 2 sc, 1 dec repeat from * 1 more time, 4 sc. (30)
Rnd 26: 5 sc, 15 sc, 10 sc. (30)
Rnd 27: 5 sc, 16 sc, 9 sc. (30)
Rnd 28: 1 sc, 1 dec, 1 sc, 2 sc, 1 dec, 4 sc, 1 dec repeat from * 1 more time, 2 sc, 2 sc, 1 dec repeat from * 1 more time. (24)
Rnd 29: 2 sc, 17 sc, 5 sc. (24)
Rnd 30: 1 sc, 23 sc. (24)
Now switch to denim yarn (the main body color).
- Rnd 31: 24 sc. (24)
- Rnd 32: 2 sc, dec repeat from * 5 more times. (18)
- Rnds 33-35: 18 sc. (18) (3 rounds)
- Rnd 36: 4 sc, dec repeat from * 2 more times. (15)
- Rnds 37-38: 15 sc. (15) (2 rounds)
- Rnd 39: 3 sc, dec repeat from * 2 more times. (12)
- Rnds 40-42: 12 sc. (12) (3 rounds)
- Rnd 43: 2 sc, dec repeat from * 2 more times. (9)
- Rnds 44-45: 9 sc. (9) (2 rounds)
Stuff the body firmly up to this point with fiberfill.
- Rnd 46: 1 sc, dec repeat from * 2 more times. (6)
- Rnds 47-48: 6 sc. (6) (2 rounds)
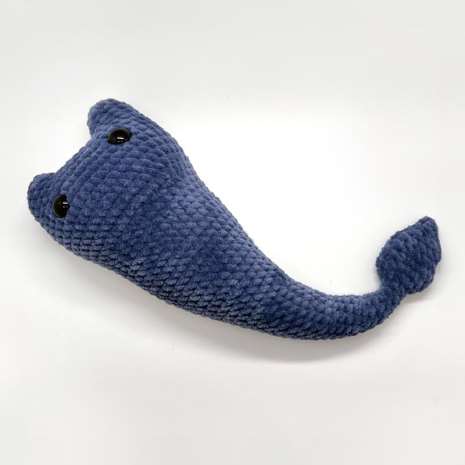
Now we begin the tail “bumps”—this creates that characteristic stingray tail!
- Rnd 49: 6 inc. (12)
- Rnd 50: 1 sc, inc repeat from * 5 more times. (18)
- Rnd 51: 18 sc. (18)
- Rnd 52: 1 sc, dec repeat from * 5 more times. (12)
- Rnds 53-54: 12 sc. (12) (2 rounds)
- Rnd 55: 6 dec. (6)
- Rnd 56: 6 sc. (6)
The tail is not stuffed. Fasten off, leaving a tail to weave in securely. Give the eyes an extra push to sink them in slightly for a more realistic look.
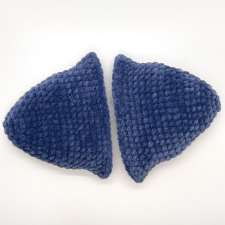
Side Fins (Make 2)
These fins are worked with both denim and gray yarn to create a beautiful two-tone effect.
With denim yarn to start:
- Rnd 1: 6 sc in a magic ring. (6)
- Rnd 2: 6 inc. (12)
- Rnd 3: 1 sc, inc repeat from * 5 more times. (18)
The marked stitches will be worked in gray.
- Rnd 4: 5 sc (denim), 3 sc (gray), 10 sc (denim). (18)
- Rnd 5: 3 inc (denim), 1 sc (denim), 5 sc (gray), 1 sc (denim), 3 inc (denim), 5 sc (denim). (24)
- Rnd 6: 6 sc (denim), 7 sc (gray), 11 sc (denim). (24)
- Rnd 7: 1 sc (denim), 3 inc (denim), 1 sc (denim), 9 sc (gray), 1 sc (denim), 3 inc (denim), 6 sc (denim). (30)
- Rnd 8: 7 sc (denim), 11 sc (gray), 12 sc (denim). (30)
- Rnd 9: 6 sc (denim), 13 sc (gray), 11 sc (denim). (30)
- Rnd 10: 2 sc (denim), 3 inc (denim), 1 sc (denim), 13 sc (gray), 1 sc (denim), 3 inc (denim), 7 sc (denim). (36)
- Rnds 11-15: 9 sc (denim), 13 sc (gray), 14 sc (denim). (36) (5 rounds)
- Rnd 16: 5 sc (denim), 3 inc (denim), 1 sc (denim), 13 sc (gray), 1 sc (denim), 3 inc (denim), 10 sc (denim). (42)
- Rnd 17: 12 sc (denim), 13 sc (gray), 17 sc (denim). (42)
- Rnd 18: 5 sc (denim), inc, 1 sc repeat from * 2 more times (denim), 1 sc (denim), 13 sc (gray), 1 sc (denim), inc, 1 sc repeat from * 2 more times (denim), 10 sc (denim). (48)
Continue working sc until you reach the side of the fin (where it will be flattened). Finish with 1 sl st and cut the yarn.
These fins are not stuffed—they will be flattened and sewn onto the body
Head Details (Spots and Decorations)
Using the Catania cotton yarn and 2.5 mm hook, create several little circles to decorate your stingray’s head:
Small Circles (make 2-3):
- Make a magic ring, work 6 sc into the ring, close with 1 sl st.
- For a slightly larger small circle: Rnd 1: 6 sc, Rnd 2: inc to 12 sc, close with sl st.
Medium Circle (make 1):
- Rnd 1: 6 sc in magic ring.
- Rnd 2: 6 inc. (12)
- Rnd 3: (1 sc, inc) repeat 6 times. (18)
Close with 1 sl st, leaving a long tail for sewing.
Arrange these circles on your stingray’s head as desired—like sweet little spots or decorative markings! Sew them on securely using the tails.
Finishing: Bringing Your Stingray to Life
Embroidery Details
Now for the magical part—giving your stingray a sweet face!
- Eyes: Using black embroidery thread, you may want to add a small highlight or outline around the safety eyes for extra expression.
- Eyebrows: With black thread, embroider tiny curved eyebrows above each eye. This gives him such a sweet, gentle expression!
- Cheeks: With pink or matching thread, add a small stitch or two on each side of the face to create rosy cheeks.
- Mouth: Using black or dark thread, embroider a sweet smile below the eyes. A small curved line is all it takes!
Attaching the Fins
- Position the side fins on either side of the body. The pattern notes that the fins are “squeezed” or flattened when attached—they should fan out gracefully from the body.
- Use pins to hold them in place and check positioning from all angles.
- Sew around the base of each fin securely, attaching it firmly to the body.
Final Touches
- Weave in all remaining ends carefully.
- Give your stingray a final shape—flatten the fins nicely, adjust the tail position.
- Add any additional embroidery details you desire.
Tips for Success
- Yarn Matters: This pattern uses two different types of polyester yarn plus a cotton for details. The chenille is wonderfully soft and cuddly, while the cotton gives crisp definition for the small spots.
- Read Your Color Changes: For the side fins, the color changes are marked clearly. Take it slowly and count your stitches—the result is worth it!
- Stitch Markers Are Essential: With all the increases and decreases, a stitch marker will save you from losing your place.
- Stuff Firmly: A well-stuffed body holds its shape better. Use a chopstick or stuffing tool to get fiberfill into all areas.
- Positioning the Eyes: The pattern suggests placing them after Rnd 9 with 8 visible stitches between them. Take your time to get them symmetrical—they really make the face!
- Don’t Overstuff the Tail: The tail is left unstuffed, which gives it a nice, flexible, realistic feel.
A Final Word from Our Cozy Corner
And there you have it—your very own sweet stingray, ready to glide through the currents of your imagination! Isn’t he just the most charming sea creature you’ve ever made?
I love how this pattern captures the gentle, graceful nature of real stingrays while making them completely huggable and cute. From his sweet embroidered smile to his floppy side fins and that adorable bumpy tail, every detail works together to create a friend that’s truly special.
This little guy would make a wonderful gift for an ocean lover, a unique addition to a nursery mobile, or simply a sweet companion for your own collection. And because he’s made with such soft, cuddly yarns, he’s perfect for little hands to hold and love.
Thank you for joining me on this undersea adventure! I hope you’ve enjoyed every stitch and that your stingray brings you as much joy as he’s brought me. Remember, the best part of amigurumi isn’t just the finished toy—it’s the love and care we stitch into every single loop.
Happy crocheting, dear friends, and may your hooks always find their way to the next beautiful creation