Crochet a Glowing Friend: A Beginner’s Guide to the Lumière Candle Amigurumi
Hello, lovely makers! Welcome to a magical little project that’s sure to brighten up your day and your craft basket. Today, we’re diving into a pattern that’s as charming as it is heartwarming—a cute, personified candle amigurumi named Lumière!
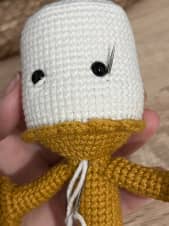
Have you ever wanted to create a crochet friend that feels like a tiny, huggable light? This Lumière pattern is just that—a delightful candle with a sweet, friendly face, complete with little flames and a cozy, textured body. It’s a project filled with personality, perfect for adding a handmade touch to any shelf, desk, or nursery.
This pattern is my original design, shared with so much joy. It’s intended for your personal crafting pleasure. I ask kindly that you respect the work that went into it by not distributing, copying, selling, or translating the pattern. Feel free, however, to gift or cherish the finished toys you make—they’re yours to love!
Whether you’re looking for a mindful project for a quiet evening, a unique handmade gift for a friend who loves all things cozy, or a cheerful seasonal decoration, Lumière is a wonderful choice. It combines basic amigurumi techniques with a few fun details, making it a fantastic “next step” project for crocheters ready to try something with a bit of character.
The finished candle stands about 20 cm tall (depending on your yarn and tension), making it a wonderfully substantial little friend to hold. The design uses simple stitches but incorporates clever techniques like working in back loops for texture, simple embroidery for the face, and a bit of wiring for posable arms. Don’t worry if that sounds new—I’ll guide you through it!
So, gather your favorite yarn, find your comfiest spot, and let’s create some light and warmth together with hook and thread. I’m so excited to see your version! If you have any questions or just want to share your finished piece, you can always reach out. Happy crocheting!
Materials & Tools You’ll Need
- Yarn: The pattern uses ALIZE COTTON GOLD HOBBY in colors 02, 62, and 533 (for the body, candle, and details). You can substitute with other yarns (like plush yarn for a different look), but remember this will change the final size.
- Embroidery Thread: A thin black thread for stitching cute eyelashes.
- Crochet Hook: A 2 mm hook is recommended to match the suggested yarn.
- Safety Eyes: Two 5 mm eyes.
- Stuffing: A bag of HOLLOFIBER or your preferred polyester fiberfill.
- Needles: A stuffing needle and a yarn/embroidery needle for sewing.
- Notions: Scissors, pins, and a stitch marker.
- Reinforcement: A small circle of cardboard to stiffen the bottom.
- Wire: A bit of bendable wire to create a frame for the body and arms.
Crochet Abbreviations (Stitch Key)
Here’s your cheat sheet for the pattern language:
- MR = Magic Ring
- CH = Chain Stitch
- SC = Single Crochet
- DC = Double Crochet
- HDC = Half Double Crochet
- INC = Increase (2 sc in the same stitch)
- DEC = Decrease (sc 2 stitches together)
- SL ST = Slip Stitch
- BLO = Back Loop Only
- FLO = Front Loop Only
- ( … ) = Total number of stitches you should have at the end of that round.
- ( … ) * X = Repeat the instructions inside the parentheses X number of times.
A Quick Note: This is not a beginner’s how-to-crochet tutorial, but a pattern for those familiar with basic stitches and terms. The difficulty is medium, but take it one step at a time—you’ve got this!
Finished Size
Using the materials listed, your Lumière will be approximately 20 cm (about 8 inches) tall. Your own crochet tension and yarn thickness will make your creation uniquely sized, and that’s perfectly okay!
Step-by-Step Crochet Instructions
Let’s build our candle friend from the bottom up! Remember to stuff the body gradually as you go.
Part 1: The Body (Candle Holder)
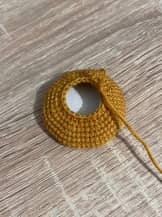
We start with the wide, weighted base.
- 8 SC into MR.
- 8 INC (16).
- (SC, INC) * 8 (24).
- (2 SC, INC) * 8 (32).
- (3 SC, INC) * 8 (40).
- (4 SC, INC) * 8 (48).
- (5 SC, INC) * 8 (56).
- BLO: 56 SC. (This creates a ridge).
- Rounds 9-10: 56 SC (2 rounds).
- (5 SC, DEC) * 8 (48).
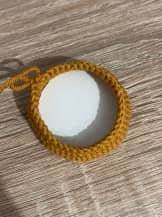
- Now, insert your pre-cut cardboard circle into the base for stability.
- (4 SC, DEC) * 8 (40).
- (3 SC, DEC) * 8 (32).
- (2 SC, DEC) * 8 (24).
- FLO: 24 SC.
- Rounds 16-17: 24 SC (2 rounds).
- 24 SC, but make sure you crochet through both the current round and the back loops of Round 15.
- Rounds 19-20: 24 SC (2 rounds).
- (2 SC, DEC) * 6 (18).
- Rounds 22-33: 18 SC (12 rounds).
Part 2: Forming the Arm Holes & Candle Base
Now we’ll create openings for the arms and widen the top for the candle.
34. 5 SC, 4 CH (skip the next 4 SC), 5 SC, 4 CH (skip the next 4 SC). You now have two chain “bridges.”
35. Rounds 35–36: 18 SC (2 rounds).
37. FLO: (2 SC, INC) * 6 (24).
38. (3 SC, INC) * 6 (30).
39. (4 SC, INC) * 6 (36).
40. (5 SC, INC) * 6 (42).
41. (6 SC, INC) * 6 (48).
42. (7 SC, INC) * 6 (54).
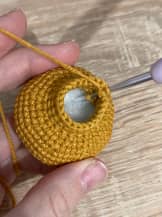
* Stop here! Change to your white yarn for the candle wax. Pull the mustard-colored yarn tail to the outside (don’t cut it yet).
* Insert your prepared wire frame inside the body now. Also, thread a separate piece of wire through the arm hole openings you made.
Part 3: The Candle (White Wax)
- BLO: 54 SC.
- Rounds 2-18: 54 SC (17 rounds).
- Between Rounds 8 and 9 of the candle, insert the 5 mm safety eyes. Leave 8 SC between them.
- BLO: (5 SC, DEC) * 8 (48).
- (4 SC, DEC) * 8 (40).
- (3 SC, DEC) * 8 (32).
- (2 SC, DEC) * 8 (24).
- (SC, DEC) * 8 (16).
- 8 DEC. Fasten off, leaving a tail.
- Go back to Round 19 of the candle and make a border of SC in the FLO all around.
- Stuff the top of the candle firmly and use your needle to close the opening.
Part 4: Adding Decorative Borders
- On the Body: Return to Round 42 of the body. In the FLO, work a pretty border: [SL ST, CH, 3 DC, CH, SL ST] repeat all around.
- On the Base: Return to Round 8 of the body (the first BLO ridge). Work a simple border of SC in the FLO all around.
Part 5: The Arms (Make 2)
Attach yarn at the bottom edge of an arm hole. Stuff very lightly as you go.
- 4 SC along the bottom row, INC in the corner stitch, 4 SC along the top row, INC in the corner stitch (12).
- Rounds 2-11: 12 SC (10 rounds).
- FLO: 12 INC (24).
- 24 SC.
- Change to white yarn here, pulling the mustard tail out but not cutting it.
- BLO: 24 SC.
- Rounds 15-19: 24 SC (5 rounds).
- BLO: 12 DEC (12).
- 6 DEC. Fasten off, leaving a tail.
- Finishing: Return to Round 20 and make a SL ST border in the FLO. Then, return to Round 14 and make an SC border in the FLO.
- Firmly stuff the hand and sew the opening closed.
Part 6: Small Details
- Small Flames (Make 2 in yellow): Into an MR, work: SC, 2 HDC, DC, 2 HDC, DC, 2 HDC, SC. Gently tighten the ring.
- Large Flame (Make 1 in yellow):
- 8 SC into MR, but don’t pull it tight yet.
- Crochet into the opening: 4 HDC, 3 DC, 3 TR, 3 DC, 4 HDC, SL ST to join.
- Droplet (Make 1 in white): Same as a small flame: SC, 2 HDC, DC, 2 HDC, DC, 2 HDC, SC into MR. Gently tighten.
- Nose (Make 1 in white): CH 4. Starting from the 2nd CH from the hook, make 3 SC. Leave a long tail for sewing.
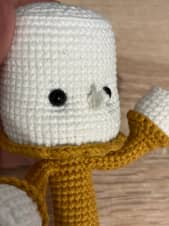
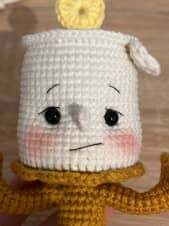
Assembly & Finishing: Bringing Lumière to Life
This is where the magic happens and your candle gets its personality!
- Shaping the Face: Thread your needle. Insert it at the bottom center of the neck and bring it out at the outer corner of the right eye. Insert the needle into the outer corner of the left eye, skip two stitches inward, and bring the needle back out at the bottom of the neck. Gently pull to indent the face—don’t be shy, pull firmly to create sweet, round cheeks! Tie a secure knot. Repeat this process for the other side of the face.
- Attaching Features: Sew the white nose between the eyes. Use your black embroidery thread to stitch on expressive eyebrows, pretty eyelashes, and a little smiling mouth.
- Adding Sparkle: Sew the yellow flames and the white droplet onto the white candle body wherever you think they look happiest. Refer to the pattern photo for inspiration!