Cozy Up Your Little One: A Beginner-Friendly Plush Onesie Crochet Pattern
There’s something incredibly special about making a gift with your own two hands. Especially when that gift is a tiny, cozy, and utterly adorable piece of clothing for a little one. The soft yarn, the rhythmic click of the hook, the love stitched into every row—it’s a recipe for a truly heartfelt present.
If you’ve been looking for that perfect project to welcome a new baby, celebrate a shower, or just to indulge in some cozy crochet therapy, you’ve found it! This Plush Onesie pattern is an absolute dream to make. it’s crafted from supremely soft chenille-style yarn that feels like a warm hug.
This pattern is fantastic for confident beginners who are ready to move beyond simple scarves and blankets. We’ll be working in rounds and rows, using basic stitches to create something truly magical. The result is a snuggly 3-month size onesie that is sure to become a cherished keepsake.
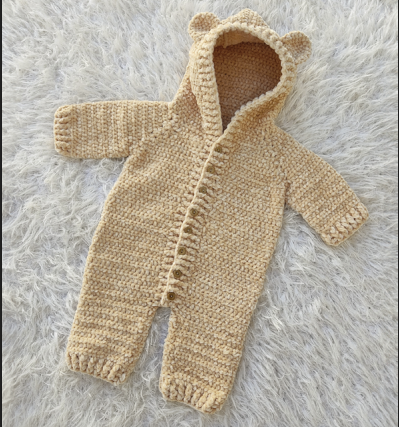
The best part? It features an adorable button-up design and a sweet little hood with ears! Imagine how cute those little ears will look peeking out from a stroller. This project is perfect for a quiet weekend, a mindful make, or a dedicated gift-making session.
So, grab your softest yarn and your favorite hook, pour yourself a warm drink, and let’s create something beautiful together. You’ve got this!
Materials You’ll Need
- Yarn: Circulo Yarns – Amiqurumi Pelucia (or any similar super soft chenille/plush yarn). You’ll need approximately 4 balls in color #7650 Almond.
- Crochet Hook: H/5.0 mm hook, or whatever size you need to match the gauge.
- Notions:
- 8 clear buttons (about 0.40″ or 1 cm in diameter)
- Tapestry needle for weaving in ends
- Scissors
- Measuring tape
Gauge & Sizing
- Finished Size: This pattern makes a onesie sized for a 3-month-old.
- Gauge: 18 double crochets (dc) x 12 rows should measure 4 inches (10 cm) square using your H/5.0 mm hook. Please take a moment to check your gauge! This is super important for making sure your onesie turns out the right size.
Crochet Abbreviations Cheat Sheet
Don’t worry about memorizing these! Just keep this list handy as you work.
- ch: chain
- sc: single crochet
- hdc: half double crochet
- dc: double crochet
- sl st: slip stitch
- inc: increase (work 2 stitches into the same stitch)
- dec: decrease
- rnd: round
- FPdc: front post double crochet
- BPdc: back post double crochet
- sk: skip
- mk: make
- st(s): stitch(es)
- eor: end of row/round
Let’s Get Crocheting!
The Main Yoke & Body
We start by crocheting the yoke, which is the top part that goes over the shoulders. We’ll work this back and forth in rows.
- Foundation: Make a starting chain of 42 chains, then add 3 more chains to turn (this counts as your first dc).
- Follow the Chart: Work the yoke by following the stitch chart provided on page 3 of the pattern. The chart uses the abbreviations above. Take it one row at a time!
- Separate Front & Back: Once the yoke chart is complete, you will continue working, but now you will be working on the front and back pieces at the same time.
- Leg Opening: Continue crocheting until the piece measures about 8.75 inches from your very first starting chain. At this point, you will create the leg openings. To do this, you will skip the 6 center stitches and work the rest of the row. You will then crochet the two legs separately.
- Finish the Body: Continue working on the legs until the entire piece measures 13 inches from the beginning.
- Add the Ribbing: Work 3 final rows in the “Crochet Rib st” (again, follow the chart on page 3 for this ribbed texture). Fasten off and weave in your ends.
The Ears (Make 2)
These cute little ears are worked flat (back and forth).
- Foundation: Chain 5, then add 1 chain to turn.
- Follow the Chart: Work the ear shape by following the ear chart on page 3.
- Finish: Once the chart is complete, fasten off your yarn, but make sure to leave a long tail. You’ll use this tail to sew the ears onto the hood later.