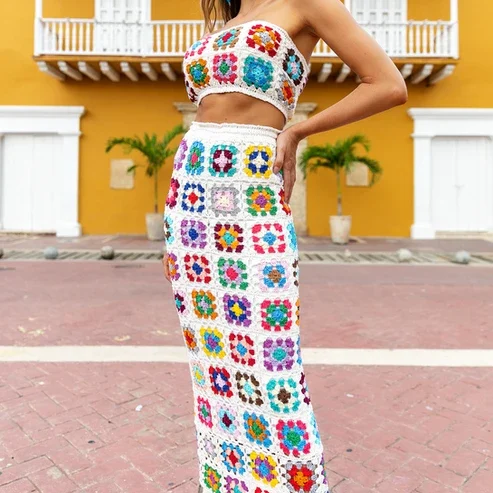
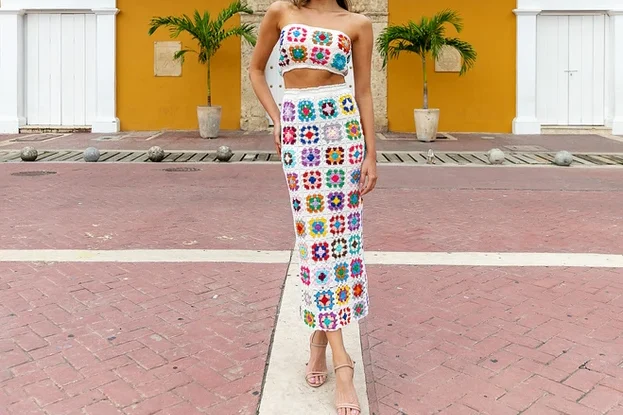
Crochet a Beautiful Granny Square Set: Top & Skirt Pattern
Hello, lovely crocheters! Are you ready to embark on a truly magical and rewarding project? Today, we’re diving into creating a gorgeous two-piece set entirely from classic granny squares. This pattern allows you to play with a rainbow of scrap yarns while constructing a timeless and trendy outfit.
Imagine wearing a handmade cropped top and a flowy skirt, each piece telling a story through every colorful square. This set is a fantastic way to use up those precious leftover bits of fingering weight yarn, transforming them into a wearable work of art. It’s a project that grows with you, square by square, making it a perfect travel companion or a relaxing evening activity.
While making 120 squares might seem like a big task, it’s absolutely achievable! The process is wonderfully portable and meditative. This pattern is perfect for a crocheter who has mastered the basics and is looking for a project that focuses on joining and assembly. The result is a breathtaking, custom-fit set that is as unique as you are.
So, let’s gather those colorful scraps and some neutral yarn to tie it all together. Get ready to create something you’ll be incredibly proud to wear!
Materials You’ll Need
- Main Yarn (Neutral): Circulo Yarns Anne (Off-white, #8176)
- 2 balls of Anne 500 or 4 balls of Anne 250
- Scrap Yarn: Fingering weight yarn in various colors for the squares.
- Crochet Hook: 2.0 mm hook (or size needed to obtain gauge)
- Notions:
- Tapestry needle
- Scissors
- Measuring tape
- Elastic: 48 inches of 4mm wide elastic AND 10 yards of round cord elastic (in off-white)
- Optional: Fabric for lining the top and skirt.
Gauge & Sizing
- Gauge: Rounds 1-4 of the square should measure 3.34 inches x 3.34 inches using a 2.0 mm hook.
- Sizing: The finished set is designed to fit a size 6. The assembly is flexible, so you can adjust the number of squares for a custom fit.
Abbreviations
- st: stitch
- ch: chain
- sl st: slip stitch
- sc: single crochet
- dc: double crochet
- FPdc: front post double crochet
- BPdc: back post double crochet
- inc: increase
- dec: decrease
- rnd: round
- rep: repeat
The Pattern
Part 1: Making the Granny Squares (Make 120)
This entire set is built from one beautiful granny square pattern. You will crochet each square in the round and close each round with a slip stitch.
Rnd 1: With your first scrap color, make a magic ring. Ch 3 (counts as first dc), work 1 dc into the ring. Ch 2, work 3 dc into the ring. Repeat from * to * two more times. Ch 2, work 1 dc into the ring. You should have four 3-dc groups separated by ch-2 spaces. Join with a sl st to the top of the beginning ch-3.
Rnd 2 & 3: Follow the logic of Chart 1 from the pattern, changing colors as you desire for a vibrant look.
Rnd 4: Switch to your main off-white yarn (Anne #8176). Continue following Chart 1 to complete the square.
Joining: Once all squares are made, join them together using single crochet (sc) stitches, as indicated in the assembly charts.
Part 2: Assembling the Cropped Top
You will use 20 squares to form the front and back panels of the top.
- Join the Squares: Refer to the “Cropped top assembly and measurement chart” in the original pattern. Join the 20 squares together in the layout shown to form the main body of the top.
- Add the Edging (Edge A): Using your off-white yarn, work Crochet Edge A (Rnds 1 & 2 from Chart 2) around both the top and bottom openings of the joined top.
- Insert Elastic: Using a tapestry needle, carefully weave the round cord elastic through the stitches of Rnds 1 & 2 of both the top and bottom edges. Pull gently to create a snug but comfortable gather. Secure the ends of the elastic firmly.
Part 3: Assembling the Skirt
You will use the remaining 100 squares to form the skirt.
- Join the Squares: Refer to the “Skirt assembly and measurement chart” in the original pattern. Join the 100 squares together in the layout shown.
- Add the Waistband (Edge B): Using your off-white yarn, work Crochet Edge B (Rnds 1-4 from Chart 3) around the top of the joined skirt to create a waistband.
- Attach Wide Elastic: Cut the 4mm wide elastic into two strands, each 23.75 inches long. Using a sewing machine, stitch the elastic directly onto the wrong side of the crochet waistband. This will provide structure and a secure fit.
Part 4: Finishing & Lining (Optional)
- Weave in All Ends: Take your time to neatly weave in all yarn ends for a clean finish.
- Lining: For modesty and comfort, you can create fabric linings. Use your finished crochet top and skirt as templates to cut and sew a simple strapless top and a slip to wear underneath.
Helpful Tips for Success
- Consistency is Key: Try to maintain consistent tension throughout all 120 squares so they are all the same size and assemble evenly.
- Block Your Squares: Lightly blocking each square before joining can make a huge difference. It evens out your stitches and makes the assembly process much smoother.
- Organize Your Layout: Before joining, lay out all your squares on a large floor space. Play with the color arrangement until you are thrilled with the overall look!
- Take Breaks: A project of this size is a marathon, not a sprint. Work on a few squares at a time to avoid burnout.
Congratulations on creating a truly spectacular handmade wardrobe staple! This beautiful set is a testament to your patience and skill. We hope you feel incredible wearing your stunning new crochet creation.