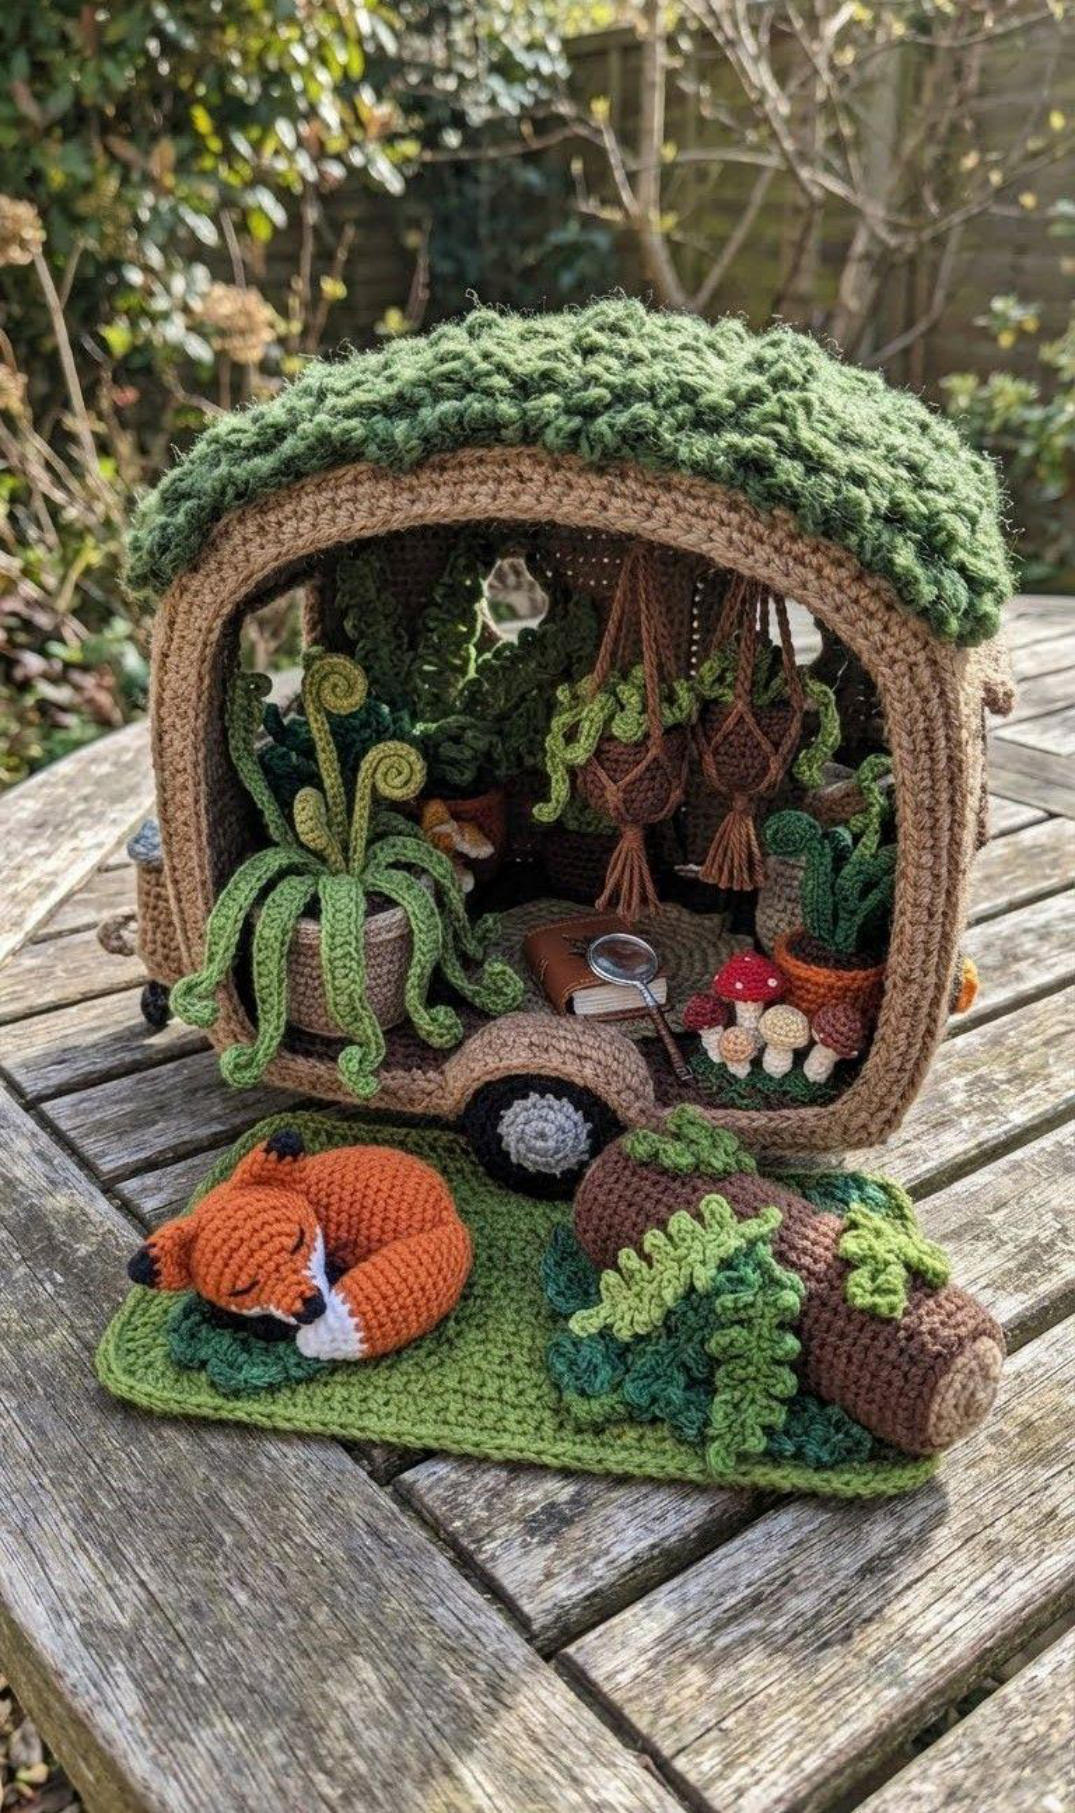
The Fern Forest Cabin Crochet Project
Part 1: The Cabin Structure (The 3-Layer Sandwich Method)
This method (Yarn – Plastic Canvas – Yarn) is crucial for a flat, rigid caravan shell. Use your 2.5mm hook for all structural components.
The Floor Base
Create two identical panels using Oak Brown yarn.
- Row 1: Chain 26. Single crochet in the 2nd chain from the hook and across the row. (25 stitches)
- Rows 2-40: Single crochet across each row. This will form a rectangle approximately 4 inches x 6.5 inches.
- Fasten off Panel 1. Keep the yarn attached to Panel 2 for assembly.
Assembly: Cut a piece of plastic canvas to precisely match the size of your crocheted panels. Sandwich the plastic canvas between the two crocheted panels. Single crochet around the entire perimeter, working through both yarn layers to securely seal the plastic canvas inside.
The Oak Walls (U-Shaped)
This single piece will form the left wall, the roof, and the right wall of your caravan, designed to mimic vertical wooden planks.
Panel A: Exterior (Oak Brown)
- Row 1: Chain 91. This length is designed to cover the Left Wall + Roof + Right Wall. Single crochet across. (90 stitches)
- Rows 2-35: Work in the Back Loop Only (BLO) for every row. This technique creates subtle horizontal ridges that, when the wall is positioned vertically, will beautifully resemble vertical wooden siding.
- Window Cutouts: Strategically create square window openings on the side wall sections by chaining 10 stitches and skipping 10 stitches in the corresponding row.
- Fasten off.
Panel B: Interior (Oak Brown or Beige)
- Use Oak Brown for a cohesive, rustic interior look, or opt for Beige for a brighter contrast.
- Work in normal single crochet (no BLO needed for the interior panel).
- Ensure this panel matches the exact dimensions and window cutout placements of Panel A.
Assembly:
- Cut a plastic canvas strip with corresponding window holes.
- Carefully sandwich the plastic canvas between Panel A (exterior) and Panel B (interior).
- Join: Using Oak Brown yarn, single crochet around the entire perimeter through both yarn layers, effectively encasing the plastic canvas. Be sure to also single crochet around the inside edges of the window frames for a neat finish.
- Shape: Gently bend the assembled wall piece into a U-shape arch to form the caravan structure. Sew the bottom edges of this U-shaped piece securely to the Floor Base.
The Moss Roof Overlay
Create a thick, dark green, textured mossy roof for your caravan.
- Base: With Dark Forest Green yarn, chain the width of your caravan’s roof section. Single crochet across this chain.
- Texture Rows: Work alternating rows to build texture.
- Row 1: *Single crochet, Bobble Stitch (3-dc cluster), Single crochet* repeat across the row.
- Row 2: Single crochet across the row.
Repeat these two rows until your piece is large enough to completely cover the roof section of the caravan.
- Assembly: Securely sew or glue this textured “blanket” onto the top exterior of your caravan. Gently pull at the bobbles to enhance their fuzzy, moss-like appearance.
Part 2: The Fernery (Interior Maximalism)
For the delicate plant life, it’s IMPORTANT to switch to your 1.5mm hook for precision.
Potted Ferns (Make 3-4 Varieties)
Each fern starts with a small pot.
- Pot: Using Terracotta or Dark Brown yarn, begin with a Magic Ring of 5 single crochets. Increase to 10 single crochets in the next round. Single crochet in the Back Loop Only (BLO) around for one round. Then, single crochet for 3 more rounds. Fill the pot with a small amount of brown yarn or fiberfill to create a soil base.
Fern Type A: The Drooping Fern (Boston Fern)
- Use Dark Green yarn. Chain 15.
- Leaflets: *Slip stitch in the next chain, Chain 2, Slip stitch in the same chain* repeat this sequence all the way down the initial chain. This technique creates a beautiful, jagged, leafy vine.
- Make 6-8 of these fronds. Glue them into a pot, arranging them so they gracefully spill over the sides, mimicking a lush Boston fern.
Fern Type B: The Fiddlehead (Spiral)
- Use Lime Green yarn. Chain 12.
- Spiral: Make 2 single crochets in each of the first 5 chains. This will cause the yarn to curl tightly, forming the fiddlehead. Slip stitch down the remaining chains to create the stem.
- Detail: Insert a tiny piece of floral wire into the stem part to allow the fiddlehead to stand upright. Group 3-4 spirals in a single pot for a charming cluster.
Macrame Hanging Baskets
- Basket: With Beige yarn, start with a Magic Ring of 6 single crochets. Increase to 12 single crochets in the next round. Single crochet for 2 more rounds to form the basket shape.
- Hangers: Chain 15. Attach one end to the rim of the basket. Make 3 such chains, evenly spaced around the basket’s rim, and then join them together at the top to create a hanging loop.
- Plant: Glue a “Drooping Fern” (Fern Type A) inside the basket. These will be hung from the interior ceiling of your caravan.
Interior Mushrooms
- Stem: Using White yarn, chain 3. Single crochet back across the chain.
- Cap: With Red or Brown yarn, start with a Magic Ring of 4 single crochets. Increase to 8 single crochets in the next round. Glue the cap securely to the top of the stem.
- Placement: Glue these tiny mushrooms randomly on the cabin’s floorboards or nestled amongst the potted ferns.
Part 3: The Botanist’s Tools
These delicate accessories also require your 1.5mm hook.
Leather Botany Book
- Cover: With Leather Brown yarn, chain 6. Single crochet for 4 rows. This forms the book’s cover.
- Pages: With White yarn, chain 5. Single crochet for 3 rows. Fold this piece in half to resemble book pages.
- Assembly: Glue the “pages” inside the “cover.”
- Detail: For an extra touch, embroider a tiny green leaf onto the front cover of the book.
Magnifying Glass
- Lens Frame: Using Black or Grey yarn, chain 12 and then join with a slip stitch to form a ring. Single crochet around this ring to thicken it, creating the frame.
- Glass (Optional): For a realistic effect, you can glue a small, clear piece of tape or plastic packaging across the ring.
- Handle: With Black yarn, chain 6. Slip stitch back down the chain. Insert a tiny piece of floral wire inside the handle to keep it straight and firm. Glue the handle securely to the lens frame.
Part 4: The Exterior Scene
For the larger exterior elements, revert to your 2.5mm hook, unless otherwise specified.
The Sleeping Fox
Craft a cozy sleeping fox using Rust Orange and White yarn.
- Head (Orange): Start with a Magic Ring of 6 single crochets. Increase to 12 single crochets. Single crochet for 2 rows. Decrease to 6 single crochets to shape the head.
- Body (Orange): Start with a Magic Ring of 6 single crochets. Increase to 12 single crochets. Then, (1 single crochet, increase) repeat around to 18 stitches. Single crochet for 5 rows. Decrease until closed, forming an oval body shape.
- Tail: Start with White yarn in a Magic Ring of 4 single crochets. Increase to 8 single crochets. Change to Orange yarn. Single crochet for 5 rows. Decrease to 4 single crochets.
- Ears (Orange): Chain 2. Single crochet in the 2nd chain from the hook. Make two and sew them to the head.
- Assembly: Sew the head to the body in a tucked position, as if the fox is sleeping. Sew the tail so it gently wraps around the body.
- Face: Embroider two delicate curved lines (like a ‘U’ shape) for sleeping eyes and a small black nose.
The Moss Mat
Create an inviting, organic moss mat for the entrance of the caravan using various shades of Green yarn.
- Shape: Crochet a freeform organic shape. Start with a rectangle and then work random increases on the edges to create an uneven, natural outline.
- Texture: Enhance the mossy look by surface slip stitching or using the Loop Stitch technique in random patches across the mat to mimic uneven moss growth.
The Wool Log with Ferns
- Log (Oak Brown): Begin with a Magic Ring of 6 single crochets. Increase to 12 single crochets. Then, (1 single crochet, increase) repeat around to 18 stitches. Single crochet in the Back Loop Only (BLO) around. Single crochet for 15 rows. Single crochet BLO around again. Decrease until closed.
- Bark Texture: Use Dark Brown yarn to surface slip stitch jagged horizontal lines around the log, mimicking natural bark.
- Ferns: Using your 1.5mm hook, make tiny green fern leaves. Chain 5, then create picot stitches along the chain. Glue these miniature ferns so they appear to be growing out of the log.
Wheels
- Tire (Black): Start with a Magic Ring of 6 single crochets. Increase to 12 single crochets. Then, (1 single crochet, increase) repeat around to 18 stitches. Single crochet for 2 rounds.
- Hubcap (Grey): Start with a Magic Ring of 6 single crochets.
- Assembly: Sew the hubcap onto the tire. Then, sew the completed wheels securely to the sides of the caravan.
Assembly & Finishing Your Woodland Retreat
Bringing all the elements together is the final, rewarding step in creating your “Fern” Forest Cabin. Pay close attention to these finishing touches to ensure a stunning display.
Final Assembly Steps:
- Structural Check: Double-check that the U-shaped caravan shell is firmly and securely attached to the floor base. Remember, the textured moss roof adds significant weight, so the plastic canvas reinforced walls must be rigid and well-connected to support it.
- Interior Landscaping:
- Carefully glue the Potted Ferns into place, arranging them in the corners and along the back wall of the caravan. Vary their heights—place the Fiddleheads taller and the Boston ferns lower—to create a dynamic, naturalistic look.
- Hang the Macrame Baskets from the interior ceiling. You can achieve this by sewing them securely through the interior roof panel.
- Thoughtfully position the miniature Leather Botany Book and Magnifying Glass on the floor or on a small crocheted stack of “books” within the caravan.
- “Plant” the tiny Interior Mushrooms by gluing them randomly onto the cabin’s floorboards, blurring the line between inside and out.
- Exterior Scene:
- Place the Moss Mat directly in front of the caravan’s door, inviting visitors into this enchanted space.
- Position the charming Sleeping Fox gently on the moss mat, as if napping peacefully.
- Arrange the Wool Log with Ferns nearby to complete the woodland setting, adding to the natural ambiance.
Congratulations! You have successfully created the “Fern” Forest Cabin, a peaceful and intricate woodland retreat. This project is a beautiful tribute to the quiet beauty of nature, perfect for any fairycore collection or as a standalone piece of enchanting crochet art.
Tips for Beginners & Complex Aspects
The “Fern” Forest Cabin project involves some advanced techniques and attention to detail. Here are a few tips, especially if you’re new to amigurumi or intricate crochet projects:
- Mastering the “3-Layer Sandwich Method”: This technique is fundamental for the structural integrity of your caravan. Practice working a single crochet around two panels with plastic canvas in between on a scrap piece before tackling the main cabin walls. Ensure your stitches are tight and even to fully enclose the canvas.
- Hook Size Matters: Pay very close attention to the hook size changes. Using the 2.5mm hook for the structure and the 1.5mm hook for delicate items like ferns and tools is critical for achieving the correct scale and detail. A smaller hook for plants allows for tighter stitches that mimic delicate foliage.
- Working in BLO for Texture: The Back Loop Only (BLO) technique used for the exterior oak walls is what gives them a vertical plank look. Practice BLO on a small swatch to get comfortable with how it creates horizontal ridges.
- Floral Wire is Your Friend: Don’t skip the floral wire for the fiddlehead stems and magnifying glass handle. It provides necessary support and allows for subtle posing, bringing your miniature elements to life.
- Patience with Small Details: The tiny ferns, mushrooms, book, and magnifying glass are intricate. Take your time, use good lighting, and don’t be afraid to take breaks. These small details truly elevate the overall piece.
- Invisible Decrease (Dec): While any decrease works, using an invisible decrease for amigurumi creates a smoother, less noticeable reduction in stitches, which is ideal for the fox’s body and head.
- Surface Slip Stitch: This technique for the moss mat and log bark adds incredible texture. It’s essentially crocheting on top of an existing piece. Experiment with different yarn weights for this to see how it affects the texture.
- Glue Wisely: Fabric glue or hot glue is essential for assembling the delicate interior elements. Use small amounts to avoid excess and ensure a clean finish.
Embrace the challenge, and enjoy the creative process of bringing this magical woodland cabin to life