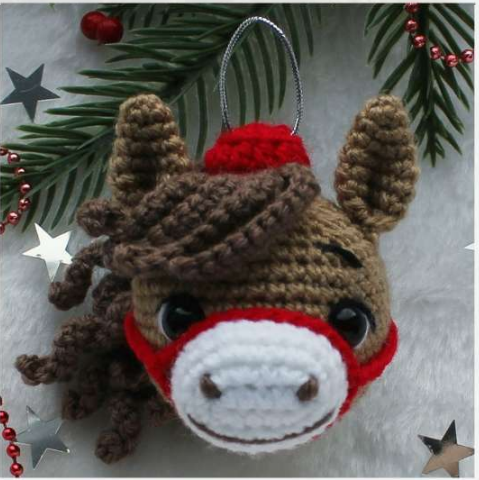
The Cozy Little Horse Ball: A Free Crochet Amigurumi Pattern
Hello, lovely makers! Have you ever seen something so sweet, so tiny, and so full of whimsy that you just had to drop everything and make it? That’s exactly how I felt when I first imagined this little friend. Welcome to a project that’s pure, cozy magic: The Cozy Little Horse Ball.
This isn’t just an amigurumi; it’s a miniature bundle of charm, designed to fit right in the palm of your hand. With its perky ears, playful fringe, and gentle eyes, this little horse ball is here to bring a smile to your face and a touch of handmade warmth to any space.
Inspired by the joy of simple, whimsical creatures, this pattern is perfect for anyone looking for a quick, satisfying crochet project. It’s absolutely ideal for using up small scraps of that precious “special” yarn you’ve been saving. Whether you’re a beginner eager to practice shaping and assembly, or a seasoned pro looking for a delightful one-evening make, this pattern is for you.
And let’s talk about gifting! This little horse ball makes the most adorable gift. Tie a loop to the top, and it becomes a whimsical ornament for a baby’s mobile, a keychain for a friend who loves horses, or a lucky charm to tuck into a stocking or gift bag. The pattern notes it’s ready to bring joy and luck for the New Year, but honestly, its cheerful vibe is perfect for any day that needs a little brightening.
So, grab your favorite dk or sport weight yarn, your trusty hook, and let’s pour a cup of something warm. We’re about to create some tiny, unforgettable magic, one little stitch at a time. Don’t worry, I’ll be with you for every single step.
Your Cozy Horse Ball Toolkit: Materials
Gathering your supplies is the first step to a happy crochet session! Here’s everything you’ll need:
- Yarn: “Detskaya Novinka” or any similar DK/Sport Weight yarn (approx. 200m/50g) in the following colors:
- Main Color (MC): Dark Beige
- White
- Cappuccino (a medium brown)
- Red (for the bridle & hat rim)
- Crochet Hook: Size 1.75 mm
- Notions:
- Toy stuffing
- Yarn/ tapestry needle (with a blunt tip and large eye)
- Decorative cord or “Iris” thread for the hanging loop
- 9mm Safety Eyes
- Stitch markers or sewing pins
- Scissors
Finished Size: Your little horse ball will be approximately 5.5 cm (about 2.2 inches) in diameter, not including the adorable fringe and ears!
Let’s Speak the Same Language: Crochet Abbreviations
Before we begin, here’s a quick cheat sheet for the terms we’ll use. Keep this handy!
- MR/Magic Ring
- ch: chain
- sl st: slip stitch
- sc: single crochet
- hdc: half double crochet
- inc: increase (2 sc in the same stitch)
- dec: decrease (sc2tog – single crochet two stitches together)
- ( ) x times: Repeat the instructions inside the parentheses the number of times indicated.
Pattern Note: The number at the end of each round indicates your total stitch count. This is your best friend for keeping on track!
Part 1: Creating the Sweet Little Head (The Ball)
We start with the foundation—the cute, round head. We’ll use our Main Color (Dark Beige).
Using Dark Beige:
- Round 1: 6 sc into a Magic Ring. (6)
- Round 2: Inc in each stitch around. (12)
- Round 3: (1 sc, inc) repeat 6 times. (18)
- Round 4: (2 sc, inc) repeat 6 times. (24)
- Round 5: (3 sc, inc) repeat 6 times. (30)
- Round 6: (4 sc, inc) repeat 6 times. (36)
- Round 7: (5 sc, inc) repeat 6 times. (42)
Time for Eyes! Between Rounds 7 and 8, attach the 9mm safety eyes. Place them in Round 12 (you’ll be working a few straight rounds first to reach it). The eyes should be spaced 9 sc apart.
- Rounds 8-15: 1 sc in each stitch around. Work even for 8 rounds. (42)
- Round 16: (5 sc, dec) repeat 6 times. (36)
- Round 17: (4 sc, dec) repeat 6 times. (30)
- Round 18: (3 sc, dec) repeat 6 times. (24)
- Round 19: (2 sc, dec) repeat 6 times. (18)
Stuffing Time! Now, firmly stuff the head with toy stuffing. Get it nice and round.
- Round 20: (1 sc, dec) repeat 6 times. (12)
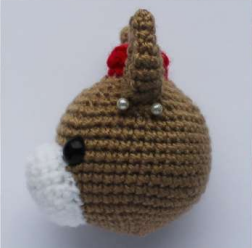
Color Change (to Red or White for the little “hat”):
14. Round 21: This round is worked in the front loops only (FLO). 1 sc in each stitch around, join with a sl st. (12)
15. Round 22: Ch 2 (counts as first hdc), 1 hdc in each stitch around, join with a sl st to the top of the beginning ch-2. (12 hdc)
16. Lightly stuff the very top section above the color change.
17. Round 23: Dec 6 times around. (6)
18. Fasten off, leaving a tail. Thread the tail through the front loops of the remaining 6 stitches, pull tight to close, and weave in the end securely.

Part 2: Adding Character: The Face & Ears
The Sweet Face Patch (in White)
This oval snout gives our horse its adorable expression.
- Ch 4.
- Row 1: Starting in the 2nd ch from the hook: inc, 2 sc, work 4 sc in the last chain. Now working along the bottom of the foundation chain: 2 sc, inc. Join with a sl st to the first sc. (12)
- Row 2: Ch 1, (1 sc, inc) repeat 6 times. (18)
- Row 3: Ch 1, (2 sc, inc) repeat 6 times. (24)
- Rows 4-5: Ch 1, 1 sc in each stitch around. (24 for 2 rows)
- Fasten off, leaving a long tail for sewing. Do not stuff yet.
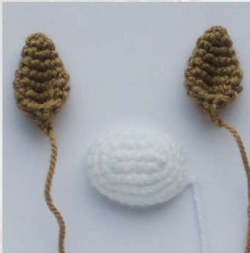
The Perky Ears (Make 2 in Dark Beige)
- Round 1: 6 sc in a MR. (6)
- Round 2: 1 sc in each stitch. (6)
- Round 3: (1 sc, inc) repeat 3 times. (9)
- Round 4: (2 sc, inc) repeat 3 times. (12)
- Round 5: (5 sc, inc) repeat 2 times. (14)
- Rounds 6-7: 1 sc in each stitch. (14 for 2 rounds)
Shaping the Ear:
7. Round 8: Work 7 sc, but work them through both layers of the ear, pairing up stitches to flatten it (e.g., stitch 1 with stitch 14, stitch 2 with stitch 13, etc.).
8. Round 9: Work 3 sc through both layers.
9. Fasten off, leaving a long tail for sewing.
Part 3: Bringing It All Together: Assembly & Embroidery
This is where the magic happens and your horse gets its personality!
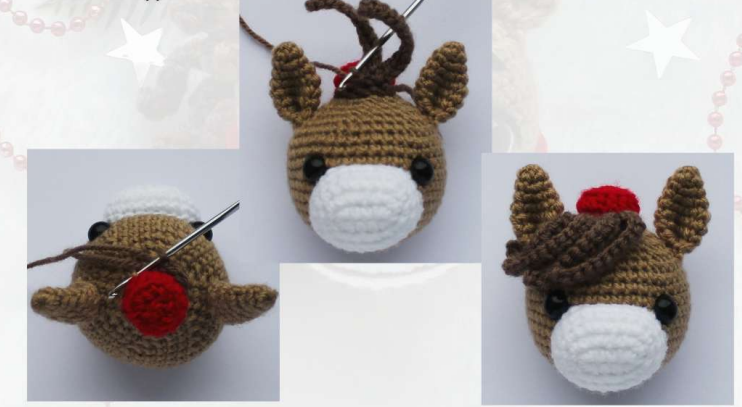
- Attach the Face Patch: Position the white oval on the head. The top should sit level with the middle of the eyes, and the bottom should end between Rounds 5 and 6 of the head. Pin it in place first. As you sew it on using the long tail, lightly stuff the snout to give it a gentle puff.
- Attach the Ears: Pin the ears in place, attaching them by the bottom 3 sc of each ear. Sew them on securely over 2 rows. For perky ears, sew the inner side of the ear to the head one row higher, which will make them stand up cheerfully.
- Create the Fringe & Mane: (See details in sections below!).
- Embroider the Face:
- With white yarn, embroider small “whites” of the eyes around the outer sides of the safety eyes.
- With black or dark brown, outline the top eyelid line and embroider small eyebrows above.
- With dark brown (Cappuccino), embroider two little dots for nostrils and a sweet, simple smile on the white snout.
- Add the Bridle (Optional): See instructions below.
- Attach the Loop: Sew your decorative cord or thread securely to the very top center of the head to create a hanging loop.
Part 4: The Playful Details: Fringe, Mane & Bridle
The Side-Swept Fringe
With dark brown, we’ll work directly onto the head, under the “hat” brim.
- Locate the 4 center stitches of the hat’s brim on the forehead. Insert your hook under the stitch posts of these 4 sc and pull up a loop. Work 1 sc in each of the 4 stitches.
- For each fringe lock: *Ch 13. Work 1 sc in the 2nd ch from hook and in each ch across (12 sc total). Sl st into the next base stitch on the head.* Repeat from * to * for all 4 base stitches.
- Gently brush out the fringe and sweep it all cutely to one side.
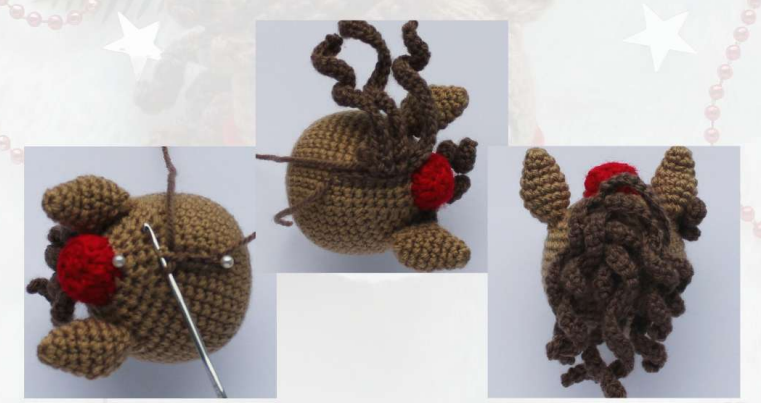
The Flowing Mane
- On the back of the head, mark a straight line down from the hat with pins.
- With dark brown, work 7 sl sts along this line. Leave a yarn tail hanging at the start.
- Over each sl st, make a long lock: *Ch 25. Work 1 sc in the 2nd ch from hook and in each ch across (24 sc). Sl st into the next base sl st.* Repeat 6 more times (7 locks total). Leave a yarn tail at the end.
- Tie the two tails together in a knot inside the mane, trim, and hide the ends inside the head with your hook. Fluff and arrange the mane locks.
The Tiny Bridle (Optional)
Using Red or Dark Brown yarn:
- Ch 28, join with a sl st to the first ch to form a ring. This ring should fit snugly around the horse’s nose/muzzle.
- From each side of the ring, chain 18-20 stitches. Fasten off.
- Bring both chains to the back, underneath the bottom of the mane. Tie the ends together, trim, and hide the tails inside the head.
You Did It!
And there you have it! Your very own Cozy Little Horse Ball, a tiny testament to your skills and a huge source of handmade joy. Give it a gentle squeeze, fluff its mane one more time, and find it the perfect spot—on your keys, your bag, your tree, or gifted to someone who needs a little luck and a lot of smiles.