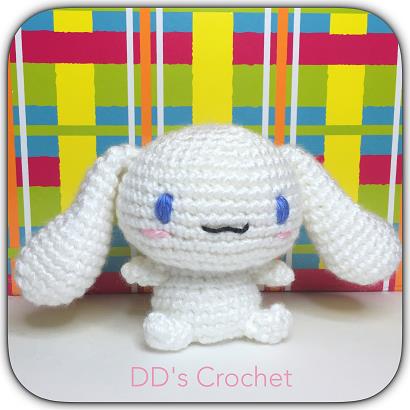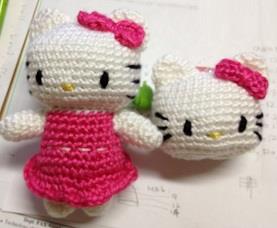
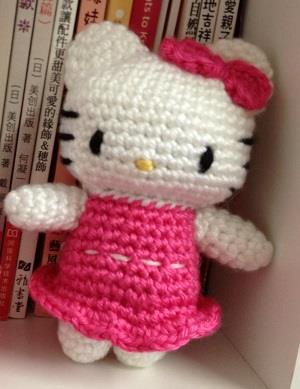
Sweet & Simple Hello Kitty Amigurumi
Hello, crochet lovers! Today we are making a true icon of the “kawaii” world. Get your hooks ready for this darling Hello Kitty Amigurumi!
There is something so timeless about Hello Kitty. Whether you grew up with her or are making her for a little one in your life, this plushie is sure to bring a smile to anyone’s face. This version stands approximately 5 inches tall, making it a wonderful size for hugging or displaying on a shelf.
This pattern by DD’s Crochet uses soft, worsted yarn to create a classic look. We’ll be working through the head, body, and those signature pointy ears, finishing it all off with her famous pink bow. It’s a great project for those who are comfortable with the basics and want to practice shaping and assembly.
Let’s grab a cup of cocoa and start stitching this sweet little friend
🧶 Materials & Tools
Gather these supplies to begin your Kitty:
- Yarn: Worsted weight yarn (the designer recommends Simply Soft) in White, Pink, and Yellow.
- Hook: Size E (3.5mm) crochet hook.
- Filling: Polyester fiber filling.
- Tools: Tapestry needle and a stitch marker.
📝 Abbreviations & Terms
- ch: Chain
- st: Stitch
- sc: Single Crochet
- sl st: Slip Stitch
- inc: Increase (2 sc in the same stitch)
- dec: Decrease (1 sc over two stitches)
- fo: Fasten off
🎀 The Hello Kitty Pattern
The Head
Using White yarn Unlike a standard magic ring, we start with a foundation chain to give Kitty her signature oval head shape.
- Round 1: Chain 5 + 1 (6 chains total). Starting from the 5th chain from hook: 1 sc in next 4 chains, 3 sc in the last chain. Turn to work on the bottom of the chain: 1 sc in next 3 chains, 2 sc in the last chain. Sl st to the first sc and ch 1. (12 sts)
- Round 2: Inc in first st, 1 sc in next 3 sts, inc in next 3 sts, 1 sc in next 3 sts, inc in last 2 sts. (18 sts)
- Round 3: Inc, 1 sc in next 4 sts, inc, 1 sc, inc, 1 sc, inc, 1 sc in next 4 sts, inc, 1 sc, inc, 1 sc. (24 sts)
- Round 4: Inc, 1 sc in next 5 sts, inc, 1 sc in next 2 sts, inc, 1 sc in next 2 sts, inc, 1 sc in next 5 sts, inc, 1 sc in next 2 sts, inc, 1 sc in next 2 sts. (30 sts)
- Round 5: Inc, 1 sc in next 6 sts, inc, 1 sc in next 3 sts, inc, 1 sc in next 3 sts, inc, 1 sc in next 6 sts, inc, 1 sc in next 3 sts, inc, 1 sc in next 3 sts. (36 sts)
- Round 6: Inc, 1 sc in next 7 sts, inc, 1 sc in next 4 sts, inc, 1 sc in next 4 sts, inc, 1 sc in next 7 sts, inc, 1 sc in next 4 sts, inc, 1 sc in next 4 sts. (42 sts)
- Rounds 7–13: Sc in each stitch around. (42 sts)
- Round 14: 5 sc, dec. Repeat 6 times. (36 sts)
- Round 15: 4 sc, dec. Repeat 6 times. (30 sts)
- Round 16: 3 sc, dec. Repeat 6 times. (24 sts)
- Round 17: 2 sc, dec. Repeat 6 times. (18 sts)
- Finish: Stuff firmly and fasten off.
The Body
Using Pink yarn
- Round 1: MR, 6 sc. (6 sts)
- Round 2: Inc in each st. (12 sts)
- Round 3: 1 sc, inc. Repeat 6 times. (18 sts)
- Round 4: 2 sc, inc. Repeat 6 times. (24 sts)
- Round 5: 3 sc, inc. Repeat 6 times. (30 sts)
- Rounds 6–10: Sc in each st around. (30 sts)
- Round 11: 3 sc, dec. Repeat 6 times. (24 sts)
- Round 12: Sc in each st around. (24 sts)
- Round 13: 2 sc, dec. Repeat 6 times. (18 sts)
- Finish: Fasten off and leave a long tail for sewing.
The Ears (Make 2)
Using White yarn
- Round 1: MR, 4 sc. (4 sts)
- Round 2: 1 sc, inc. Repeat 2 times. (6 sts)
- Round 3: 1 sc, inc. Repeat 3 times. (9 sts)
- Round 4: 2 sc, inc. Repeat 3 times. (12 sts)
- Finish: Fasten off and leave a long tail for sewing.
The Arms (Make 2)
Using White yarn
- Round 1: MR, 6 sc. (6 sts)
- Rounds 2–6: Sc in each st. (6 sts)
- Finish: Fasten off with a long tail to sew to the sides of the body.
The Feet (Make 2)
Using White yarn
- Round 1: MR, 6 sc. (6 sts)
- Round 2: 1 sc in next 2 sts, inc, 1 sc in next 2 sts, inc. (8 sts)
- Rounds 3–6: Sc in each st around. (8 sts)
- Finish: Fasten off with a long tail to sew to the bottom of the body.
The Pink Bow
Using Pink yarn
- Round 1: Chain 6 + 1. 1 sc in next 5 chains, 4 sc in the next chain. Turn to work on the bottom of the chain: 1 sc in next 4 chains, 3 sc in the last chain. Sl st and ch 1.
- Round 2: Inc, 1 sc in next 4 sts, inc in next 4 sts, 1 sc in next 4 sts, inc in next 3 sts.
- Finish: Use the remaining yarn tail to tie around the middle of the piece to create the bow shape.
✨ Assembly & Finishing Touches
- Head & Body: Stuff the body and sew the head to the body.
- Ears: Sew the ears to the top of the head.
- Limbs: Attach the arms to the sides and the feet to the bottom of the body.
- Face: Use black yarn or floss to embroider two oval eyes and three whiskers on each side of the face. Use yellow yarn to embroider a small oval nose in the center.
- Bow: Sew the pink bow near one of the ears.
Enjoy your new handmade Hello Kitty