Sweet Christmas Angel: A Free Crochet Pattern for a Heavenly Holiday Decoration
Hello, dear crochet friends! The holiday season is just around the corner, and what better way to celebrate than by creating something truly heavenly? Today, I’m absolutely delighted to share this exquisite Sweet Christmas Angel pattern from the talented designer Elke Eder. With her delicate wings, flowing dress, and sweet little halo, this angel is sure to become a cherished part of your holiday traditions for years to come.
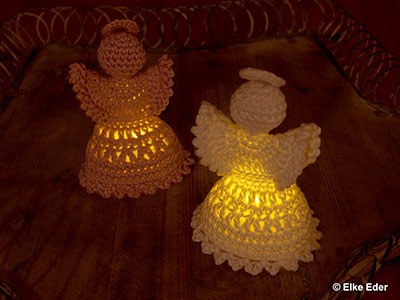
There’s something so magical about handmade Christmas decorations, don’t you think? Each stitch carries a little piece of our love and care, making our homes feel extra special during the most wonderful time of the year. This angel is versatile too—she can perch on top of a gift, hang from the tree as an ornament, sit on a mantelpiece, or even become the centerpiece of a holiday tablescape. And here’s a little secret: she’s designed to sit safely over an LED tealight, casting the most beautiful, warm glow!
The pattern is written with clear, detailed instructions and includes helpful photos and a crochet diagram to guide you through every step. Even if you’re new to some of the techniques, Elke has included basic instruction pages that walk you through the magic ring, spiral crochet, and all the stitches you’ll need. The result is a stunning 9-12 cm angel (depending on your yarn choice) that looks far more complicated than it actually is!
So brew yourself a cup of hot cocoa, put on your favorite holiday music, and let’s create a little angel magic together. This project works up quickly and makes the most thoughtful handmade gift for teachers, neighbors, or anyone who needs a little angel in their life.
Materials & Tools
Yarn Options (choose one):
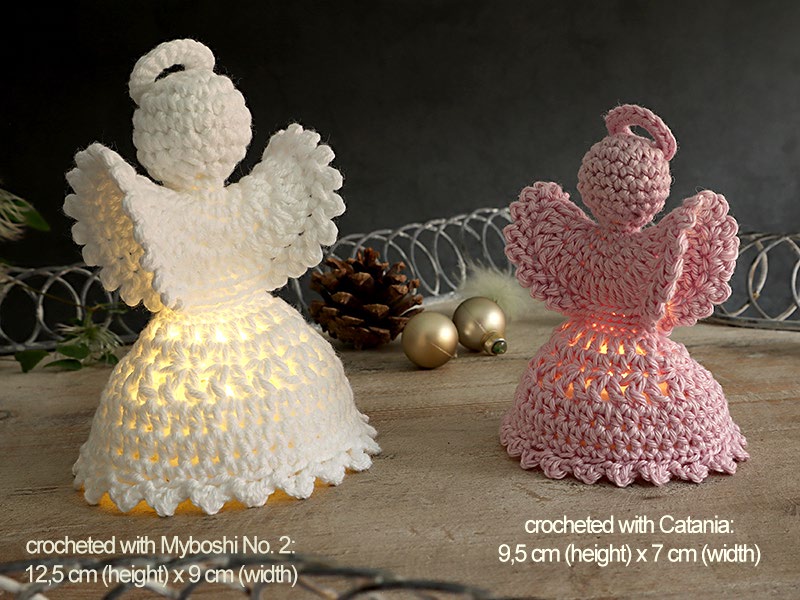
- Option 1: Schachenmayr Catania (125 m / 50 g), Sport weight (5 ply / Fine #2). Approximately 10 grams per angel.
- Option 2: Myboshi No. 2 (100 m / 50 g), Worsted weight. Approximately 16 grams per angel.
Choose any color that speaks to you—traditional white or cream, soft pastels, or even a bold metallic for something truly special!
Hook:
- For Catania: 2.5 mm hook
- For Myboshi No. 2: 3.0 mm hook
Other Supplies:
- Sewing needle
- Stitch marker
- Small amount of fiberfill for stuffing the head
- LED tealight (for display—safety first!)
Finished Size:
- With Catania: approximately 9.5 cm tall × 7 cm wide
- With Myboshi No. 2: approximately 12.5 cm tall × 9 cm wide
Abbreviations (US Terms)
- ch: chain
- slst: slip stitch
- sc: single crochet
- hdc: half double crochet
- dc: double crochet
- picot: ch 2, 1 slst in 2nd ch from hook
- rnd: round
Let’s Start! The Sweet Christmas Angel Pattern
Head and Body
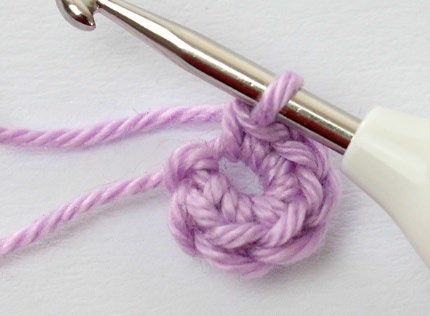
We’ll begin at the top of the head and work our way down. Rounds 1-11 are worked in a continuous spiral—use a stitch marker to keep track of your rounds!
Rnd 1: Make a magic ring, ch 1, work 6 sc into the ring. (6 sc)
Rnd 2: 2 sc in each sc around. (12 sc)
Rnd 3: [sc in next sc, 2 sc in next sc] around. (18 sc)
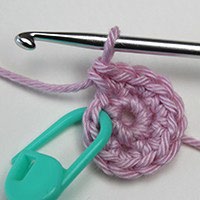
Rnds 4-6: Sc around. (18 sc) (3 rounds)
Rnd 7: Sc, crocheting every 2nd and 3rd stitch together (this means: sc in next sc, dec around). (12 sc)
Stuff the head lightly with fiberfill.
Rnd 8: Sc, crocheting every 1st and 2nd stitch together (dec around). (6 sc)
Rnd 9: Sc around. (6 sc)
Rnd 10: 2 sc in each stitch around. (12 sc)
Rnd 11: [sc in next sc, 2 sc in next sc] around. (18 sc)
You can remove your stitch marker now, as the remaining rounds will be joined.
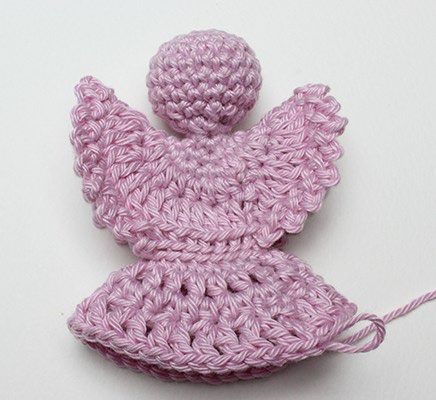
The Dress and Wings
Now we begin shaping the beautiful dress and wings of our angel. Refer to the crochet diagram on page 8 of the original pattern if you’re a visual learner!
Rnd 12: (Slst, ch 2, hdc) in first sc, (2 hdc) in next sc, hdc in next sc.
- (2 hdc) in next sc, (2 hdc) in next sc, hdc in next sc. Repeat from * 3 more times.
Hdc in next sc, (2 hdc) in next sc, hdc in last sc. (28 hdc)
Rnd 13: (Slst, ch 3—counts as first dc—and dc) in first hdc, (2 dc) in next hdc, dc in next hdc.
- (2 dc) in next hdc, (2 dc) in next hdc, dc in next hdc. Repeat from * 7 more times.
Dc in last hdc, join with slst to top of ch-3. (46 dc)
Rnd 14: This round creates the delicate picot edge! Take your time—it’s easier than it looks.
Ch 2, slst in 2nd ch from hook (= 1 picot).
- slst in next dc, 1 picot. Repeat from * 15 more times. (You should have 17 picots total.)
Working in back loops only (and crochet these slip stitches loosely), slst in next 7 dc.
Ch 2, slst in 2nd ch from hook (= 1 picot).
- slst in next dc, 1 picot. Repeat from * 15 more times. (Another 17 picots)
Working in back loops only, slst in next 6 dc.
Join with slst in slst of the last round, working in back loops only.
Rnd 15: * Ch 2, skip 17 picots, slst in next 7 slst (working in back loops only). Repeat from * one more time. (18 stitches)
Rnd 16: Ch 1, sc in back loops only around, join with slst to first sc. (18 sc)
Rnd 17: Ch 3 (counts as hdc and ch-1), * hdc in next sc, ch 1. Repeat from * 16 more times, join with slst to 2nd of ch-3. (36 stitches—18 hdc and 18 ch-1 spaces)
Rnd 18: Ch 2 (counts as first hdc), hdc in first ch-1 space.
- skip hdc, hdc in next ch-1 space. Repeat from * 6 more times.
- skip hdc, 2 hdc in next ch-1 space, skip hdc, hdc in next ch-1 space. Repeat from * 6 more times.
skip hdc, 2 hdc in next ch-1 space, skip hdc, 2 hdc in last ch-1 space, join with slst to top of ch-2. (28 hdc)
Rnd 19: Ch 4 (counts as dc and ch-1), dc in first stitch (the same stitch where the slst was made).
- skip hdc, (dc, ch 1, dc) in next hdc. Repeat from * 12 more times,
join with slst to top of ch-3.
Rnd 20: Ch 2 (counts as first hdc), hdc in first ch-1 space,
- hdc in next 2 dc, hdc in next ch-1 space. Repeat from * 12 more times,
hdc in last dc, join with slst to top of ch-2. (42 hdc)
Rnd 21: Ch 2 (counts as first hdc), hdc around, join with slst to top of ch-2. (42 hdc)
Rnd 22: Ch 1, sc around, join with slst to first sc. (42 sc)
Rnd 23: * Ch 3, slst in 2nd ch from hook, ch 1, skip sc, slst in next sc. Repeat from * 20 more times.
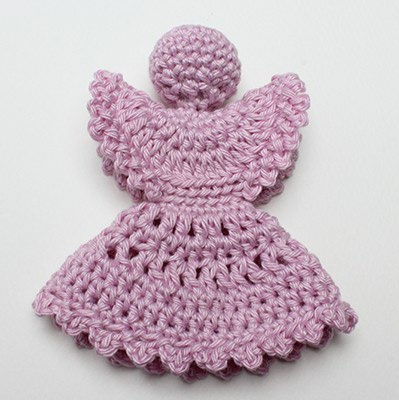
Fasten off. Weave in both the beginning and ending tails securely.
The Halo
Our angel needs her heavenly halo!
Make a magic ring. Into the ring, ch 1 and work 18 sc.
Pull the ring closed gently—you want the diameter to be about 2 cm (not too tight!).
Fasten off, leaving tails for sewing.
Sew the halo to the back of the angel’s head. Position it so it sits just above her head like a glowing circle.
Assembly and Finishing
- Weave in all ends carefully. Take your time to make sure everything is secure and tidy.
- Shape the dress gently with your fingers, encouraging the ruffles and wings to spread nicely.
- Add the halo as described above, sewing it securely to the back of the head.
Displaying Your Angel
This angel is designed to be displayed with an LED tealight underneath her skirt! The open base allows the warm glow to shine through, creating the most magical effect.
Important Safety Note: Please use only LED tealights as illuminants. Never use a real flame near your crochet creation!
Place her on a mantelpiece, shelf, or holiday table where the light can shine through. She also makes a beautiful gift topper or tree ornament if you add a small hanging loop to the top of her head.
Tips for Success
- Read Through First: Take a moment to read the entire pattern before starting. This will help you understand how the pieces come together.
- Use a Stitch Marker: For rounds 1-11 (worked in a spiral), a stitch marker is essential! Mark the first stitch of each round so you never lose your place.
- Work Loosely for Rnd 14: When working the slip stitches in back loops only on Round 14, keep them loose. This makes it much easier to work the following round.
- Count Your Picots: Round 14 calls for 17 picots in each section. Counting as you go will save you from having to frog later!
- Blocking: A light blocking (gently steaming or spraying with water and pinning into shape) can help the dress layers lie beautifully.
- Color Choices: While traditional white is lovely, try metallics for sparkle, pastels for a sweet look, or even variegated yarns for something truly unique!
A Final Word from Our Cozy Corner
There you have it—your very own Sweet Christmas Angel, ready to bring light and joy to your holiday celebrations! Isn’t she lovely? Every time I make one of these angels, I’m struck by how such a small project can hold so much beauty and meaning.
These angels make the most thoughtful handmade gifts. Imagine tucking one into a Christmas card for a faraway friend, attaching one to a special package, or giving a set to a teacher or neighbor. Each one is a little piece of your heart, crafted with love and care.
I hope this pattern brings you as much joy as it’s brought me. Remember, the true magic of handmade decorations isn’t just in how they look—it’s in the love we stitch into every loop and the memories we create while making them.