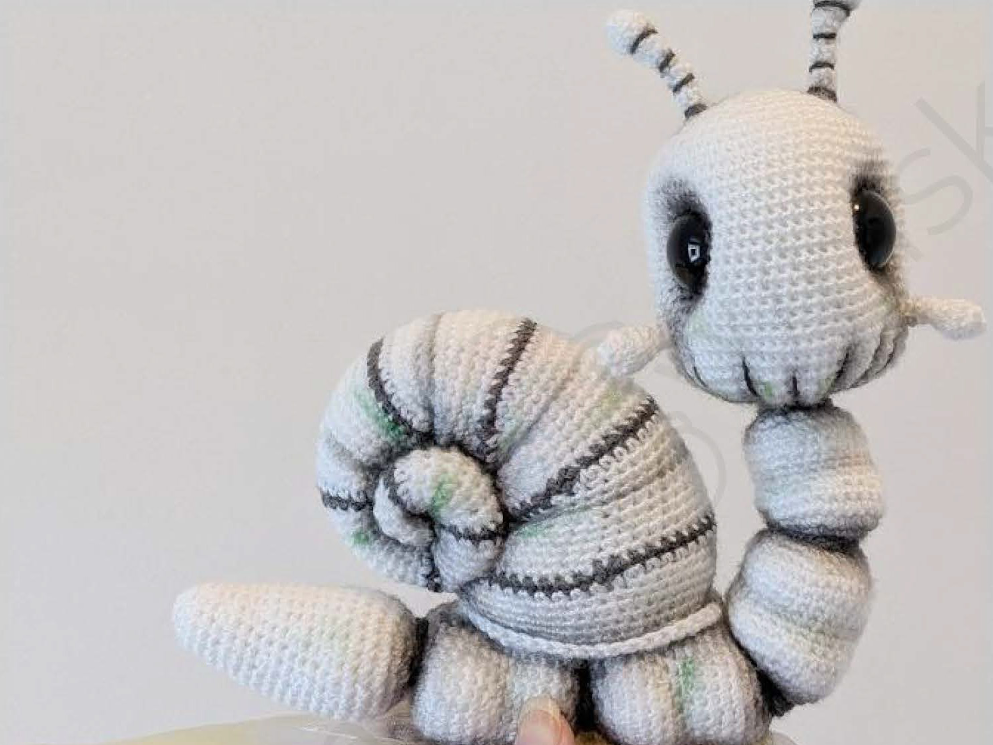
Spare Rib The Skeleton Snail Crochet Pattern
Materials
Yarn & Supplies
- White DK yarn: 75 g
- Dark grey or black DK yarn: 5 g
- Black safety eyes: 24 mm
- Craft wire: 0.1 mm, approximately 50 cm
- Toy stuffing
Equipment
- Crochet Hook: 3.00 mm
- Tapestry needle
- Scissors
- Stitch marker
- Pins
Optional Supplies
- Parchment paper: For the slime base
- Glue gun: For the slime base
- Black/green eyeshadow or pencil: For shading details
Abbreviations (US Terminology)
- ch: chain
- sc: single crochet
- inc: increase (2 sc in the same stitch)
- dec: decrease (sc 2 stitches together)
- slst: slip stitch
- rnd(s): round(s)
- st(s): stitch(es)
- BLO: work through the back loops only
- FLO: work through the front loops only
Finished Size
Approximately 23 x 20 x 10 cm (9 x 8 x 4 inches).
Crochet Skeleton Snail: Step-by-Step Instructions
How to Crochet the Head
Begin with white yarn.
- Start: Make 6 sc into a magic circle.
- Rnd 1: Inc in every stitch (12 sts).
- Rnd 2: (1 sc, inc) x 6 (18 sts).
- Rnd 3: (2 sc, inc) x 6 (24 sts).
- Rnd 4: (3 sc, inc) x 6 (30 sts).
- Rnd 5: 2 sc, inc, (4 sc, inc) x 5, 2 sc (36 sts).
- Rnd 6: (5 sc, inc) x 6 (42 sts).
- Rnd 7: 3 sc, inc, (6 sc, inc) x 5, 3 sc (48 sts).
- Rnd 8: (7 sc, inc) x 6 (54 sts).
- Rnd 9: 54 sc.
- Rnd 10: 4 sc, inc, (8 sc, inc) x 5, 4 sc (60 sts).
- Rnd 11-16: 60 sc (6 rounds).
Next, you will create the holes for the safety eyes.
-
- Rnd 17: 19 sc, ch 3, miss 2 stitches, 18 sc, ch 3, miss 2 stitches, 19 sc (62 sts).
-
- Rnd 18: 19 sc, 2 sc into the ch-3 space, 18 sc, 2 sc into the second ch-3 space, 19 sc (60 sts).
- Rnd 19-22: 60 sc (4 rounds).
Insert the 24 mm safety eyes into the holes you just created.
- Rnd 23: 4 sc, dec, 4 sc, (3 sc, inc) x 10, 4 sc, dec, 4 sc (68 sts).
- Rnd 24: 68 sc.
- Rnd 25: (2 sc, dec) x 2, 52 sc, (dec, 2 sc) x 2 (64 sts).
- Rnd 26: 64 sc.
- Rnd 27: 4 sc, dec, 52 sc, dec, 4 sc (62 sts).
- Rnd 28: 62 sc.
- Rnd 29: 2 sc, dec, 54 sc, dec, 2 sc (60 sts).
Now, create the folds that will form the teeth.
-
- Rnd 30: 15 sc, (miss 4 stitches, 1 sc in the next stitch) x 7, 10 sc (32 sts).
Push all the folded “bumps” to the inside of the head to create the mouth shape. Begin stuffing the head firmly and continue to stuff as you close the opening.
- Rnd 31: (2 sc, dec) x 8 (24 sts).
- Rnd 32: (dec, 2 sc) x 6 (18 sts).
- Rnd 33-34: 18 sc (2 rounds).
Fasten off, leaving a long tail for stitching later.
Shaping the Face and Teeth
-
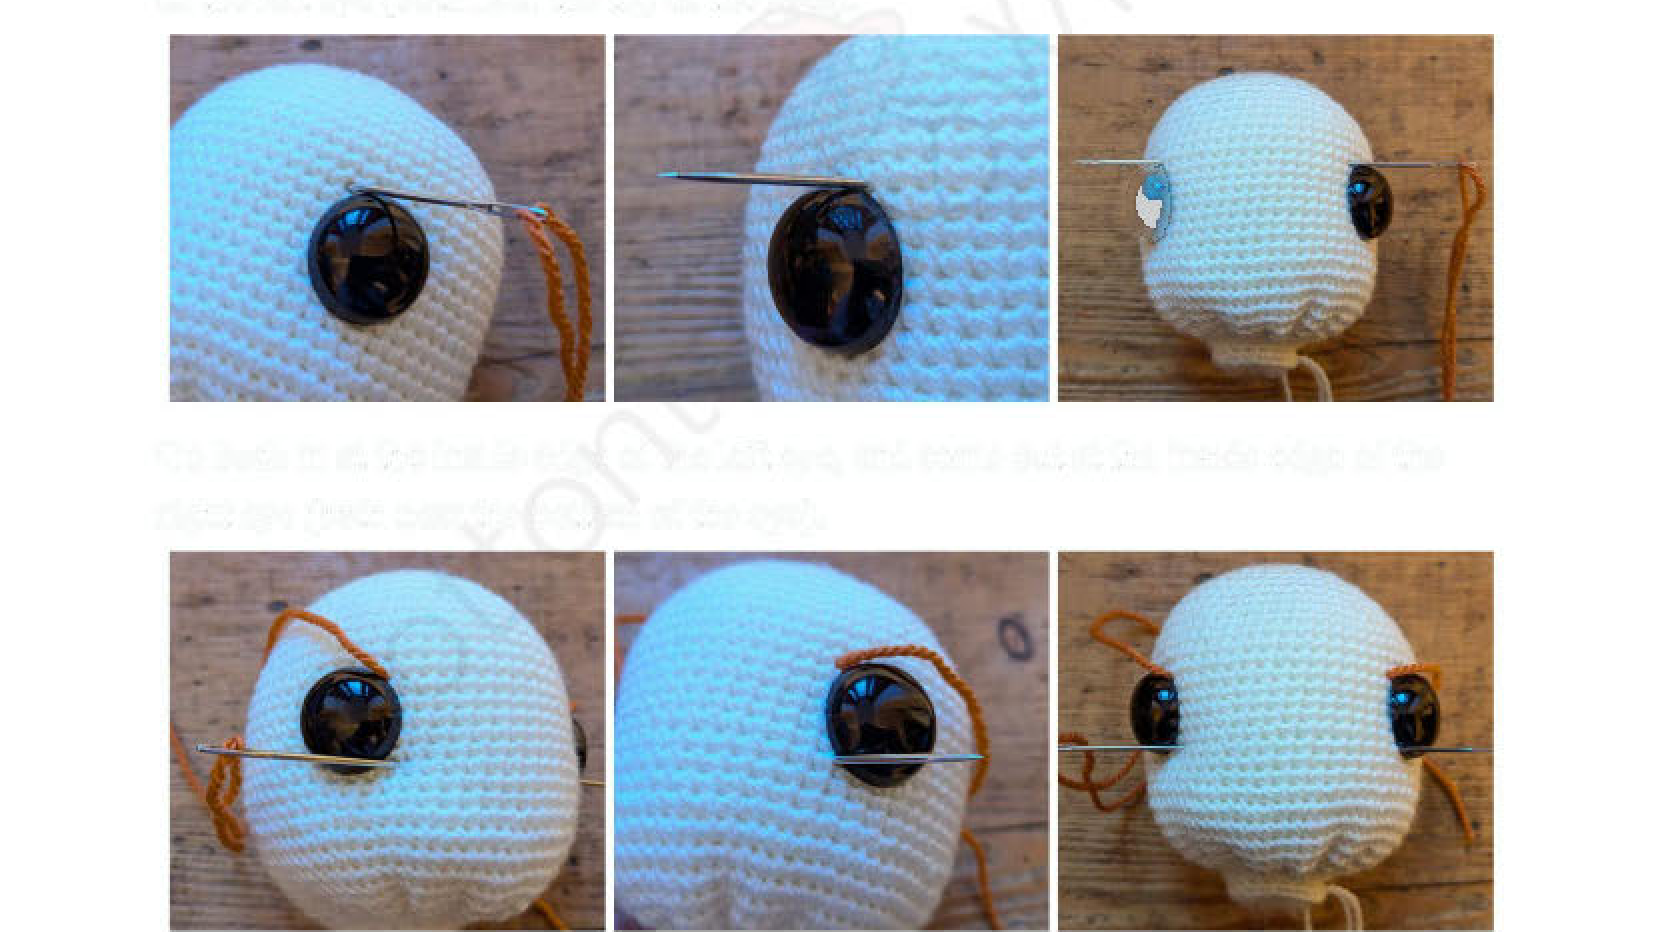
- Using a length of white yarn and a tapestry needle, insert the needle at the inside edge of the right eye (near the top) and bring it out at the inside edge of the left eye (also near the top).
-
- Go back in at the inside edge of the left eye (near the bottom) and come out at the inside edge of the right eye (near the bottom).
-
- Pull the yarn ends tight to bring the eyes closer together, tie a secure knot, and weave in the ends.
- Repeat this process on the outside edges of the eyes to further define the face shape.
-
- To define the teeth, take a knotted length of dark grey/black yarn. Enter through the neck opening and come out at the bottom of the first mouth fold. Make a straight stitch up to the top of the fold.
- Repeat this for all the folds, varying the stitch lengths for a natural look. Weave in the end.
Eye Stalks (Make 2)
Using white yarn:
- Start: Make 6 sc into a magic circle
- Rnd 1: (1 sc, inc) x 3 (9 sts)
- Rnd 2-3: 9 sc
- Rnd 4: (1 sc, dec) x 3 (6 sts)
- Rnd 5: (1 sc, dec) x 2 (4 sts)
- Rnd 6-11: 4 sc
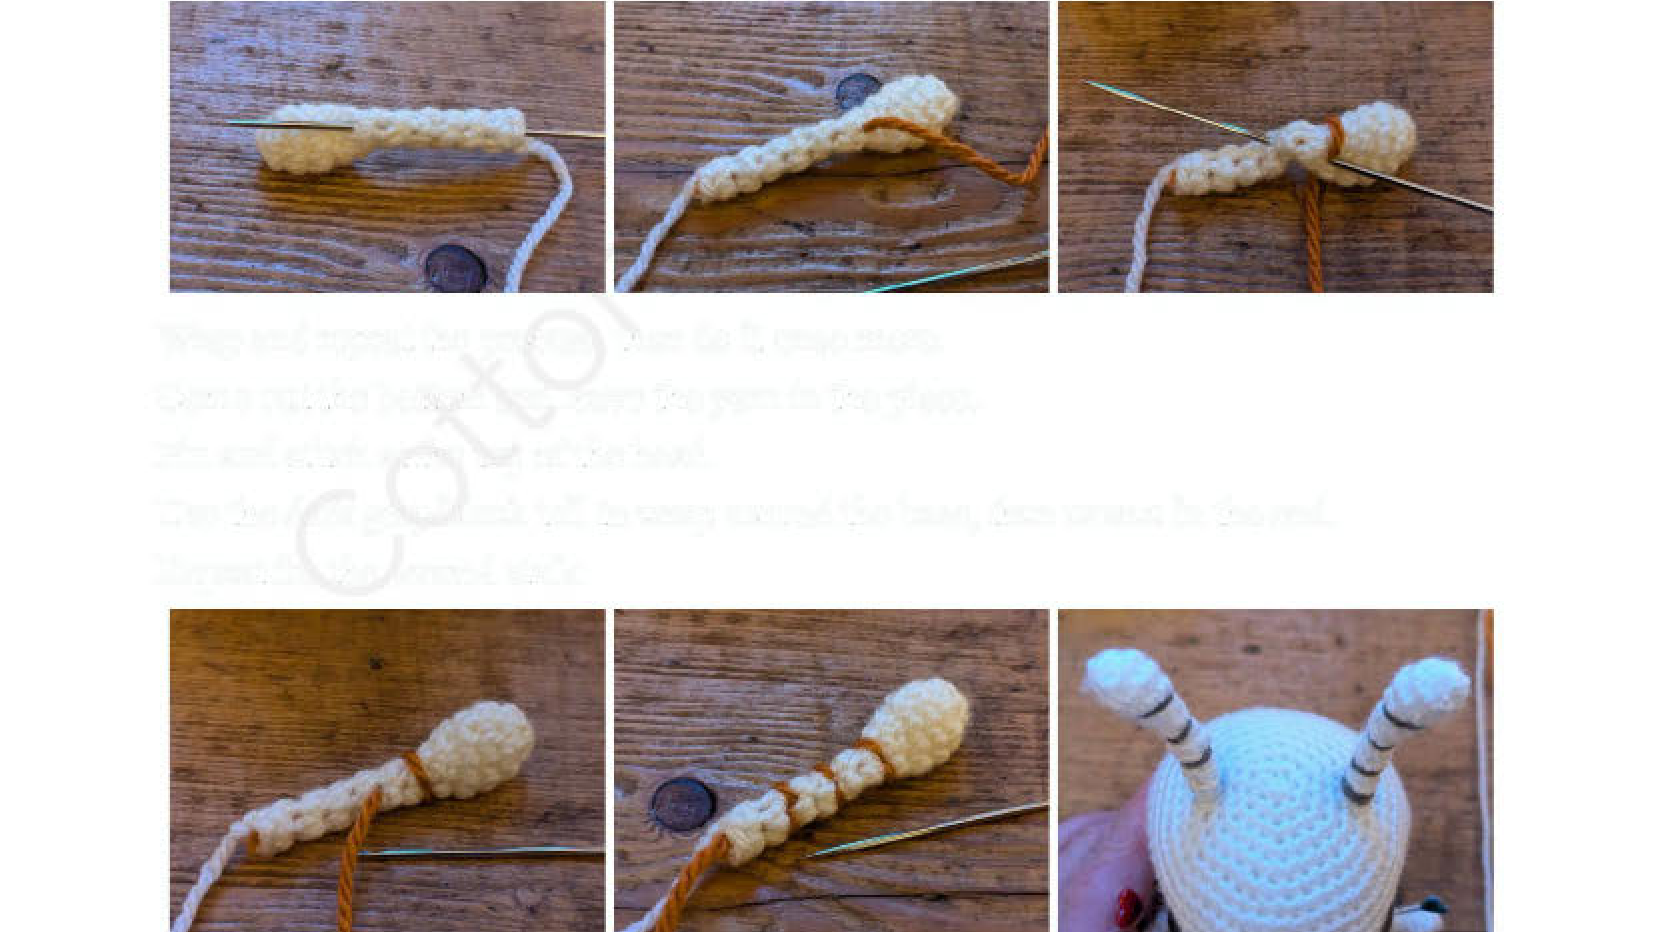
Fasten off, leaving a tail for stitching. To add the stripes, take a knotted length of dark grey/black yarn. Go inside the stalk and come out between Rnds 4 & 5. Wrap the yarn around the stalk, go back in, and come out 2 rounds down. Repeat this process to create stripes. Pin and stitch the stalks to the top of the head.
Tentacles (Make 2)
Using white yarn:
- Start: Make 6 sc into a magic circle.
- Rnd 1: (1 sc, inc) x 3 (9 sts).
- Rnd 2: 9 sc.
- Rnd 3: (1 sc, dec) x 3 (6 sts).
- Rnd 4: (1 sc, dec) x 2 (4 sts).
- Rnd 5-6: 4 sc.
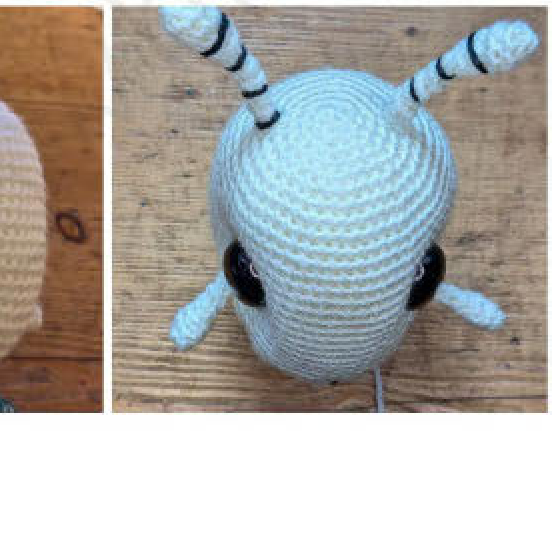
Fasten off, leaving a tail for stitching. Pin and stitch one tentacle on each side of the head, below the eyes.
How to Crochet the Shell
For the shell, you will alternate between white and dark grey/black yarn. Instructions for the dark grey/black yarn are in bold and underlined.
Start with white yarn.
- Start: Make 4 sc into a magic circle.
- Rnd 1: (1 sc, inc) x 2 (6 sts).
- Rnd 2: 6 sc.
- Rnd 3: (2 sc, inc) x 2 (8 sts).
- Rnd 4-6: 8 sc. Pause here to thread a long, knotted piece of white yarn from the inside to the outside of Rnd 1 for later assembly.
- Rnd 7: (3 sc, inc) x 2 (10 sts).
- Rnd 8-9: 10 sc.
- Rnd 10: (4 sc, inc) x 2 (12 sts).
- Rnd 11-12: 12 sc. Begin stuffing and continue to stuff as you go.
- Rnd 13: (3 sc, inc) x 3 (15 sts).
- Rnd 14: 15 sc.
- Rnd 15-16: 15 sc.
- Rnd 17: (4 sc, inc) x 3 (18 sts).
- Rnd 18-21: 18 sc.
- Rnd 22: (5 sc, inc) x 3 (21 sts).
- Rnd 23: 21 sc.
- Rnd 24-26: 21 sc.
- Rnd 27: (6 sc, inc) x 3 (24 sts).
- Rnd 28-31: 24 sc.
- Rnd 32: (7 sc, inc) x 3 (27 sts).
- Rnd 33: 27 sc.
- Rnd 34-36: 27 sc.
- Rnd 37: (8 sc, inc) x 3 (30 sts).
- Rnd 38-41: 30 sc.
- Rnd 42: (9 sc, inc) x 3 (33 sts).
- Rnd 43: 33 sc.
- Rnd 44-48: 33 sc.
- Rnd 49: (10 sc, inc) x 3 (36 sts).
- Rnd 50-52: 36 sc.
- Rnd 53: 36 sc.
- Rnd 54-57: 36 sc.
- Rnd 58: (11 sc, inc) x 3 (39 sts).
- Rnd 59-62: 39 sc.
- Rnd 63: 39 sc.
- Rnd 64-66: 39 sc.
- Rnd 67: (12 sc, inc) x 3 (42 sts).
- Rnd 68-72: 42 sc.
- Rnd 73: 42 sc.
- Rnd 74: 42 sc.
- Rnd 75: (6 sc, inc) x 6 (48 sts).
- Rnd 76-78: 48 sc.
- Rnd 79: (6 sc, dec) x 6 (42 sts).
- Rnd 80: 42 sc, slst into the next stitch.
Fasten off, leaving a tail for stitching. Roll back the last 2-3 rounds to create a lip.
How to Crochet the Spine and Body
Wire Preparation
Take your craft wire, measure 20-25 cm and make a right-angle bend. Measure 3 cm and make another right-angle bend. Measure another 20-25 cm and cut the wire. Set it aside.
Tailbone
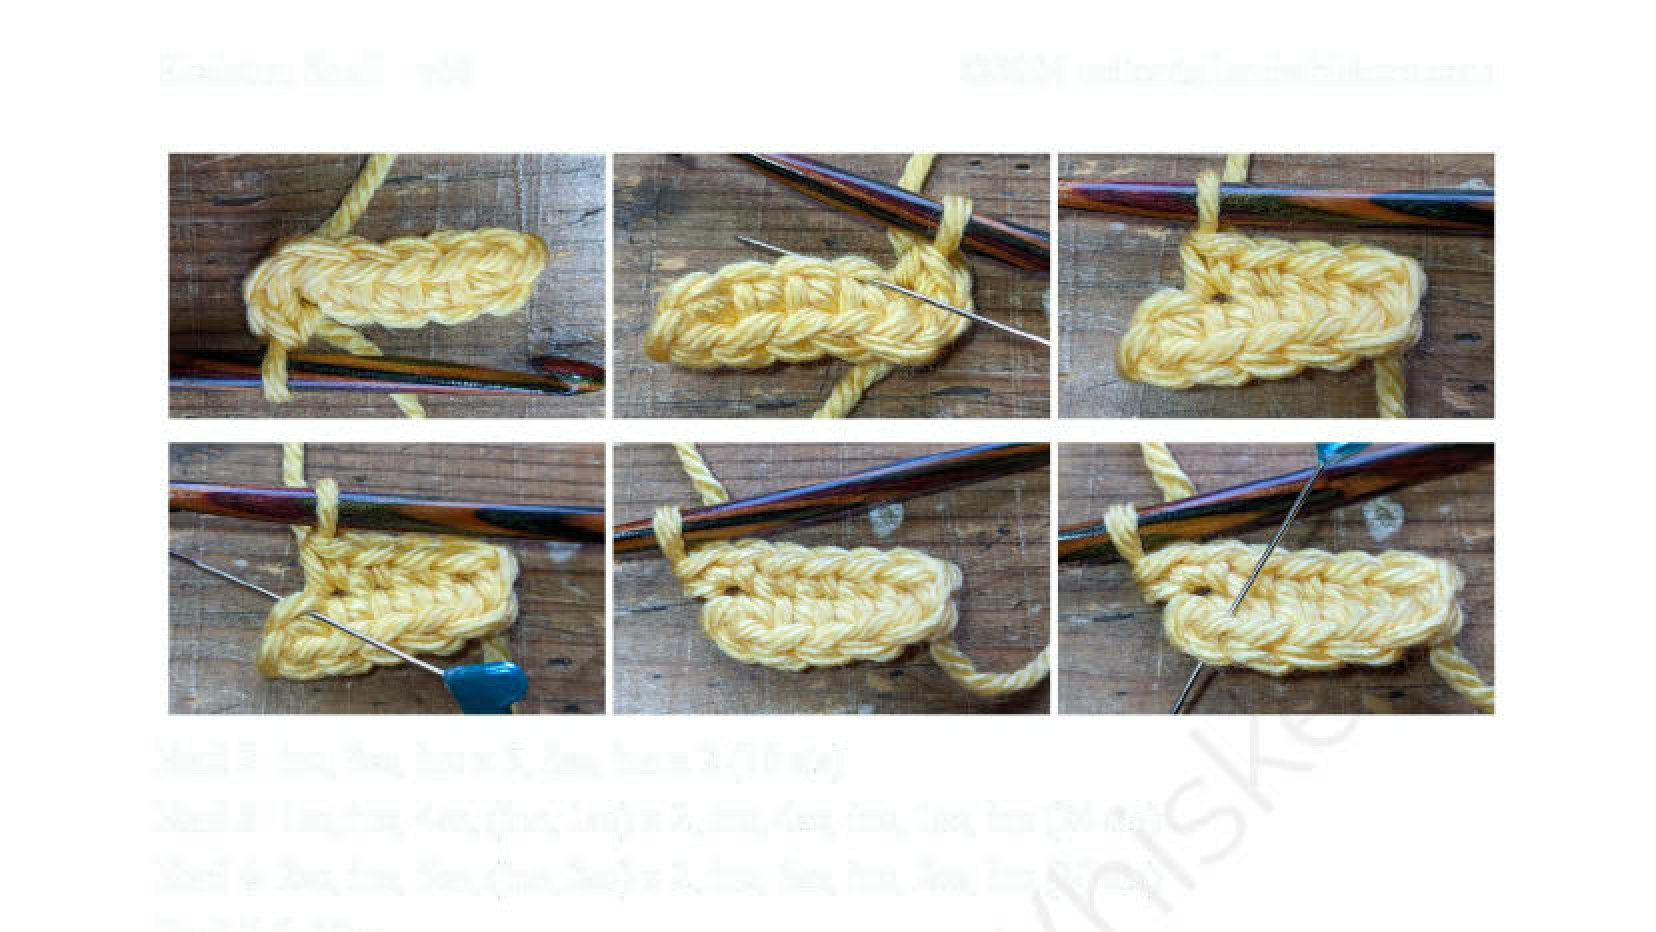
With white yarn, ch 6.
-
- Rnd 1: Start in the 2nd ch from hook. 4 sc, 3 sc in last st. Working on the other side of the chain: 3 sc, 2 sc in last st (12 sts).
- Rnd 2: Inc, 3 sc, inc x 3, 3 sc, inc x 2 (18 sts).
- Rnd 3: 1 sc, inc, 4 sc, (inc, 1 sc) x 2, inc, 4 sc, inc, 1 sc, inc (24 sts).
- Rnd 4: 2 sc, inc, 5 sc, (inc, 2 sc) x 2, inc, 5 sc, inc, 2 sc, inc (30 sts).
- Rnd 5-6: 30 sc.
- Rnd 7: Dec, 10 sc, dec, 1 sc, dec, 10 sc, dec, 1 sc (26 sts).
- Rnd 8-9: 26 sc. Pause here to insert the two long ends of the wire piece through the bone, pushing them out along the middle line about 3 cm apart. Pull the wire through.
- Rnd 10: Dec, 8 sc, dec, 1 sc, dec, 8 sc, dec, 1 sc (22 sts).
- Rnd 11-12: 22 sc. Begin stuffing.
- Rnd 13: Dec, 6 sc, dec, 1 sc, dec, 6 sc, dec, 1 sc (18 sts).
- Rnd 14-15: 18 sc.
- Rnd 16: (4 sc, dec) x 3 (15 sts).
- Rnd 17-18: 15 sc.
- Rnd 19: (3 sc, dec) x 3 (12 sts).
- Rnd 20: 12 sc.
- Rnd 21: Dec x 6 (6 sts).
Fasten off and weave in the end.
Spine Bones 1, 2, 3, & 4
You will now create four more bones for the spine. Each bone is made similarly, threaded onto the wire, stuffed, and then stitched to the previous bone. Follow the specific round counts for each bone.
- Spine Bone 1: Start with ch 6 and work 20 rounds.
- Spine Bone 2: Start with ch 8 and work 20 rounds.
- Spine Bone 3: Start with ch 6 and work 18 rounds.
- Spine Bone 4: Start with ch 6 and work 16 rounds.
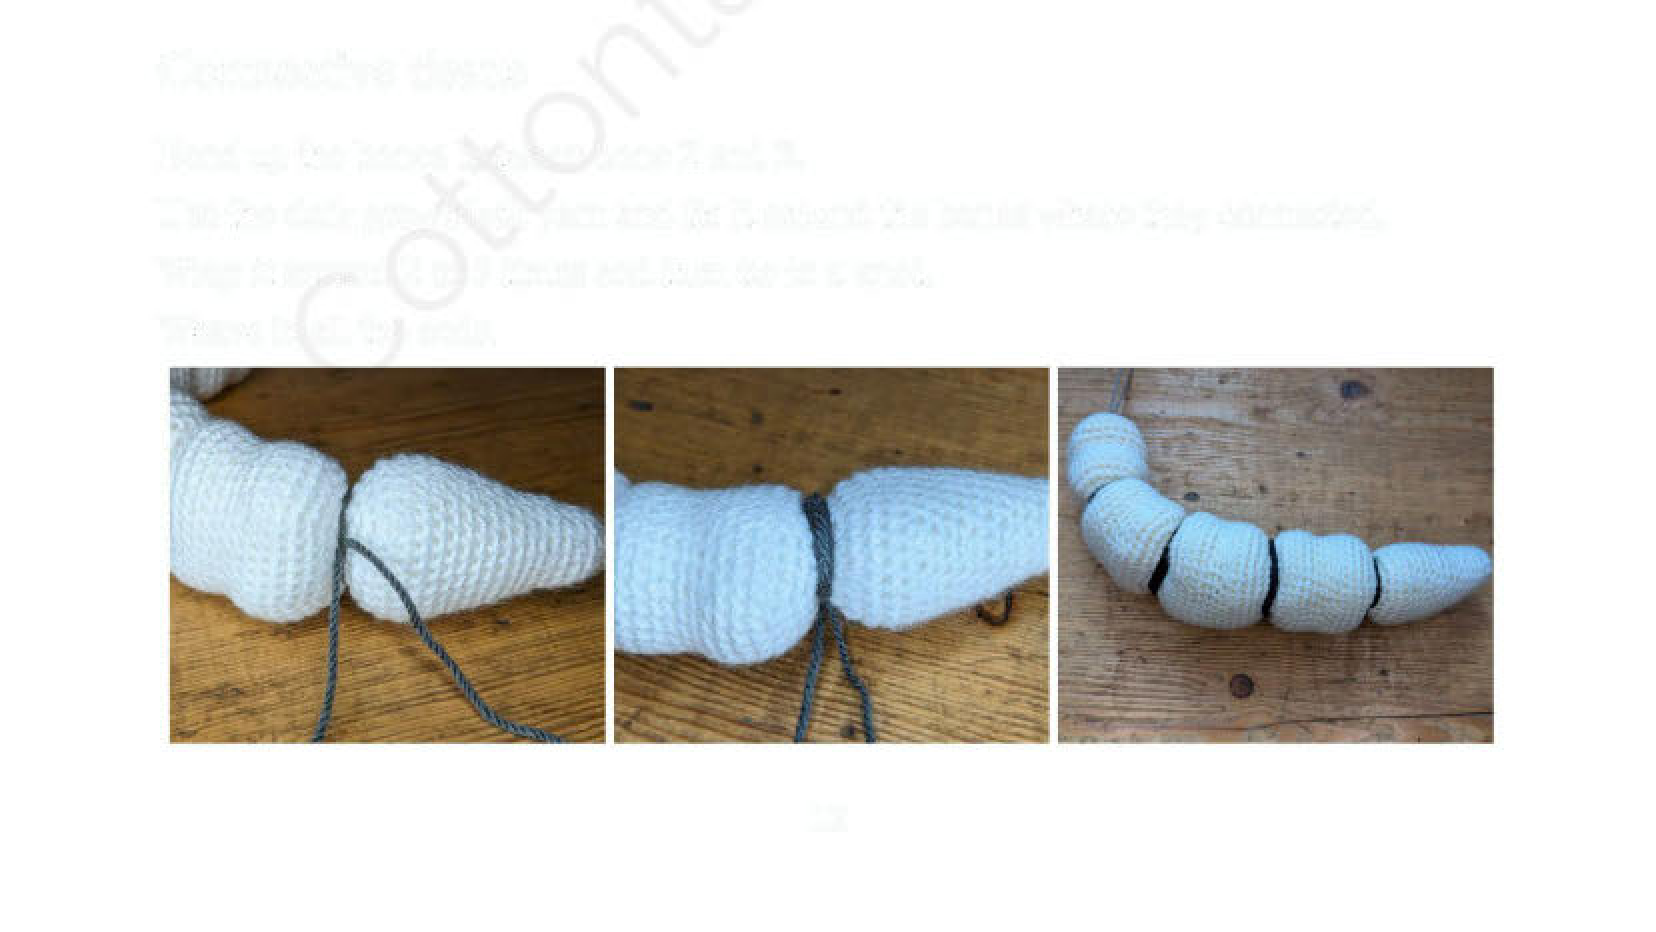
For each bone, crochet the initial rounds, then stop to insert the wires. Continue crocheting around the wire, stuffing as you go. After each bone is complete, stitch it securely to the previous bone (1 stitch on each side, 2 in front, 2 in back).
Connective Tissue
Bend the spine gently between bones 2 and 3. Take the dark grey/black yarn, tie it around the connection point, wrap it 2-3 times, and tie a secure knot. Weave in the ends. Repeat this for all bone connections, including where the head will attach.
Assembly and Finishing
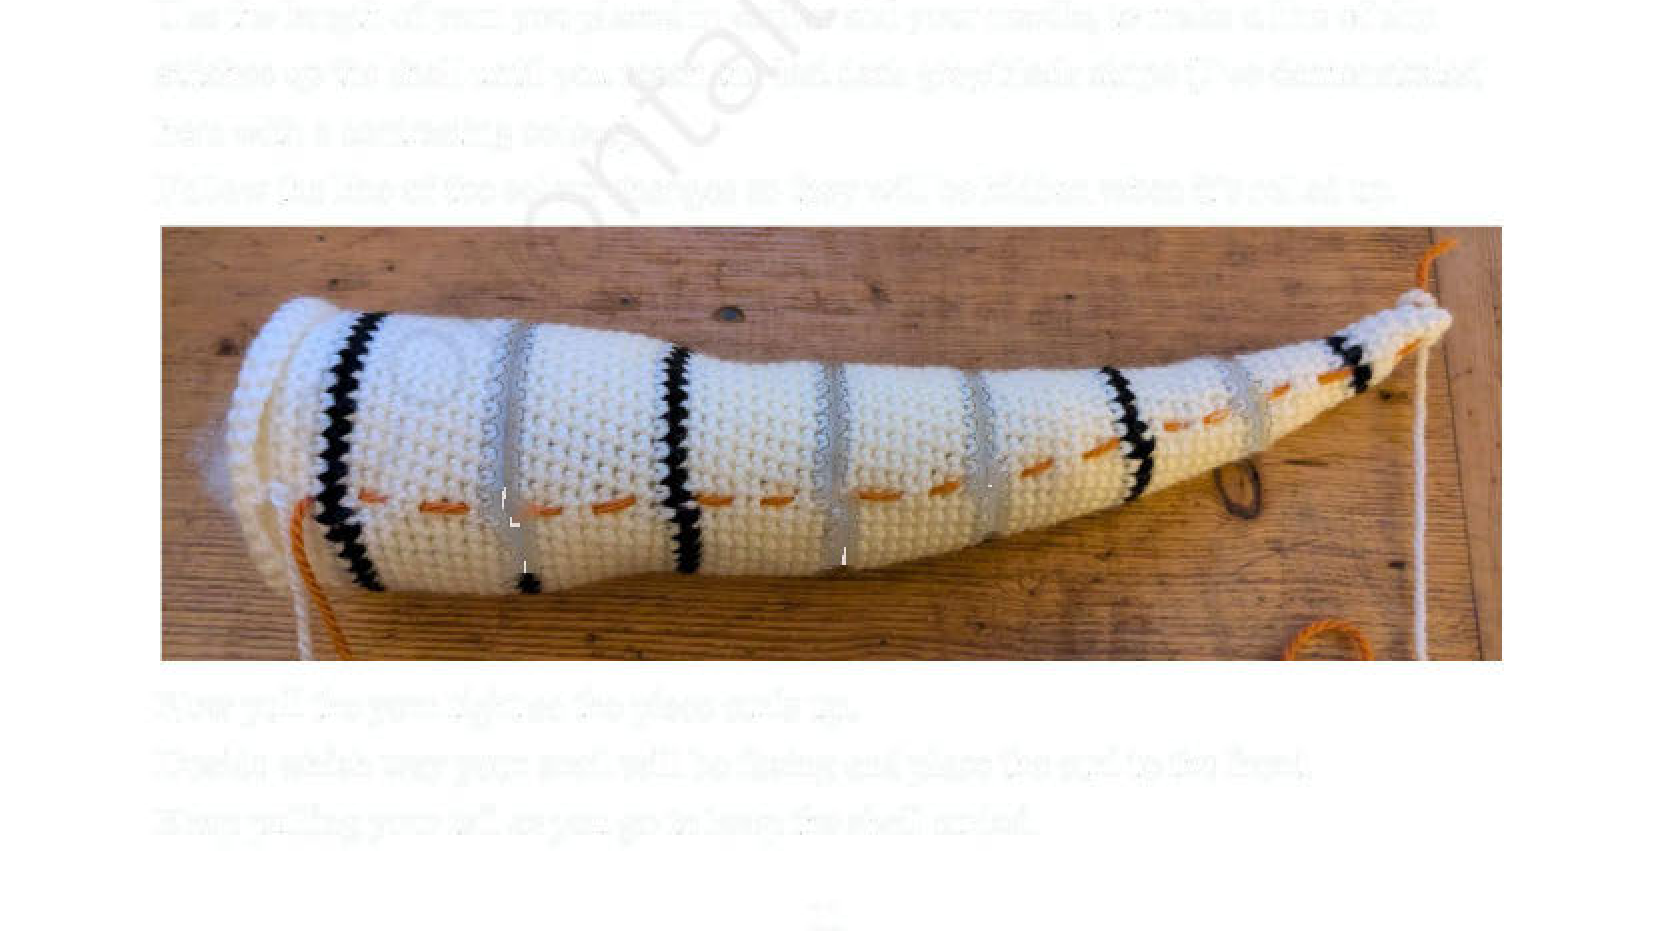
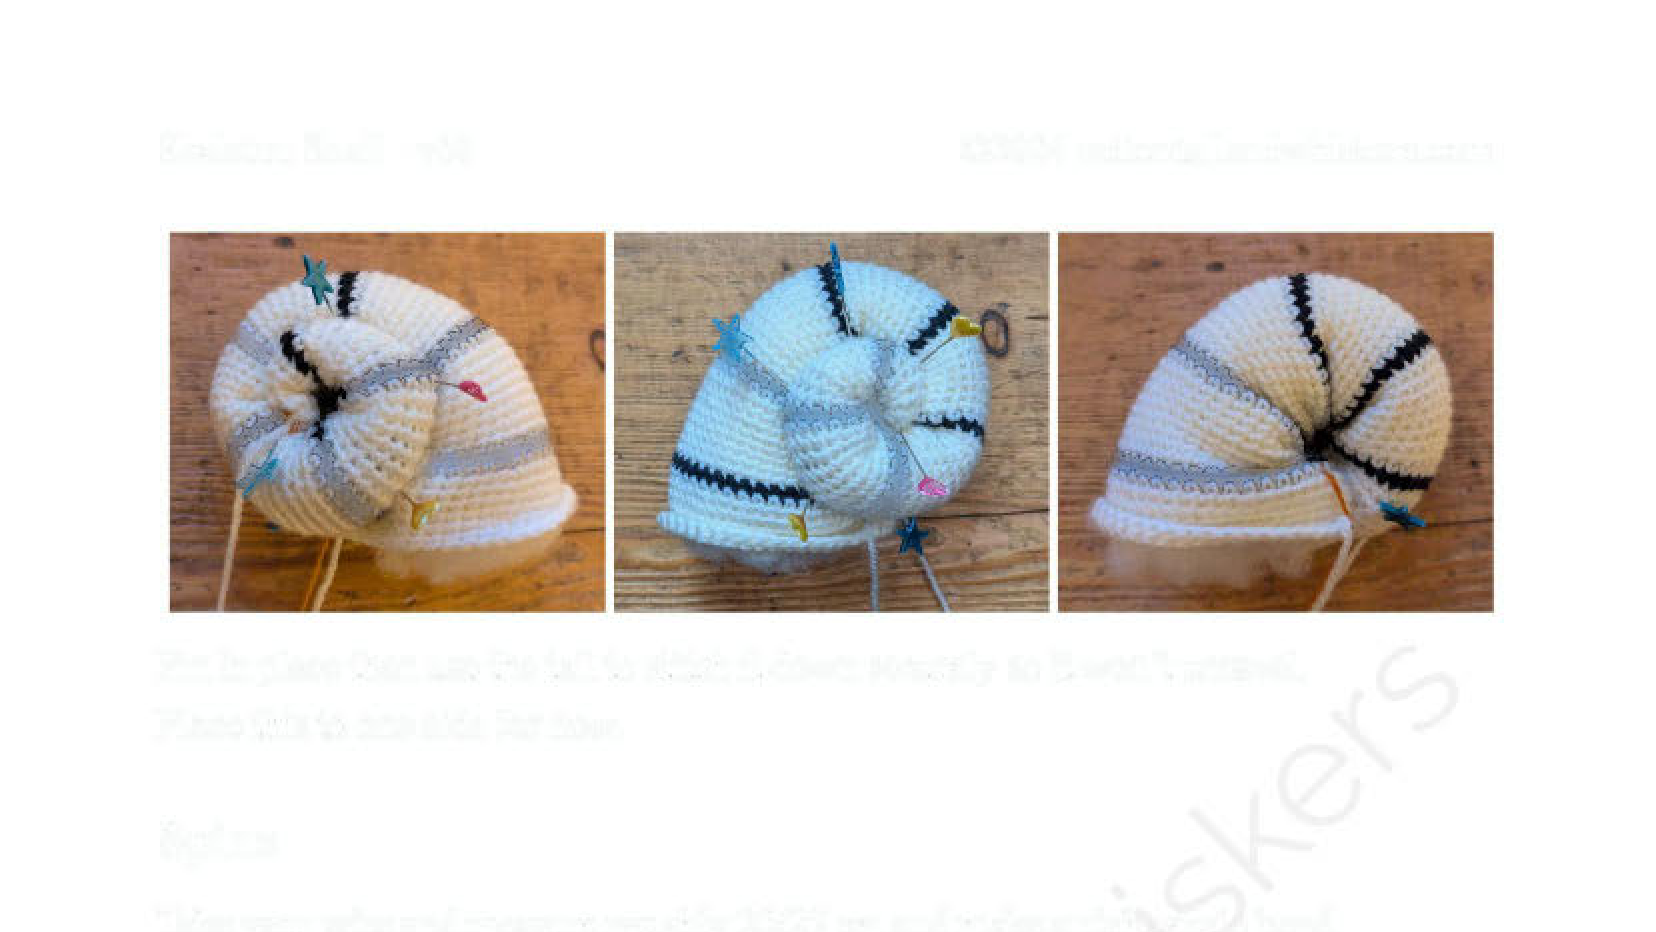
- Curl the Shell: Take the long white yarn tail you left at the start of the shell. Use a needle to make a line of slip stitches up the shell, following the color changes. Pull this yarn tight to make the shell curl into its spiral shape. Pin it securely and stitch it down so it holds its shape.
- Attach the Shell: Pin the open end of the shell to spine bones 2 and 3. Add more stuffing if needed before stitching it securely in place around Rnd 79/80, leaving the rolled lip unattached.
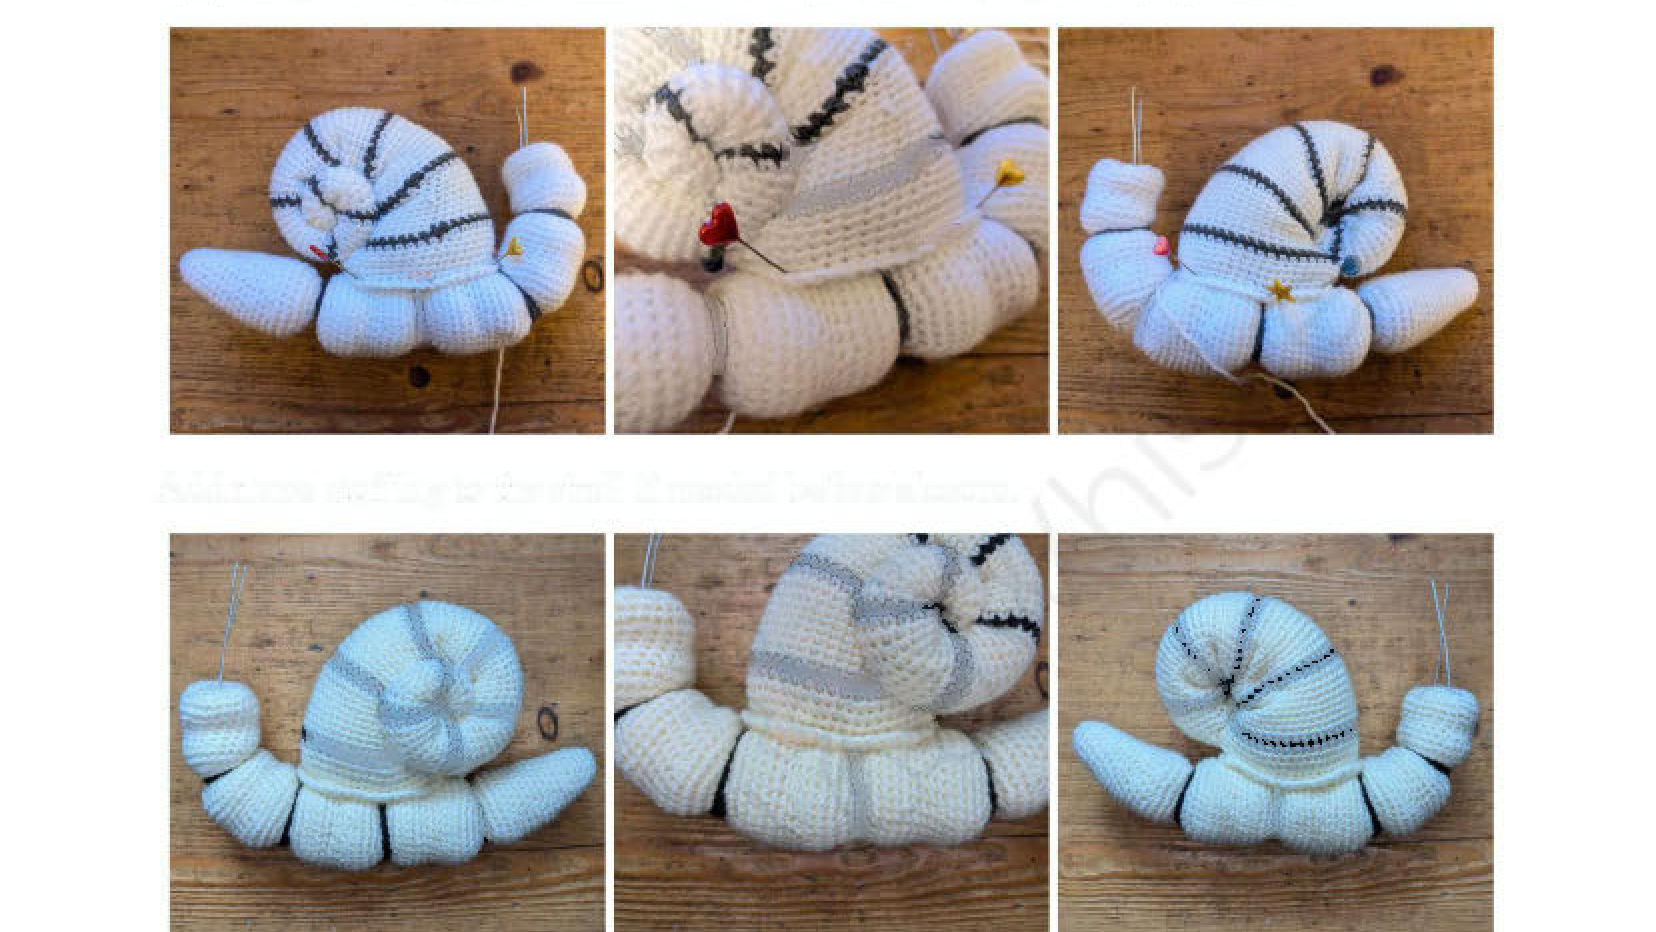
- Attach the Head: Carefully push the head onto the protruding ends of the wire frame (trim the wire if it’s too long). Pin the neck to the final spine bone and stitch it securely.
- Finish the Neck: Wrap dark grey/black yarn around the neck joint, just as you did for the connective tissue between the bones.
Optional Finishing: Slime Base
This optional step creates a stable base for your snail.
- On a sheet of parchment paper, trace around the base of your snail. Draw a wavier, more organic “slime” shape around your tracing.
- Fill the shape with hot glue. At the tail end, pull the glue out to create a trail effect.
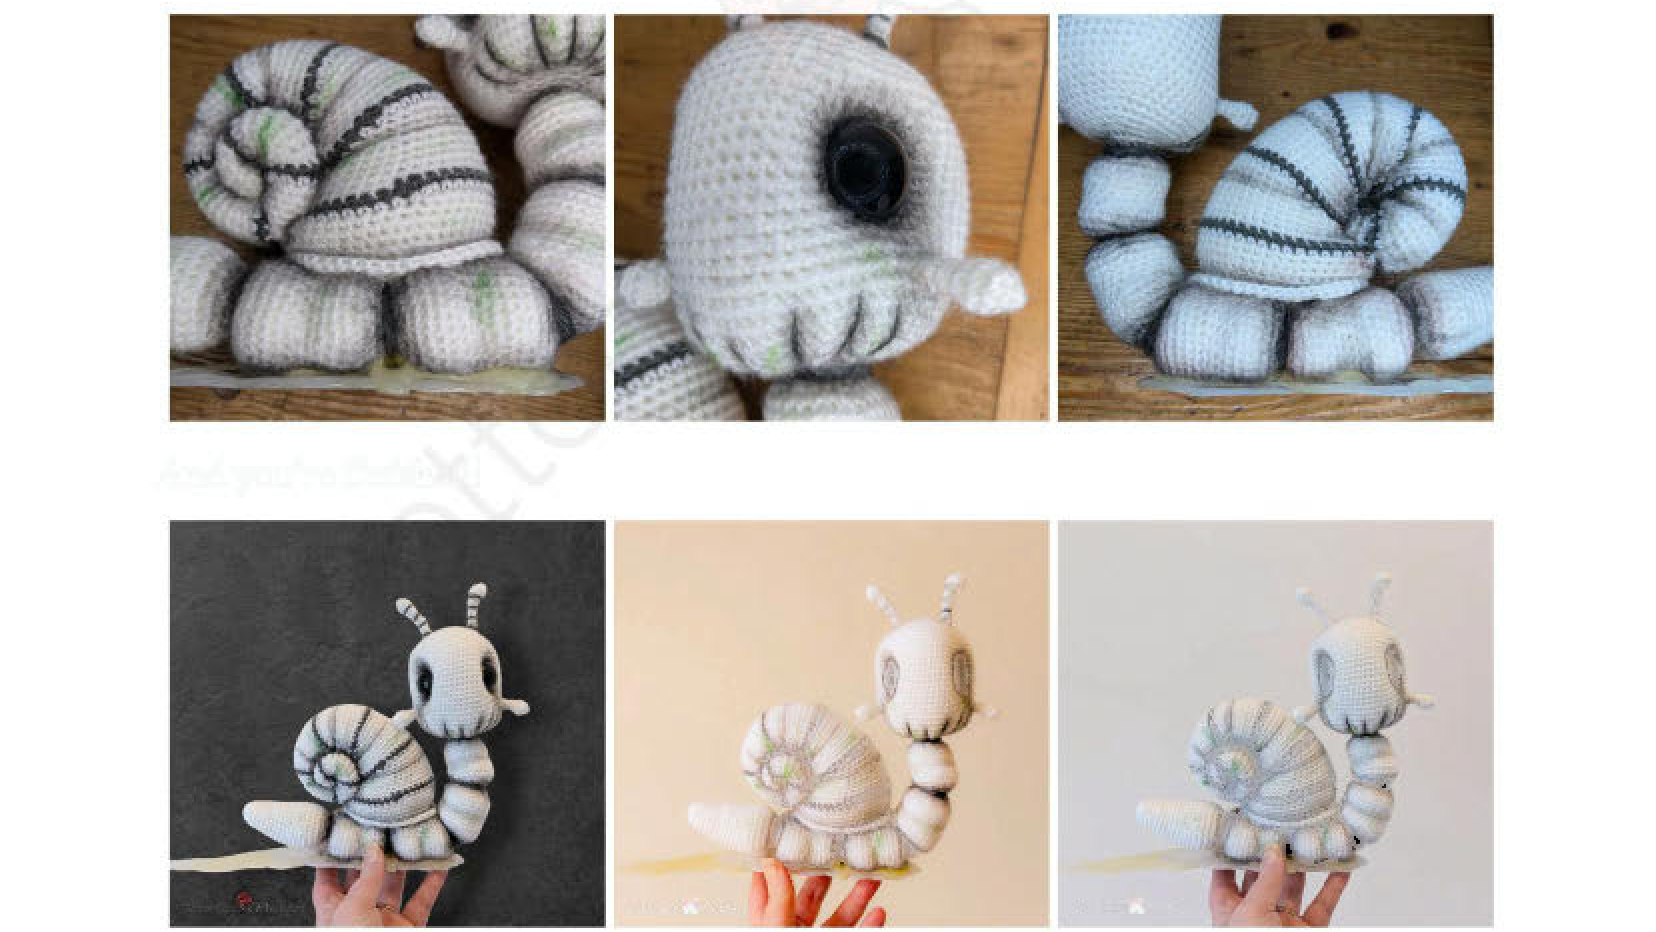
- Add another line of glue down the middle of your shape and firmly press the snail onto it. Hold it in place until the glue hardens.
- Once completely cool, peel the parchment paper away from the hardened glue base.
Optional Finishing: Shading
To add depth, use black and green eyeshadow or a soft pencil. It’s a good idea to practice on a separate crochet swatch first. Lightly apply shading around the eyes, between the bones and teeth, and along the ridges of the shell to enhance the skeletal look.
Your Spare Rib the Skeleton Snail is now complete


