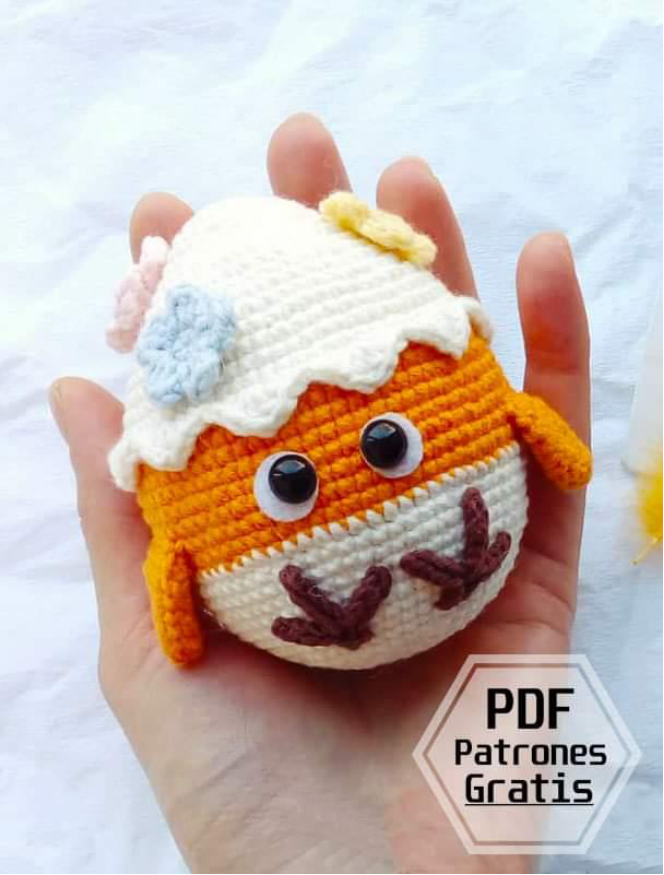
Pajarito de Pascua Amigurumi Patrón Gratis
Materials
To crochet your adorable Easter Bird Amigurumi, you will need the following supplies:
- Needle (for weaving in ends and assembly)
- Yarn (white, yellow, and brown as specified in the pattern)
- Crochet Hook (size appropriate for your chosen yarn, to achieve a tight amigurumi fabric)
- Scissors
- Stuffing (polyester fiberfill for amigurumi)
- 8mm half beads (for eyes)
- 10mm felt circles (for eye backing)
- Craft glue (suitable for fabric/felt for eye assembly)
Abbreviations
Understanding these standard crochet abbreviations will help you follow this free Easter bird amigurumi pattern with ease:
- MR – Magic Ring
- sc – Single Crochet
- inc – Increase (2 single crochet stitches into the same stitch)
- dec – Decrease (single crochet 2 together)
- tr – Treble Crochet (Triple Crochet)
- st – Stitch
- dc – Double Crochet
- hdc – Half Double Crochet
- sl st – Slip Stitch
- ch – Chain
- FLO – Front Loop Only (working into the front loop of the stitch)
- BLO – Back Loop Only (working into the back loop of the stitch)
Instructions
Get ready to crochet a charming Easter bird amigurumi! This section provides step-by-step instructions for each component, making it a perfect DIY Easter decoration or handmade gift.
Crochet the Egg (Main Body)
This is the core of your Easter bird amigurumi. Remember to stuff the egg body well as you crochet to ensure a firm, smooth shape. We’ll start with white yarn to create the base of the egg.
Egg Body – White Yarn Start
- 1Rnd: 6sc in MR (6)
- 2Rnd: 6inc (12)
- 3Rnd: (1sc, inc)*6 (18)
- 4Rnd: (2sc, inc)*6 (24)
- 5Rnd: 24sc (24)
- 6Rnd: (3sc, inc)*6 (30)
- 7Rnd: (4sc, inc)*6 (36)
- 8Rnd: (5sc, inc)*6 (42)
- 9Rnd: 42sc (42)
- 10Rnd: (6sc, inc)*6 (48)
- 11Rnd: (7sc, inc)*6 (54)
- 12Rnd: (8sc, inc)*6 (60)
- 13Rnd: 60sc (60)
- 14Rnd: (9sc, inc)*6 (66)
- 15Rnd: (10sc, inc)*6 (72)
- 16Rnd: 72sc (72)
Egg Body – Yellow Yarn Section
Change yarn color to yellow at the beginning of Round 17 to create a distinct band around your amigurumi egg.
- 17Rnd: BLO 72sc (72)
- 18-24Rnd: 72sc (7 rows) (72)
Egg Body – White Yarn Finish
Switch back to white yarn to complete the top portion of the Easter egg bird, decreasing stitches to shape the top.
- 25Rnd: 72sc (72)
- 26Rnd: (10sc, dec)*6 (66)
- 27Rnd: 66sc (66)
- 28Rnd: (9sc, dec)*6 (60)
- 29Rnd: 60sc (60)
- 30Rnd: (8sc, dec)*6 (54)
- 31Rnd: 54sc (54)
- 32Rnd: (7sc, dec)*6 (48)
- 33Rnd: 48sc (48)
- 34Rnd: (6sc, dec)*6 (42)
- 35Rnd: (5sc, dec)*6 (36)
- 36Rnd: (4sc, dec)*6 (30)
- 37Rnd: (3sc, dec)*6 (24)
- 38Rnd: (2sc, dec)*6 (18)
- 39Rnd: (1sc, dec)*6 (12)
- 40Rnd: 6dec (6)
Fasten off and weave in the end. Continue stuffing firmly until the very end.
Egg Shell Edge
Add a charming decorative ruffled edge to your crocheted egg. This detail enhances the “hat” or “shell” look of your Easter bird.
- Move to chain 16 stitches, then with white yarn, crochet the edge of the shell using the following repeat: (sc, hdc, 3dc in 1 stitch, hdc, sc, sl st)*12. This creates a beautiful, wavy edge.
- To ensure it doesn’t wobble, you can carefully sew this edge down to the main body.
Crochet the Wings (Make 2)
These two small wings, crocheted in yellow yarn, will give your amigurumi bird its delightful character. Make sure to create two identical pieces.
- 1Rnd: 6sc in MR (6)
- 2Rnd: (1sc, inc)*3 (9)
- 3Rnd: (2sc, inc)*3 (12)
- 4Rnd: 12sc (12)
- 5Rnd: (3sc, inc)*3 (15)
- 6Rnd: (4sc, inc)*3 (18)
- 7Rnd: 18sc (18)
Once both wings are crocheted, fold each piece in half and crochet 9sc along the folded edge to close it. Fasten off the yarn, cut it, and leave a long tail for sewing the wings onto the body.
Crochet the Feet (Make 2)
Craft the small, delicate feet for your amigurumi bird using brown yarn. These are designed with chains and slip stitches to create a unique shape.
- With brown yarn, Ch 7.
- Starting from the 2nd loop from hook: 4 sl st.
- Then, Ch 5, 4 sl st.
- Again, Ch 5, 4 sl st.
- In the 5th loop (from where you just finished the 4 sl st), sl st.
- Then, 2 sl st in the remaining loops of the original chain.
Fasten off, leaving a tail for sewing. Make a second foot identical to the first.
Crochet the Flowers (Make 3)
Add a sweet decorative touch to your Easter bird with three small crocheted flowers.
- 1Rnd: 5sc in MR, sl st to join (5)
- 2Rnd: For each of the 5 stitches, work the following into one loop: (Ch 2, 2dc, Ch 2, sl st). This creates a petal. Repeat this 5 times for 5 petals.
Fasten off and weave in ends. You can optionally leave a tail for sewing them onto your bird.
Assembly & Finishing
Now that all the pieces are crocheted, it’s time to bring your Easter bird amigurumi to life! Follow these steps for a beautifully finished handmade toy or decoration.
- Attach the Wings: Using the yarn tails, sew the two yellow wings symmetrically onto the sides of the egg body. Position them between rounds 22 and 23, close to each other, to give your bird a natural look.
- Secure the Shell Edge: If you haven’t already, carefully sew down the crocheted shell edge around the top of the egg. This prevents it from wobbling and ensures a neat finish.
- Create and Attach Eyes: To make the eyes, glue the 8mm half beads onto the 10mm felt circles. Allow them to dry completely. Once dry, glue these assembled eyes onto the bird’s face, positioning them as desired for expression.
- Attach the Feet: Securely sew the two brown crocheted feet to the bottom of the bird, ensuring they are evenly spaced and positioned for stability.
- Add Flowers: Arrange and securely attach your three crocheted flowers to your Easter bird. You can place them on its head, body, or wherever you feel they add the most charm.
- Final Stuffing Check: Before closing up any final openings, give your amigurumi a final check to ensure it is stuffed firmly and evenly throughout. This maintains its shape and gives it a professional finish.
Tips for Beginners
Crocheting amigurumi, especially detailed patterns like this Easter bird, can be a delightful and rewarding experience. Here are a few beginner-friendly tips to help you along the way:
- Consistent Tension is Key: Try to maintain an even and tight tension with your yarn. This prevents gaps in your stitches, which can cause stuffing to show through, and helps your amigurumi hold its shape better.
- Don’t Skimp on Stuffing: For amigurumi projects, robust and even stuffing is crucial. Stuff well as you go, especially with the egg body, to ensure a firm, smooth, and shapely final product. Use small pieces of fiberfill to avoid lumps.
- Use Stitch Markers: When working in continuous rounds (which is common in amigurumi), it’s easy to lose track of the beginning of a round. A stitch marker placed in the first stitch of each round will save you from miscounting and frustration.
- Read Through First: Before you start crocheting, take a moment to read through the entire pattern. This helps you understand the construction process and identify any potentially tricky steps beforehand.
- Practice Your Abbreviations: Familiarize yourself with the crochet abbreviations used in the pattern. This will make following the instructions much smoother and faster.
- Leave Long Tails for Sewing: When fastening off a piece that needs to be attached later (like the wings or feet), always leave a long yarn tail (about 6-8 inches) for sewing. This saves you from having to attach new yarn just for assembly.