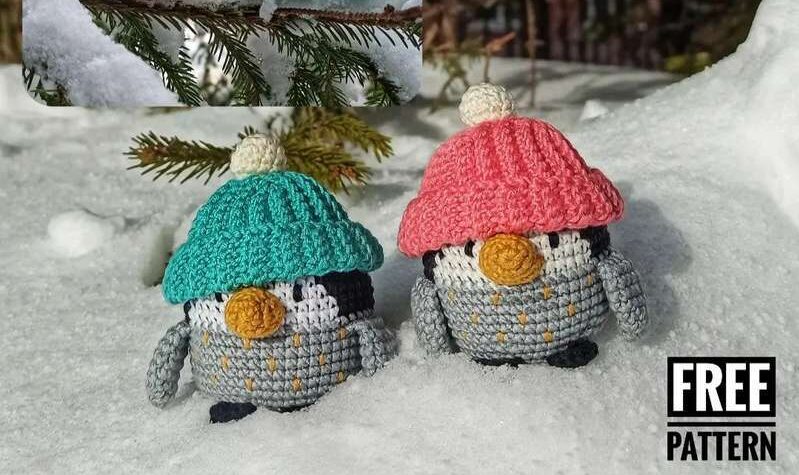
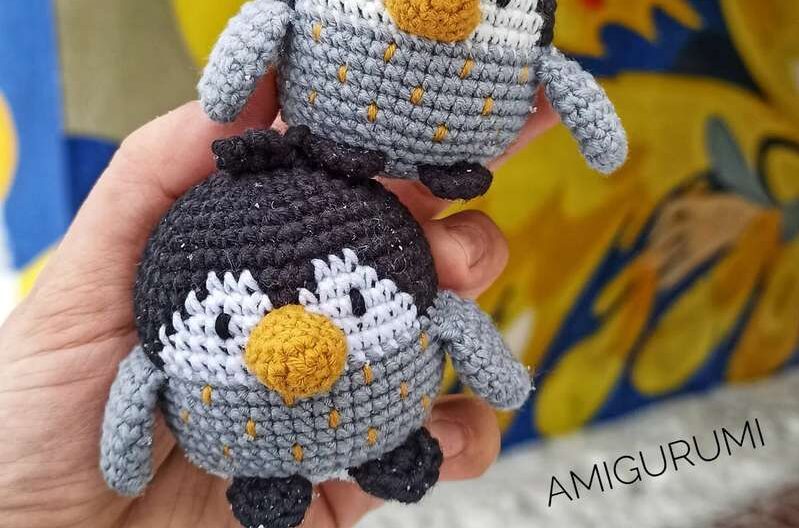
Meet the Little Penguin: A Free Crochet Pattern with Sweet Details
Hello, dear crochet friends! Today, I have the pleasure of introducing you to someone truly special—the Little Penguin! Isn’t he just the sweetest thing? With his bright little beak, waddle-worthy feet, and that darling tuft on his head, he’s sure to steal your heart from the very first stitch.
This pattern comes to us from the talented Svetlana Mametova, who found her inspiration in real penguins and their incredibly adorable chicks. There’s something so endearing about these tuxedoed birds, and Svetlana has captured their charm perfectly in this little guy. Whether he’s waddling across your shelf, sitting on a nursery dresser, or becoming a child’s new best friend, this penguin is pure joy.
What I love most about this pattern is the thoughtful details. The little white chest is created using a simple colorwork technique, giving him that authentic penguin look. He comes with tiny accessories too—a cozy hat with a pom-pom for those chilly Antarctic days (or just for extra cuteness!), and even a little scarf if you’d like to add one. The pattern offers options for making him a simple stuffed toy or even a rattle for little hands to shake and giggle over.
This project is perfect for adventurous beginners who are comfortable with basic stitches and ready to try a little color changing. The pieces are small and work up quickly, and the finishing touches—like embroidered eyes and those tiny feet—are where his personality really shines through. So grab your favorite worsted weight yarn in black, white, gray, and a pop of yellow or orange, and let’s bring this little guy to life!
A Note from the Designer
This master class is my original design, and it’s free for your enjoyment. It is not intended for sale. Please remember to mention me (Svetlana Mametova) when sharing the pattern or photos of your finished work. I wish you happy crocheting and a wonderful result!
Your Supply List: Materials & Tools
Yarn: Worsted weight yarn in the following colors:
- Black (for the main body and head)
- White (for the chest patch)
- Gray (for the body and wings)
- Yellow or orange (for the beak)
- Optional: Contrast color for the hat and scarf
Hook: Size appropriate for your yarn (typically 3.0-3.5 mm for worsted weight). Choose a hook that gives you a tight, firm fabric so the stuffing doesn’t show through.
Stuffing: Polyester fiberfill (and a rattle insert if making a rattle version).
Other Supplies:
- Tapestry needle for sewing and embroidery
- Black embroidery floss or yarn for the eyes
- Stitch markers
- Scissors
Abbreviations (US Terms)
- sc: single crochet
- inc: increase (2 sc in one stitch)
- dec: decrease (single crochet 2 together)
- sl st: slip stitch
- ch: chain
- hdc: half double crochet
- dc: double crochet
- KA: magic ring (кольцо амигуруми)
- (…)*6: repeat instructions in parentheses 6 times
Let’s Begin! The Little Penguin Pattern
1. Head and Body (Worked in One Piece)
We’ll start at the top of the head and work our way down through the body.
With black yarn:
- Rnd 1: 6 sc in a magic ring. (6)
- Rnd 2: 6 inc. (12)
- Rnd 3: (1 sc, inc) repeat 6 times. (18)
- Rnd 4: (2 sc, inc) repeat 6 times. (24)
- Rnd 5: (3 sc, inc) repeat 6 times. (30)
- Rnd 6: (4 sc, inc) repeat 6 times. (36)
- Rnd 7: (5 sc, inc) repeat 6 times. (42)
- Rnd 8: (6 sc, inc) repeat 6 times. (48)
Now we’ll create the white chest using a simple colorwork technique. You can either carry the unused yarn inside your work or cut and rejoin as needed. If you cut, be sure to tie ends securely!
- Rnd 9: With black: 9 sc. Switch to white: 3 sc. Switch to black: 3 sc. Switch to white: 3 sc. Switch to black: 30 sc. (48)
- Rnd 10: Black: 8 sc, White: 4 sc, Black: 1 sc, White: 4 sc, Black: 31 sc. (48)
- Rnd 11: Black: 7 sc, White: 13 sc, Black: 28 sc. (48)
- Rnds 12-13: Black: 6 sc, White: 15 sc, Black: 27 sc. (48) (2 rounds)
- Rnd 14: Black: 6 sc. Switch to gray yarn. Gray: 42 sc. (48)
For convenience, you can now move the beginning of your round to the junction of the black and gray colors. Just work an additional 6 sc in gray.
- Rnds 15-21: With gray: 48 sc. (7 rounds)
Now we begin shaping the bottom of the body.
- Rnd 22: (6 sc, dec) repeat 6 times. (42)
- Rnd 23: (5 sc, dec) repeat 6 times. (36)
- Rnd 24: (4 sc, dec) repeat 6 times. (30)
- Rnd 25: (3 sc, dec) repeat 6 times. (24)
Stuff the body firmly. If you’re making a rattle version, insert the rattle capsule now.
- Rnd 26: (2 sc, dec) repeat 6 times. (18)
- Rnd 27: (1 sc, dec) repeat 6 times. (12)
- Rnd 28: 3 dec. (6)
Fasten off, leaving a tail. Thread the tail through a needle, weave through the front loops of the last 6 stitches, and pull tight to close. Hide the end inside the body.
2. Wings (Make 2)
With gray yarn:
- Rnd 1: 6 sc in a magic ring. (6)
- Rnd 2: (2 sc, inc) repeat 2 times. (8)
- Rnd 3: (3 sc, inc) repeat 2 times. (10)
- Rnd 4: (4 sc, inc) repeat 2 times. (12)
- Rnds 5-6: 12 sc. (2 rounds)
- Rnd 7: (2 sc, dec) repeat 3 times. (9)
Do not stuff the wings. Flatten the piece and crochet the edges together with 4 sc through both layers. Leave a long tail for sewing.
3. Beak
With yellow or orange yarn:
- Rnd 1: 6 sc in a magic ring. (6)
- Rnd 2: (2 sc, inc) repeat 2 times. (8)
- Rnd 3: (3 sc, inc) repeat 2 times. (10)
- Rnd 4: 10 sc.
Work an additional 5 sc to move to the edge. Fasten off, leaving a long tail for sewing.
4. Feet (Make 2)
With black yarn (or yellow/orange to match the beak):
You have two options for the feet: crochet them separately and sew them on, or work them directly onto the body using a slip stitch foundation. Here’s the basic foot shape:
Option 1 – Separate Foot:
Ch 4. Starting in the second chain from the hook: work 1 hdc, 1 dc in the same stitch, 1 hdc, ch 1, 1 sl st in the same stitch. Fasten off, leaving a tail for sewing.
Option 2 – Worked Directly on the Body: Using a slip stitch, create 4 foundation stitches on the body where you want the foot to go, then follow the same stitch pattern.
5. Tail
With gray yarn:
The tail is placed at the back, centered around Row 22.
Option 1 – Separate Tail:
Ch 6. Starting in the second chain from the hook: 1 sc, 1 hdc, 3 dc in the next stitch, 1 hdc, 1 sc, ch 1, 1 sl st in the same stitch. Fasten off, leaving a tail for sewing.
Option 2 – Worked Directly on the Body: Using a slip stitch, create 6 foundation stitches on the body at the desired location, then follow the same stitch pattern.
6. Little Tuft
With black yarn:
Using a slip stitch, create 3 foundation stitches on the top of the head. Then work the following pattern:
(Ch 5, 1 sl st in the second chain from hook, 1 sl st in the next 3 chains), then 1 sl st in the next foundation stitch. Repeat this pattern 3 times total.
Pull the yarn through, secure the ends, and hide them inside the head.
Assembly: Bringing Your Penguin to Life
- Attach the Wings: Sew the wings to the sides of the body at the junction of the black and gray colors, starting from the edge of the white chest patch.
- Attach the Beak: Position the beak between Rounds 11-13, centered on the white chest patch. Stuff lightly as you sew it in place.
- Attach the Feet: Sew the feet to the bottom of the body, approximately between Rounds 21 and 22. Leave about 2-3 sc between the feet.
- Attach the Tail: Sew the tail to the back of the body, centered on Row 22.
- Embroider the Eyes: Using black embroidery floss or a strand of black yarn, embroider two small eyes just above the beak.
- Decorate the Tummy: Add a few decorative stitches in the beak color to the tummy area for extra charm.
Your Little Penguin is complete! Give him a squeeze and admire your work.
Bonus: A Cozy Hat for Your Penguin
This little hat is worked in short rows to create a sweet, snug cap with a pom-pom on top!
Hat Instructions:
Work in short rows, working into the back loops only, using single crochet stitches. Work in one section continuously. At the end, you’ll make a seam using slip stitches to join the beginning and end. This seam will run toward the top of the hat.
- Ch 20. (The beginning of the chain is the future top of the hat.)
- Starting in the second chain from the hook: work 14 sc. Work 1 sl st, ch 1, turn.
- Working into the back loops only: 15 sc. Ch 1, turn.
- Working toward the top: 14 sc, 1 sl st, and catch one loop from the foundation chain by working 1 sl st into it. (Note: at this point, there are 3 loops left unworked on the foundation chain.) Ch 1, turn.
- 16 sc, ch 1, turn.
- 15 sc, 1 sl st, and catch one loop from the foundation chain by working 1 sl st into it. Ch 1, turn. (2 loops remain on the foundation chain.)
- 17 sc, ch 1, turn.
- 16 sc, 1 sl st, and catch one loop from the foundation chain by working 1 sl st into it. Ch 1, turn. (1 loop remains.)
- 18 sc, ch 1, turn.
- 17 sc, 1 sl st, and catch the last loop from the foundation chain by working 1 sl st into it. Ch 1, turn.
- 19 sc, ch 1, turn.
The first section is complete! Now begin the second section. The last row (Row 11) of the first section will serve as the foundation chain for the second section.
Work 14 sc along this edge, then repeat steps 4-11.
When both sections are complete, use slip stitches to sew the seam, closing the hat.
Pom-Pom (Make 1):
- Rnd 1: 6 sc in a magic ring. (6)
- Rnd 2: 6 inc. (12)
- Rnds 3-5: 12 sc. (3 rounds)
- Rnd 6: 3 dec. (6)
Stuff lightly with fiberfill. Close the opening and leave a tail for sewing the pom-pom to the top of the hat.
Sew the pom-pom to the tip of the hat. Place the hat on your penguin’s head for the ultimate cuteness!
Tips for Success
- Colorwork Made Easy: When working the white chest, you can either carry the black yarn behind your white stitches or cut and rejoin for each section. If you’re new to colorwork, cutting and rejoining might be simpler—just be sure to tie secure knots!
- Move Your Marker: The pattern suggests moving the beginning of your round after Rnd 14. This helps keep the color changes neat and centered.
- Stuff Firmly: A well-stuffed penguin holds his shape better. Use a chopstick or stuffing tool to get fiberfill into all the nooks and crannies.
- Embroidery Over Safety Eyes: For the youngest recipients, embroidered eyes are safer than plastic safety eyes. Plus, they give this little guy such a sweet, handcrafted look!
- Add a Scarf: For extra charm, crochet a simple chain stitch scarf or a small rectangle to wrap around his neck