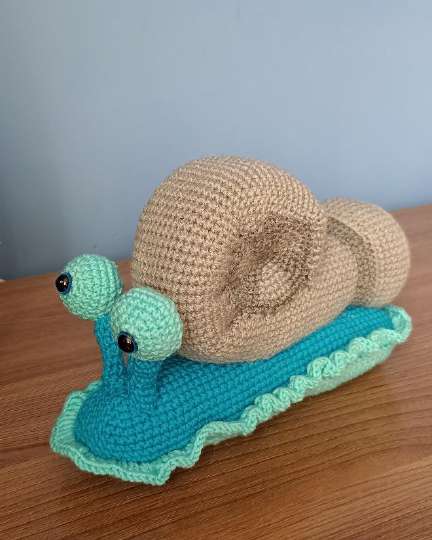
Make a Splash with the Turbo Snail: A Free Crochet Pattern
Hello, sweet hooksters! Are you ready to crochet something truly unique? Today, we’re venturing into the garden (and maybe the race track!) with the most adorable character: the Turbo Snail. This little guy is packed with personality, from his curious, bobbing eyes to his spectacularly coiled “turbo” shell.
I found this pattern and just knew it had to be shared. There’s something so charming about a snail, with their gentle pace and cozy home on their back. But this isn’t just any snail; with that vibrant, striped shell, he looks like he’s ready to zoom! This project is a wonderful way to use up those small amounts of yarn in your stash and mix and match colors to create a snail that’s uniquely yours.
Whether you’re looking for a thoughtful, handmade gift for a little one, a quirky decoration for your shelf, or just a fun and engaging project to sink your hook into, the Turbo Snail is the perfect companion. And don’t let the unique shape of the shell fool you—if you can crochet a tube, you can make this snail! So, grab your favorite yarn, and let’s get started on bringing this speedy little creature to life.
The Cozy Craft Corner: Let’s Meet the Turbo Snail!
This project is broken down into a few simple parts: the unique turbo-charged shell, a sweet little body, and some adorable facial features. We’ll build it piece by piece, and before you know it, you’ll have a new friend to show off. The pattern uses basic stitches and simple shaping, making it a fantastic next step for beginners who are comfortable with crocheting in the round and want to try something a little different. Let’s see what you’ll need to gather before we begin our crochet journey.
Your Crochet Toolkit: Materials & Supplies
Before we start, let’s make sure you have everything you need. This project is quite flexible, so feel free to use what you have on hand!
- Yarn: I used “Caramelka” (100% acrylic, 50g – 175m) in several colors. You’ll need a main color for the body, colors for the shell stripes, and a small amount of black. My color palette was:
- Light Gray (for the main part of the shell)
- Dark Gray (for the shell stripes and side details)
- Black (for the start of the shell)
- Turquoise (for the body and eyes)
- Blue (for the body “skirt”)
- Crochet Hook: Size 2.5 mm (or size needed to achieve a tight, firm fabric so the stuffing doesn’t show).
- Safety Eyes: 2 pairs (or 2 large eyes) for the main eyes. The pattern uses them for the turquoise eye pieces.
- Tapestry Needle: For sewing all the pieces together and weaving in your ends.
- Polyester Fiberfill: Just enough stuffing to make your snail soft and huggable.
Let’s Talk Stitches: Abbreviations (US Terms)
Don’t worry, we’ll take it step-by-step! Here are the abbreviations we’ll be using throughout the pattern:
- ch: chain
- sc: single crochet
- sl st: slip stitch
- inc: increase (2 sc in one stitch)
- dec: decrease (single crochet 2 stitches together)
Ready, Set, Crochet! The Turbo Snail Pattern
The Turbo Shell (The Star of the Show!)
We’ll start with the shell. It’s made in a spiral that forms a long tube, which we then coil and sew into shape. Remember to stuff the shell as you go!
Using black yarn:
- Rnd 1: 6 sc in a magic ring. (6)
- Rnd 2: 6 inc. (12)
- Rnd 3: (1 sc, inc) repeat 6 times. (18)
- Rnd 4: (2 sc, inc) repeat 6 times. (24)
- Rnd 5: (3 sc, inc) repeat 6 times. (30)
- Rnd 6: (4 sc, inc) repeat 6 times. (36)
Switch to light gray yarn and cut the black yarn.
- Rnd 7: 36 sl st in the back loops only? (The pattern says “36 сс”. A “сс” is a slip stitch. This row creates a neat color change ridge.)
- Beginner Tip: This row is a slip stitch row. Insert your hook into the stitch, yarn over, and pull through both the stitch and the loop on your hook. It creates a decorative line.
- Rnd 8: (5 sc, inc) repeat 6 times. (42)
- Rnd 9: (6 sc, inc) repeat 6 times. (48)
- Rnd 10: 48 sc in the back loop only. (This creates a neat edge for the shell’s opening).
- Rnds 11-17: 48 sc in both loops. (7 rounds)
Switch to dark gray yarn.
- Rnd 18: 48 sl st. (Another decorative ridge!)
- Rnd 19: 48 sc.
- Rnd 20: (6 sc, dec) repeat 6 times. (42)
- Rnd 21: (5 sc, dec) repeat 6 times. (36)
Switch to light gray yarn and cut the dark gray yarn.
- Rnd 22: 36 sc in the front loop only. (Creates another nice ridge).
- Rnds 23-93: 36 sc. (Yes, you will be crocheting 70 rounds! This makes the long tube for the coil).
Once you have finished all 93 rounds, do not stuff the very end. Flatten the end of the tube and single crochet the two halves together to close the opening. Cut your yarn, leaving a long tail (about 20 inches / 50 cm) for sewing the coil. Now, take your long tube and coil it tightly into a spiral shell shape. Use the long yarn tail to stitch the coils together securely from the back.
Side Shell Details (Make 2)
These little circles cover the sides of the shell where you stitched it together.
With dark gray yarn:
- Rnd 1: 6 sc in a magic ring. (6)
- Rnd 2: 6 inc. (12)
- Rnd 3: (1 sc, inc) repeat 6 times. (18)
- Rnd 4: (2 sc, inc) repeat 6 times. (24)
- Rnd 5: (3 sc, inc) repeat 6 times. (30)
- Rnd 6: (4 sc, inc) repeat 6 times. (36)
- Rnd 7: (5 sc, inc) repeat 6 times. (42)
- Rnd 8: 42 sc.
Finish off, leaving a long tail for sewing. Sew one to each side of the coiled shell, covering the inner gaps.
The Snail Body
We’ll make this in an oval shape, starting with a chain.
With blue yarn:
- Row 1: Ch 45.
- Rnd 2: Starting in the 2nd ch from the hook, 43 sc, 3 sc in the last ch. Now, without turning, continue working along the other side of the foundation chain: 43 sc, inc in the last stitch. Join with a sl st to the first sc. (You are now working in a continuous oval).
- Rnd 3: 43 sc, 2 inc, 43 sc, 2 inc. (94)
- Rnd 4: 43 sc, inc, 2 sc, inc, 44 sc. (98)
- Rnd 5: inc, 2 sc, inc, 43 sc, inc, 3 sc, inc, 44 sc. (104)
- Rnd 6: inc, 3 sc, inc, 45 sc, inc, 4 sc, inc, 45 sc. (110)
- Rnd 7: inc, 4 sc, inc, 46 sc, inc, 4 sc, inc, 46 sc. (116)
- Rnd 8: inc, 5 sc, inc, 47 sc, inc, 5 sc, inc, 47 sc. (122)
- Rnds 9-12: 108 sc even. (Work 4 rounds without increasing, joining each round).
Switch to turquoise yarn for the “skirt.”
- Next Round: Working in the front loops only, work 2 double crochet (dc) in each stitch around. This will create a frilly, decorative edge. Fasten off and weave in the end.
The Base (Underside)
This is crocheted identically to the body’s starting oval, and will be sewn on to close the bottom.
With turquoise yarn:
- Row 1: Ch 45.
- Rnd 2: Starting in the 2nd ch from the hook, 43 sc, 3 sc in the last ch, then working on the other side: 43 sc, inc. Join.
- Rnd 3: 43 sc, 2 inc, 43 sc, 2 inc. (94)
- Rnd 4: 43 sc, inc, 2 sc, inc, 44 sc. (98)
- Rnd 5: inc, 2 sc, inc, 43 sc, inc, 3 sc, inc, 44 sc. (104)
- Rnd 6: inc, 3 sc, inc, 45 sc, inc, 4 sc, inc, 45 sc. (110)
- Rnd 7: inc, 4 sc, inc, 46 sc, inc, 4 sc, inc, 46 sc. (116)
- Rnd 8: inc, 5 sc, inc, 47 sc, inc, 5 sc, inc, 47 sc. (122)
Finish off, leaving a long tail for sewing.
The Adorable Eyes (Make 2)
With turquoise yarn:
- Rnd 1: 6 sc in a magic ring. (6)
- Rnd 2: 6 inc. (12)
- Rnd 3: (1 sc, inc) repeat 6 times. (18)
- Rnd 4: (2 sc, inc) repeat 6 times. (24)
- Rnds 5-7: 24 sc. (3 rounds)
- Rnd 8: (2 sc, dec) repeat 6 times. (18)
- Insert the safety eyes between Rounds 5 and 6, about 4-5 stitches apart.
- Rnd 9: (1 sc, dec) repeat 6 times. (12)
- Rnd 10: 6 dec. (6)
Fasten off, leaving a long tail for sewing. Weave the tail through the front loops of the last 6 stitches and pull tight to close.
Eye Stalks (Make 2)
With blue yarn:
- Rnd 1: 7 sc in a magic ring. (7)
- Rnds 2-3: 7 sc. (2 rounds)
- Rnd 4: dec, 2 sc, dec, 1 sc. (5)
- Rnds 5-7: 5 sc. (3 rounds)
- Rnd 8: inc, 2 sc, inc, 1 sc. (7)
- Rnds 9-10: 7 sc. (2 rounds)
Fasten off, leaving a long tail for sewing.
Snail Assembly: Bringing It All Together
Now for the magical part—watching your Turbo Snail come to life
- Attach Eyes to Stalks: Sew the closed end of each turquoise eye piece to the top of a blue eye stalk.
- Attach Stalks to Body: Position the eye stalks on the wider end of the blue body (the snail’s “head”) and sew them on securely.
- Prepare the Body: Take the blue body piece and, using the turquoise base piece, sew them together. Start sewing, and as you go, stuff the body firmly with fiberfill. Continue sewing all the way around to close the body completely.
- Attach the Shell: Position the coiled turbo shell on the snail’s back, over the body. Using a strong yarn needle and the tail from the shell (or a separate piece of yarn), whip-stitch the shell securely to the body. Make sure it’s attached well at several points so it doesn’t wobble.