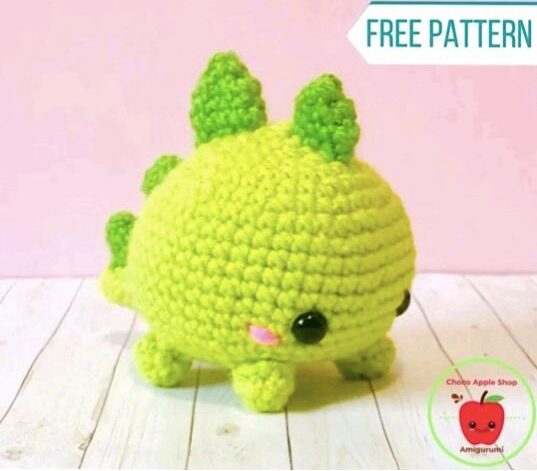
Free Little Steggy Amigurumi Crochet Pattern
Materials
To crochet your very own adorable Little Steggy amigurumi, gather the following supplies:
- Worsted weight yarn – Colour A (for the body)
- Worsted weight yarn – Colour B (for the spikes)
- 8mm safety eyes
- 3.5mm crochet hook
- 2.75mm crochet hook
- Stuffing (polyester fiberfill)
- Yarn needle
- Scissors
- Stitch marker
Abbreviations
This Little Steggy crochet pattern uses standard US crochet terms. Familiarize yourself with these abbreviations to follow the instructions:
- sc: single crochet
- inc: increase (make two single crochets in one stitch)
- dec: decrease (single crochet two stitches together)
- st: stitch
Crafting Your Little Steggy: Step-by-Step Instructions
Get ready to bring your cute amigurumi dinosaur to life with this free crochet pattern and detailed instructions. Remember to use a stitch marker to keep track of your rounds, ensuring a perfectly shaped stegosaurus.
The Body (Colour A)
Using Colour A and your preferred hook (the 3.5mm hook is typically used for the main body of amigurumi), begin crocheting the core of your stegosaurus.
- R1: sc 6 in a magic ring (6 stitches)
- R2: inc x 6 (12 stitches)
- R3: (sc, inc) x 6 (18 stitches)
- R4: (sc 2, inc) x 6 (24 stitches)
- R5: (sc 3, inc) x 6 (30 stitches)
- R6: (sc 4, inc) x 6 (36 stitches)
- R7: (sc 5, inc) x 6 (42 stitches)
- R8: (sc 6, inc) x 6 (48 stitches)
- R9 to R15: sc all around (48 stitches)
- R16: (sc 6, dec) x 6 (42 stitches)
- R17: (sc 5, dec) x 6 (36 stitches)
- R18: (sc 4, dec) x 6 (30 stitches)
- R19: (sc 3, dec) x 6 (24 stitches)
Important Note for Amigurumi: Before continuing with the next rounds, insert the 8mm safety eyes between Round 13 and Round 14. Ensure they are positioned 6 stitches apart for the best look. Begin stuffing the body firmly with polyester fiberfill as you proceed with the decreasing rounds.
- R20: (sc 2, dec) x 6 (18 stitches)
- R21: (sc, dec) x 6 (12 stitches)
Add more stuffing now if needed, ensuring the body is well-formed and firm.
- R22: dec x 6 (6 stitches)
Finish off and weave in any remaining yarn tail to neatly close the opening of your crochet steggy body.
Feet (Colour A – Make 4)
Create four sturdy feet for your stegosaurus using Colour A. These small parts add character to your crochet dinosaur.
- R1: sc 8 in a magic ring (8 stitches)
- R2: sc all around (8 stitches)
- R3: (sc 2, dec) x 2 (6 stitches)
Lightly stuff each foot. Leave a long yarn tail for sewing them onto the body later, making sure to weave it in securely.
Tail (Colour A)
Crochet the tail for your steggy, which will give it its distinct dinosaur shape and balance.
- R1: sc 6 in a magic ring (6 stitches)
- R2: sc all around (6 stitches)
- R3: (sc 2, inc) x 2 (8 stitches)
- R4: sc all around (8 stitches)
- R5: (sc, inc) x 4 (12 stitches)
- R6: sc all around (12 stitches)
- R7: (sc 5, inc) x 2 (14 stitches)
Lightly stuff the tail. Leave a long yarn tail for sewing.
Large Spike (Colour B)
Switch to Colour B for the distinctive plates along Steggy’s back. You will make one large spike for the central part of its dorsal plates.
- R1: sc 5 in a magic ring (5 stitches)
- R2: inc x 5 (10 stitches)
- R3 to R4: sc all around (10 stitches)
Do not stuff this spike. Leave a long yarn tail for sewing.
Small Spikes (Colour B – Make 3)
Make three smaller spikes using Colour B to complete the array of dorsal plates and tail tip.
- R1: sc 4 in a magic ring (4 stitches)
- R2: inc x 4 (8 stitches)
- R3: sc all around (8 stitches)
Do not stuff these spikes. Leave a long yarn tail for sewing.
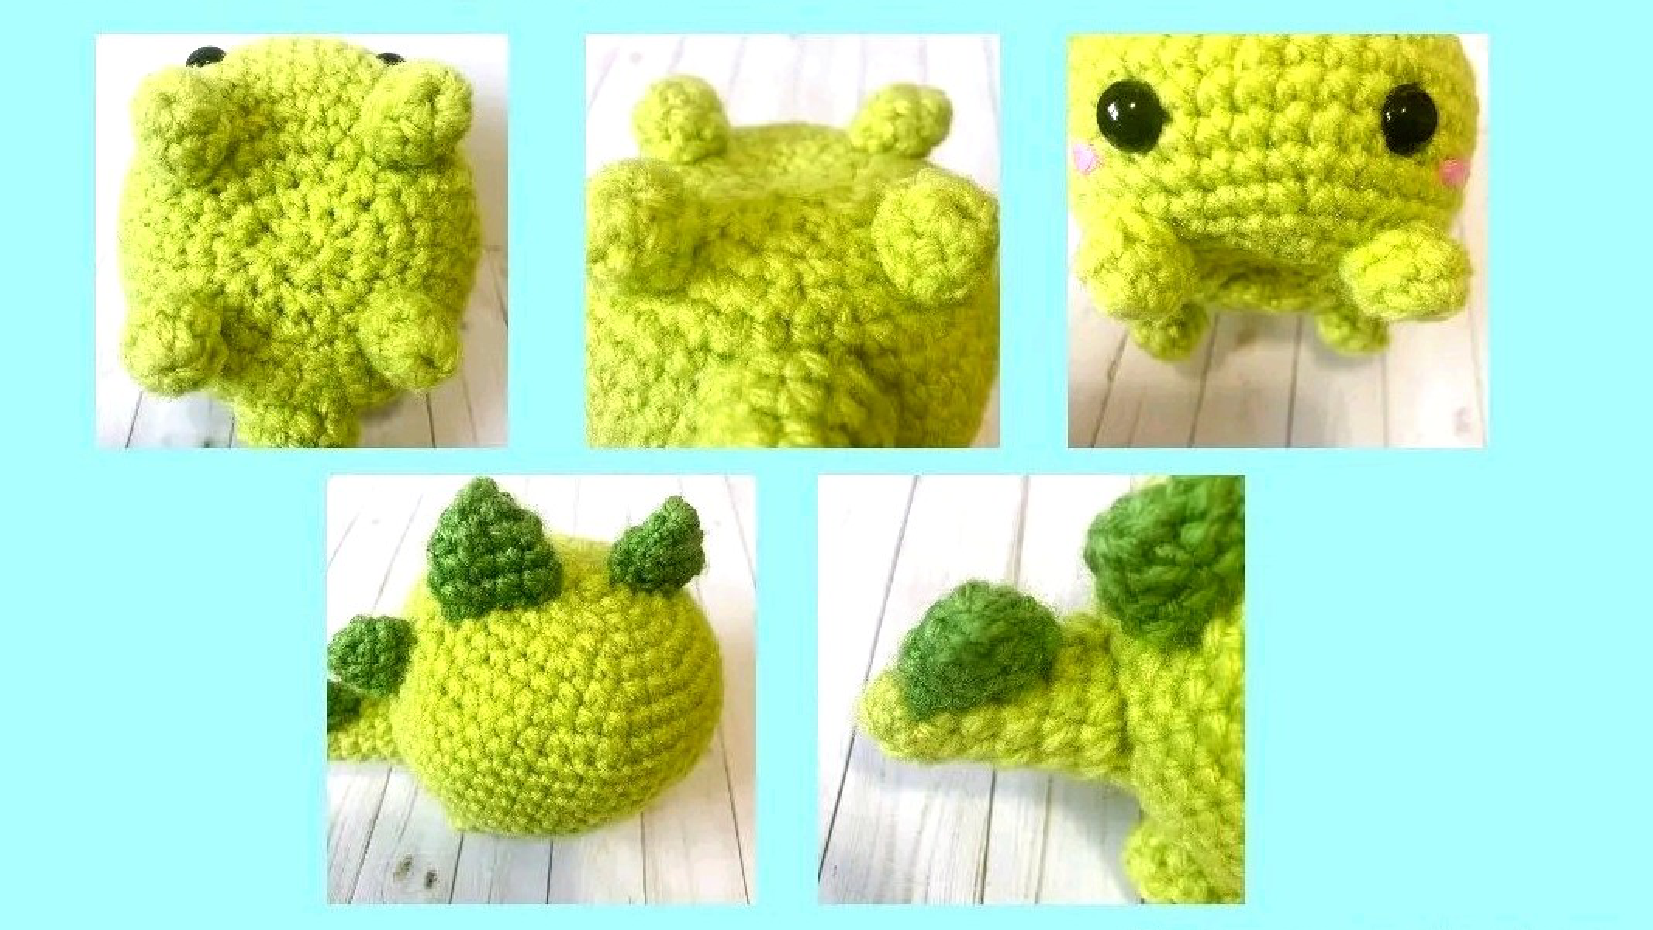
Assembly & Finishing Touches
Now it’s time for the exciting part – assembling all the crocheted pieces to bring your Little Steggy amigurumi to life! A yarn needle will be your best friend here.
- Attach the Feet: Using your yarn needle and the long tails, sew the four feet securely onto the bottom of the steggy’s body. Position them evenly for stability and aesthetic appeal.
- Sew the Tail: Attach the tail to the back of the body, specifically from Round 13 to Round 17. The designer notes that they attached it across 4 stitches on the top and bottom, and 3 stitches on each side, but you can feel free to adjust this placement to what looks best for your unique steggy.
- Position the Spikes: Carefully sew the spikes along the center of Steggy’s back. Start with one small spike just before Round 1 of the body, followed by the large spike, then another small spike. Space these spikes a row or two apart for a natural and balanced look.
- Final Small Spike: The third small spike goes on the tail, adding detail to the very end of your crochet dinosaur.
- Add Cheeks: For an extra touch of cuteness and character, add cheeks! You can do this by embroidering with pink yarn, using felt cutouts, or even applying a touch of blush.
Tips for Amigurumi Beginners
Crocheting amigurumi can be a delightful experience. Here are some beginner tips to help you succeed with your Little Steggy:
- Stitch Markers are Your Friend: Especially when working in continuous rounds, a stitch marker is invaluable for keeping track of your first stitch and ensuring your stitch counts are accurate for each round.
- Stuffing is Key: Stuff your amigurumi firmly but evenly. Too little stuffing makes it floppy, while too much can distort the stitches and make it look lumpy. For smaller parts like feet and tails, lightly stuff to maintain shape without over-bulking.
- Eye Placement Matters: Pay close attention to safety eye placement instructions. The position of the eyes can dramatically change the expression and personality of your amigurumi. Count carefully!
- Don’t Be Afraid to Adjust: While patterns provide guidelines, amigurumi is also an art form. For parts like tail and spike placement, feel free to slightly adjust the position or spacing to achieve the look you desire for your unique creation. Your handmade items are one of a kind!
- Weave in Ends Securely: Take your time to weave in all yarn tails properly. This prevents unraveling and ensures a neat, professional finish for your crochet projects.
Your Finished Little Steggy Amigurumi
Congratulations on completing your adorable Little Steggy! This charming amigurumi dinosaur makes a perfect handmade gift, a lovely nursery decor item, or a delightful addition to your own collection. We love seeing your crochet creations