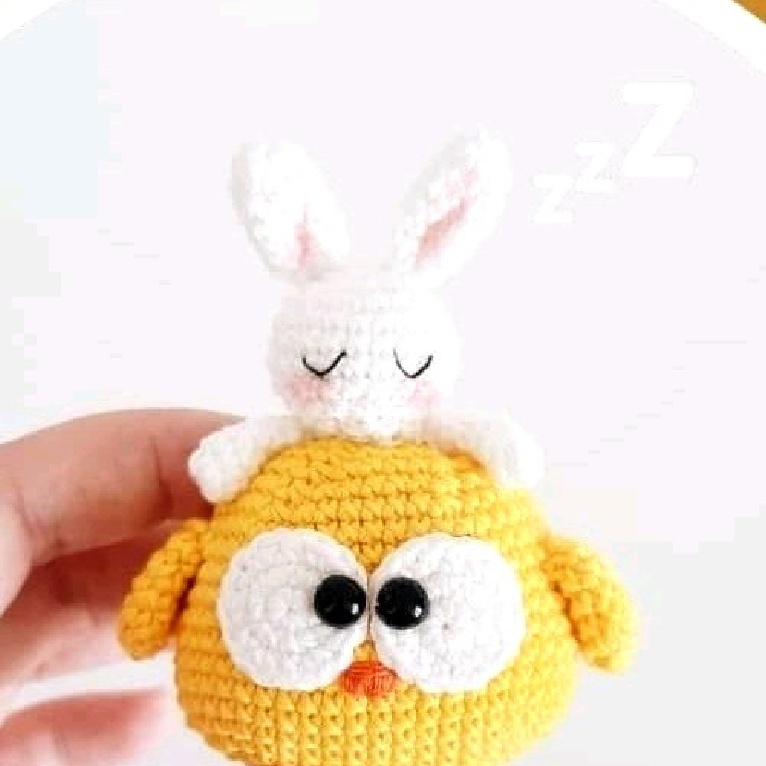
Free Crochet Amigurumi Bunny Pattern
Materials
To create your adorable amigurumi chick and bunny, gather these essential supplies:
- Yarn: Cotton VN 1m (yellow for the chick parts, white for the bunny parts and chick eyes)
- Crochet hook: 2.0 mm
- Black safety eyes
- Fiberfill for stuffing
- Tapestry needle for sewing
- Scissors
- Stitch marker
Abbreviations
Familiarize yourself with these common crochet abbreviations to follow the pattern with ease:
- Mr: Magic ring
- Sc: Single crochet
- Inc: Increase (2 single crochets in one stitch)
- Dec: Decrease (single crochet 2 stitches together)
- (…) x n: Repeat instructions in brackets n times
Get ready to bring these charming amigurumi creations to life with your crochet hook!
Crochet Pattern Instructions
Chick Body (yellow yarn)
Start with yellow yarn to create the main body for your amigurumi chick. Work on both sides of the initial chain to form an oval base.
- Chain 12. Starting from the 2nd chain from hook:
- R1: 10sc, 3sc in last st, turn, 9sc, inc (24 stitches)
- R2: inc, 9sc, 3inc, 9sc, 2inc (30 stitches)
- R3: inc, 10sc, inc, (sc, inc) x2, 10sc, inc, sc, inc, sc (36 stitches)
- R4: 2sc, inc, 11sc, inc (2sc, inc) x2, 11sc, inc, 2sc, inc (42 stitches)
- R5: 1sc, inc, 12sc, inc, (3sc, inc) x2, 12sc, inc, 3sc, inc, 2sc (48 stitches)
- R6 – R14: 48sc (48 stitches)
Begin decreasing to shape the top of the body:
- R15: (6sc, dec) x6 (42 stitches)
- R16: (5sc, dec) x6 (36 stitches)
- R17: (4sc, dec) x6 (30 stitches)
- R18: (3sc, dec) x6 (24 stitches)
- R19: (2sc, dec) x6 (18 stitches)
- R20: (sc, dec) x6 (12 stitches)
- R21: 6dec (6 stitches)
Fasten off. Stuff firmly with fiberfill as you crochet the body, especially before the opening becomes too small.
Chick Wings (yellow yarn – Make 2)
Craft two small wings for your chick using yellow yarn.
- R1: MR 6sc (6 stitches)
- R2: 6inc (12 stitches)
- R3 – R6: 12sc (12 stitches)
Fasten off and leave a long tail for sewing the wings to the body.
Chick Eyes (white yarn – Make 2)
These white circles will form the base for your safety eyes. Use white yarn.
- R1: MR 6sc (6 stitches)
- R2: 6inc (12 stitches)
- R3: (sc, inc) x6 (18 stitches)
Fasten off and leave a long tail for sewing the eyes to the chick’s head.
Bunny Head (white yarn)
Switch to white yarn to create the adorable head for your amigurumi bunny.
- R1: MR 6sc (6 stitches)
- R2: 6inc (12 stitches)
- R3: (sc, inc) x6 (18 stitches)
- R4: (2sc, inc) x6 (24 stitches)
- R5 – R8: 24sc (24 stitches)
Start decreasing and stuffing the head with fiberfill:
- R9: (2sc, dec) x6 (18 stitches)
- R10: (sc, dec) x6 (12 stitches)
Fasten off and leave a long tail for sewing the head to the body (if making a full bunny, or to secure if only making a head accessory).
Bunny Ears (white yarn – Make 2)
Make two perky ears for your bunny using white yarn.
- R1: MR 6sc (6 stitches)
- R2: (sc, inc) x3 (9 stitches)
- R3 – R7: 9sc (9 stitches)
Fasten off and leave a long tail for sewing the ears to the bunny’s head.
Bunny Arm (white yarn)
If your bunny needs a little arm, crochet this simple piece in white yarn. (Note: Only one arm instruction is provided in the pattern, implying this might be for a single-arm feature or one arm of a pair).
- R1: MR 6sc (6 stitches)
- R2-R6: 6sc (6 stitches)
Fasten off and leave a long tail for sewing.
Assembly and Finishing
Once all your amigurumi pieces are crocheted, it’s time to bring your chick and bunny to life!
- Stuffing: Ensure all body and head pieces are firmly stuffed with fiberfill to give them their desired shape.
- Attach Eyes: For the chick, place the black safety eyes onto the white eye circles, then sew the white eye circles onto the chick’s body in the desired position. For the bunny, attach safety eyes directly to the head.
- Sew Parts: Use the long tails left on each component and your tapestry needle to carefully sew the parts together.
- Attach the wings to the sides of the chick’s body.
- Sew the ears onto the top of the bunny’s head.
- If creating a full bunny, sew the head to the body and attach the arm(s).
- Weave in Ends: Securely weave in all remaining yarn tails to create a neat and finished look.
Your handmade amigurumi chick and bunny are now complete! Enjoy your adorable creations, perfect for gifts or decorations.
Happy Crocheting