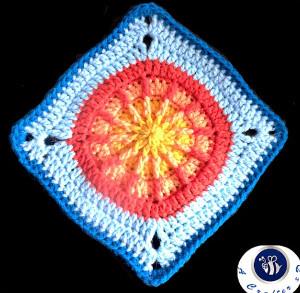
Crochet the Sun and Sky Granny Square
Materials You’ll Need
- Yarn: Worsted Weight Yarn in the following colors:
- Yellow (for the center sun)
- Orange (first sunset ring)
- Red (second sunset ring)
- Light Blue (sky)
- Dark Blue (night sky)
- Crochet Hook: US H-8 (5.0 mm)
- Notions:
- Scissors
- Yarn Needle
- Stitch Markers (highly recommended)
Stitch Abbreviations (US Terms)
- ch: chain
- sl st: slip stitch
- sc: single crochet
- hdc: half double crochet
- dc: double crochet
- tc: triple (treble) crochet
- inc: increase (2 stitches in the same stitch)
- fpdc: front post double crochet
- Special Stitch – Lattice Treble Crochet: Work a triple crochet stitch under the front post stitch (fpdc) from two rounds below
Pattern Instructions
Round 1: The Center Sun
- With yellow yarn, create a magic ring.
- Work 12 double crochet (dc) stitches into the ring.
- Join with a sl st to the first dc. Pull the magic ring tight. (12 sts)
Round 2: Creating Texture
- *Work 1 dc in the next stitch.
- Work 1 fpdc around the post of the same stitch.*
- To do an fpdc: Yarn over, insert your hook from front to back around the post of the stitch, and complete your dc as normal.
- Repeat from * in each stitch around. You are effectively adding one fpdc behind each dc from the previous round.
- Join with a sl st to the first dc. (24 sts)
Round 3: Expanding the Sun
- *Work an inc (2 dc in the next stitch).
- Work 1 dc in the following stitch.*
- Repeat from * around.
- Join with a sl st to the first dc. (36 sts)
Round 4: The First Sunset Ring
- Change to orange yarn.
- *Work 2 sc in the next two stitches.
- Work 1 lattice tc: Yarn over twice, insert your hook from front to back under the fpdc from Round 2 (two rounds below), and complete your tc as normal.*
- Repeat from * around. This creates the beautiful “ray” effect emanating from the center.
- Join with a sl st to the first sc. (36 sts)
Round 5: Increasing Again
- *Work an inc (2 dc in the next stitch).
- Work 2 dc in the next two stitches.*
- Repeat from * around.
- Join with a sl st to the first dc. (48 sts)

Round 6: The Second Sunset Ring
- Change to red yarn.
- *Work 3 sc in the next three stitches.
- Work 1 lattice tc under the fpdc from Round 4 (two rounds below).*
- Repeat from * around.
- Join with a sl st to the first sc. (48 sts)
Round 7: The Final Increase Round
- *Work an inc (2 dc in the next stitch).
- Work 3 dc in the next three stitches.*
- Repeat from * around.
- Join with a sl st to the first dc. (60 sts)
Round 8: Forming the Square (Sky)
- Change to light blue yarn.
- This round forms the corners. In your first stitch, work: (ch 4, 1 dc). (This counts as your first tc and dc, forming the start of a corner).
- Work 13 dc across the next 13 stitches.
- In the next stitch, work (1 dc, 1 tc). This is your first full corner.
- Chain 3.
- *In the next stitch, work (1 tc, 1 dc).
- Work 13 dc across the next 13 stitches.
- In the next stitch, work (1 dc, 1 tc).
- Chain 3.*
- Repeat from * two more times. You will have 4 corners.
- Join with a sl st to the top of the beginning ch-4.
Round 9: Building the Square
- Work 1 dc in the first stitch.
- Work 16 dc across the next 16 stitches.
- In the chain-3 corner space, work (2 dc, ch 2, 2 dc). This defines the corner.
- *Work 17 dc across the next 17 stitches.
- In the next chain-3 corner space, work (2 dc, ch 2, 2 dc).*
- Repeat from * around.
- Join with a sl st to the first dc.
Round 10: The Final Border (Night Sky)
- Change to dark blue yarn.
- Chain 1. Work 1 hdc in the same stitch.
- Work 20 hdc across the next 20 stitches.
- In the chain-2 corner space, work 3 hdc.
- *Work 21 hdc across the next 21 stitches.
- In the next chain-2 corner space, work 3 hdc.*
- Repeat from * around.
- Join with a sl st to the first hdc.
- Fasten off and weave in all your ends
Tips for Success
- Standing Stitches: The pattern mentions a “chainless starting dc”. To do this, make a slip knot, yarn over, insert your hook into the stitch, and complete your dc as normal. It creates a cleaner start than a chain-3.
- Post Stitches: For the fpdc and lattice tc, make sure you’re going around the post (the vertical part) of the stitch, not through the top loops.
- Counting: This pattern requires careful counting, especially in Rounds 8 and 9. Use stitch markers to mark the first stitch of each round and each corner.
- Blocking: This square will benefit greatly from blocking. It will open up the texture and ensure your square is perfectly flat and shaped.
Final Thoughts
Congratulations! You have successfully captured the beauty of a sunset in a crochet square. This project is a true achievement and a wonderful skill-builder