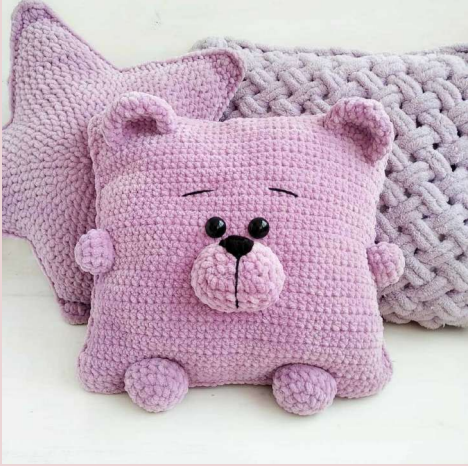
Crochet Plush Bear Pillow Pattern
Materials
- Plush yarn (e.g., YarnArt Dolce or Himalaya Dolphin Baby) – 2 skeins
- Crochet hook, size 4.0 mm or 4.5 mm
- 20 mm sew-on or safety eyes
- Black yarn (plush or other) for embroidering the nose, OR a 30 mm safety/sew-on nose
- Thin black thread (e.g., Iris) for embroidering facial details and eyebrows
- Thin thread matching the main yarn color for sewing parts
- Polyester fiberfill for stuffing (approx. 170-200g)
- A large-eye needle for sewing
Abbreviations
- ch – chain stitch
- sc – single crochet
- sl st – slip stitch
- p. – stitch
- inc – increase (2 sc in the same stitch)
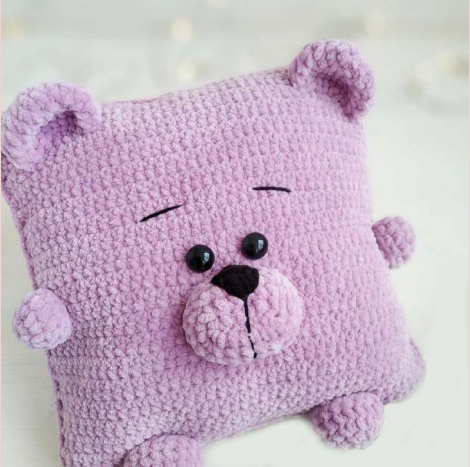
Finished Size
Approximately 30 x 30 cm (12 x 12 inches).
Crochet Bear Pillow: Step-by-Step Instructions
Tips for Working with Plush Yarn
- Starting Circle: Instead of a magic ring, which can be difficult with plush yarn, this pattern starts with 2 ch. You will work the first round’s stitches into the first chain made (the second chain from the hook)
- Smooth Finish: To avoid a “step” at the end of round pieces like the ears and paws, finish the last round with a slip stitch before cutting the yarn.
- Counting Stitches: It’s crucial to count your stitches regularly, at least every few rows, to ensure your pillow panels remain square.
- Tension: The pattern is based on a starting chain of 46 stitches. If your tension is different, you may need to adjust the number of starting chains to achieve the 30×30 cm size.
Pillow Panels (Make 2)
The main body of the bear pillow is made from two identical square panels.
- Start by making a foundation chain of 46 ch.
- Row 1: Work 1 sc into the second chain from the hook and in each chain across. (45 sc)
- Row 2: Ch 1 (this counts as your first stitch), turn your work. Work 44 sc across the row. (45 sc)
Continue repeating Row 2, crocheting back and forth in turning rows, until your piece forms a square. Create a second panel in the exact same way.
Snout
The snout is crocheted in a continuous spiral.
- Start with a foundation chain of 7 ch.
- Row 1: Work 3 sc into the second chain from the hook, 4 sc in the next 4 chains, 3 sc in the last chain. Now, working on the opposite side of the foundation chain, work 4 sc. (14 sts)
- Row 2: Work 3 increases, 4 sc, 3 increases, 4 sc. (20 sts)
- Row 3: (1 sc, inc) x 3, 4 sc, (1 sc, inc) x 3, 4 sc. (26 sts)
- Row 4: Work 26 sc around. Finish with 1 sl st. Cut the yarn, leaving a long tail for sewing.
Ears (Make 2)
- Row 1: Ch 2, work 6 sc into the first chain. (6 sc)
- Row 2: Work 6 increases. (12 sc)
- Row 3: (1 sc, inc) x 6. (18 sc)
- Row 4: (2 sc, inc) x 6. (24 sc)
- Rows 5-6: Work 24 sc around for two rows.
- Finish with 1 sl st. Cut the yarn, leaving a long tail for sewing. Repeat for the second ear.
Front Paws (Make 2)
- Row 1: Ch 2, work 6 sc into the first chain. (6 sc)
- Row 2: Work 6 increases. (12 sc)
- Rows 3-4: Work 12 sc around for two rows.
- Finish with 1 sl st. Cut the yarn, leaving a long tail for sewing. Repeat for the second paw.
Back Paws (Make 2)
- Row 1: Ch 2, work 6 sc into the first chain. (6 sc)
- Row 2: Work 6 increases. (12 sc)
- Row 3: (1 sc, inc) x 6. (18 sc)
- Rows 4-5: Work 18 sc around for two rows.
- Finish with 1 sl st. Cut the yarn, leaving a long tail for sewing. Repeat for the second paw.
Assembly and Finishing Touches
Now it’s time to bring your adorable bear pillow to life! For a visual guide on sewing plush parts,
- Assemble the Pillow: Place the two square panels together. Using the thin matching yarn, sew three sides together. Turn the pillow right-side out.
- Insert Eyes: If using safety eyes, attach them to the front panel now, before stuffing. Place them roughly in the middle of the panel, with about 5 stitches between the posts.
- Stuff the Pillow: Firmly stuff the pillow with fiberfill until it has a plump, even shape. Once stuffed, sew the final side closed.
- Attach the Snout: Pin the snout in the center of the face, about two rows below the eyes (or 8-9 rows down from the top center). If using a safety nose, insert it into the snout (around the 2nd or 3rd row) before you start sewing. Begin sewing the snout to the pillow, adding a small amount of stuffing just before you close the seam.
- Embroider Facial Details: Using the thin black yarn, embroider a vertical line down from the center of the nose. Add eyebrows above the eyes for expression.
- Sew on Ears and Paws: Position the ears on the top corners of the front panel. Pin the paws to the sides and bottom of the pillow as desired. Sew all parts securely to the front side of the pillow. Add a little stuffing to the paws as you sew them on.
Congratulations! Your plush bear pillow is finished and ready for snuggles


