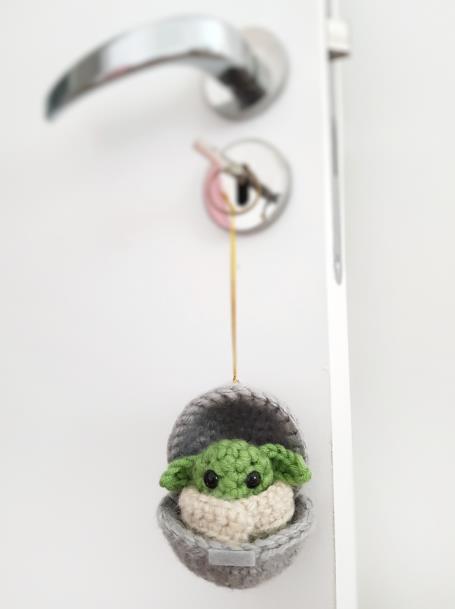
Crochet an Adorable Baby Keychain: A Quick & Cute Free Pattern
Materials & Tools
- Yarn: Small amounts of cotton yarn in Cream, Grey, and Green. The sample uses a standard weight (~100g/200m). Gauge isn’t critical, but use a hook appropriate for your yarn.
- Crochet Hook: 3.0 mm.
- Eyes: One pair of black 7mm safety eyes.
- Filling: A small amount of acrylic fiberfill or polyester stuffing.
- Felt: A small piece of grey felt for pod details.
- Notions: Tapestry needle, scissors, pins.
- Optional: Golden thread or cord for the keychain loop, fabric glue for attaching felt details.


Abbreviations (US Terms)
- Rnd: Round
- St: Stitch
- Sc: Single Crochet
- Sl st: Slip Stitch
- Dc: Double Crochet
- Hdc: Half Double Crochet
- Inc: Increase (2 sc in one stitch)
- Dec: Decrease (sc 2 stitches together)
- *** … *** : Repeat instructions between asterisks.
- ( ) : Total stitch count at the end of the round.
Finished Size: Approximately 7 cm / 2.7 inches tall.
Step-by-Step Crochet Instructions
Let’s build our baby from the pod up!
Part 1: The Pod (Make 2 Pieces)
Use Grey yarn for both pieces.
- 6 sc in a Magic Ring (6).
- 6 inc (12).
- (Sc in next st, inc) x6 (18).
- (Sc in next 2 st, inc) x6 (24).
- (Sc in next 3 st, inc) x6 (30).
- Rounds 6-7: Sc in each st around (30).
- Fasten off, leaving a long tail for sewing. Make two identical pieces.
Part 2: The Head
Use Green yarn.
- 6 sc in a Magic Ring (6).
- 6 inc (12).
- Rounds 3-4: Sc in each st around (12).
- EYE PLACEMENT: Carefully attach the 7mm safety eyes between Rounds 2 and 3, with about 2 stitches between them. Adjust based on your piece to get the sweetest expression.
- 6 dec (6).
- Add a small pinch of stuffing now.
- 6 inc (12).
- (Sc in next st, inc) x6 (18).
- Sc in each st around (18).
- Fasten off and weave the tail inside the head.
Part 3: The Ears (Make 2)
Use Green yarn.
- Ch 4. Starting in the 2nd chain from the hook:
- Work 1 sc in the first chain.
- Work 1 hdc in the next chain.
- Work 2 dc in the last chain. (4 stitches total).
- Fasten off, leaving a long tail for sewing.
Part 4: The Collar
Use Cream yarn.
- Ch 23. Starting in the 2nd chain from the hook:
- Row 1: Sc in each chain across (22 sc). Ch 1, turn.
- Row 2: Sc in each st across (22 sc).
- Fasten off, leaving a long tail for sewing.
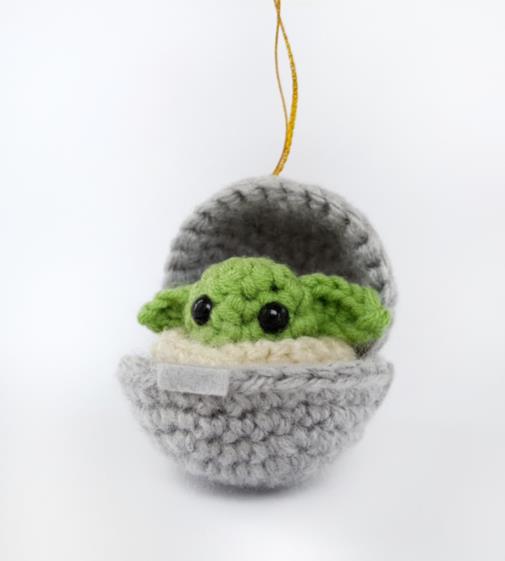
Assembly & Finishing: Bringing Your Baby to Life
This is where the magic happens! Using pins to position everything first is highly recommended.
- Attach the Ears: Sew the two green ears to the top/sides of the head.
- Attach the Collar: Wrap the cream collar around the base of the head (the neck). The ends should meet at the front. Sew or glue it in place. For maximum cuteness, position it so it sits just below the eyes, covering where a mouth would be.
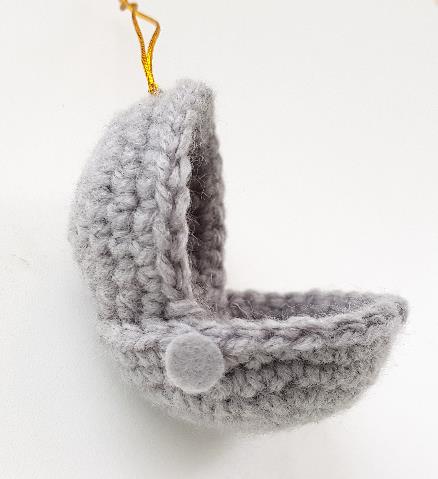
- Assemble the Pod: Take your two grey pod pieces. Nest one inside the other, lining up the edges, to give the pod a double-layered, rounded look. Sew or glue them together around the outer edge.
- Attach the Head: Sew or glue the head securely to the top of the assembled pod.
- Add Felt Details: Cut two small grey felt circles and one small rectangle. Glue the circles to each side of the pod and the rectangle to the front, as shown in the pattern photo.
- Make the Keychain Loop: Using golden thread or a strand of yarn, create a loop with a simple knot at the top of the pod for hanging. Alternatively, you can attach a small keyring.
Tips for a Perfect Miniature Make
- Safety First: If this keychain is for a very young child, consider embroidering the eyes with black thread instead of using safety eyes, as they can be a choking hazard if they become loose. The designer also recommends using anti-allergic yarn if it will be handled frequently.
- Stuffing Small Parts: Use the end of a pencil, a chopstick, or tweezers to get small amounts of stuffing into the head and to position it neatly.
- Sewing Success: When sewing small parts, use the long tails you left. Make small, secure stitches and weave in the ends thoroughly inside the body for a clean finish.
- Expression is Key: Take your time positioning the eyes! This is what gives your baby its adorable personality. Placing them slightly wide and low often creates the sweetest look.
- Personalize It: Feel free to change the colors! Make a pink or blue baby, or use different colored felt for the pod details.
Congratulations! Your utterly adorable Baby Keychain is complete