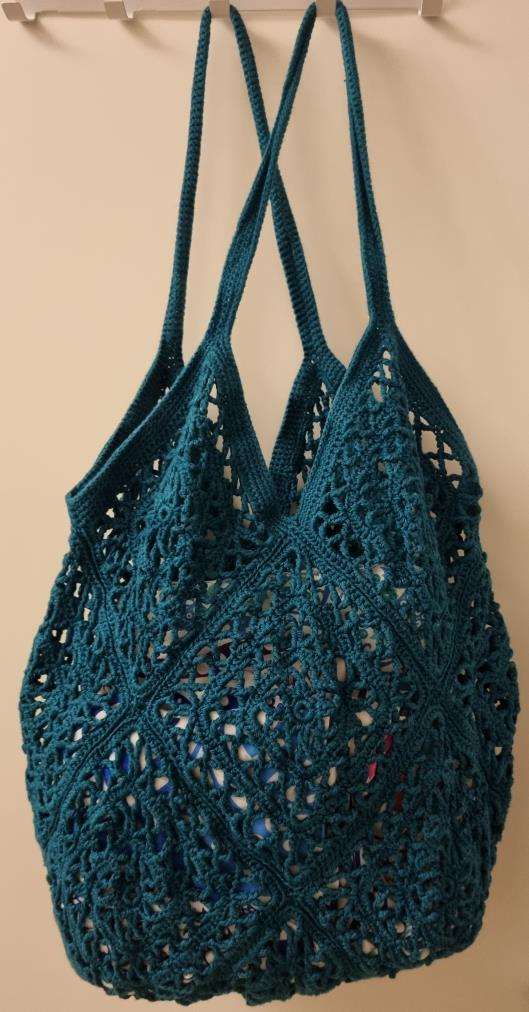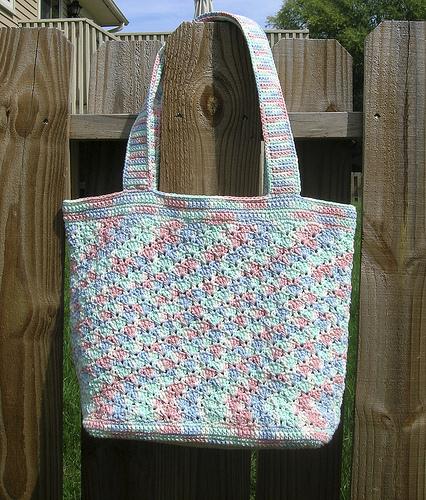
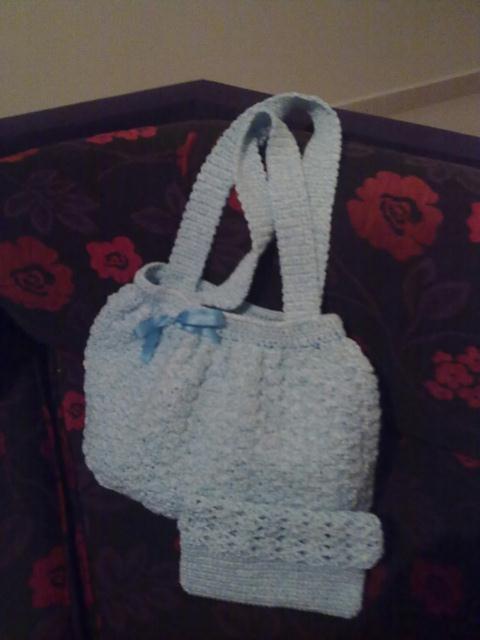
Crochet a Sweet Pea Tote Bag
Materials & Tools You’ll Need
- Yarn: Approximately 680 yards (15.5 oz) of worsted-weight cotton yarn (like Lily Sugar ‘n Cream).
- Crochet Hooks:
- US G (4.0 mm) for the body of the bag.
- US E or F (3.5 mm or 3.75 mm) for the straps (using a smaller hook makes the straps stronger).
- Notions:
- Yarn needle
- Scissors
- Sewing needle and matching sewing thread (optional, for reinforcing straps)
Gauge & Finished Size
- Gauge: 20 single crochet (sc) = 4 inches; 19 rows of sc = 4 inches.
- Finished Size: Approximately 15″ wide x 13″ high x 3″ deep.
Crochet Abbreviations (US Terms)
- ch: chain
- sc: single crochet
- hdc: half double crochet
- dc: double crochet
- sl st: slip stitch
- sp: space
- st(s): stitch(es)
- rnd: round
- rep: repeat
The Crochet Pattern: Sweet Pea Tote
Part 1: The Base (Worked in Rounds)
We begin by creating an oval base. The number of stitches will increase each round as we form the corners.
- Foundation: Ch 42.
- Rnd 1: Sc in the 2nd ch from hook. Sc in each of the next 39 ch. Work 5 sc in the last ch. Now, working down the opposite side of the foundation chain, sc in each of the next 39 sts. Work 4 sc in the same chain you made the first sc of this round. Join with a sl st to the first sc. (88 sc total) Do not turn; we will be working in continuous rounds.
- Rnd 2: Ch 1, sc in the same st as the sl st. Sc in the next 40 sc. In the next sc (this is the first corner), work [1 sc, ch 2, 1 sc]. Sc in the next st. In the next sc (second corner), work [1 sc, ch 2, 1 sc]. Sc in the next 41 sc. In the next sc (third corner), work [1 sc, ch 2, 1 sc]. Sc in the next st. In the next sc (fourth corner), work [1 sc, ch 2, 1 sc]. Join with a sl st to the first sc. *(84 sc + 4 corner groups)*
- Rnds 3-8: Continue working in this manner. Each round will increase the number of sc between the corners. The pattern for the corners remains the same: [1 sc, ch 2, 1 sc] in each ch-2 sp from the previous round.
- Your stitch count will increase by 8 sc each round:
- Rnd 3: 92 sc
- Rnd 4: 100 sc
- Rnd 5: 108 sc
- Rnd 6: 116 sc
- Rnd 7: 124 sc
- Rnd 8: 132 sc
- After Rnd 8, join with a sl st and fasten off.
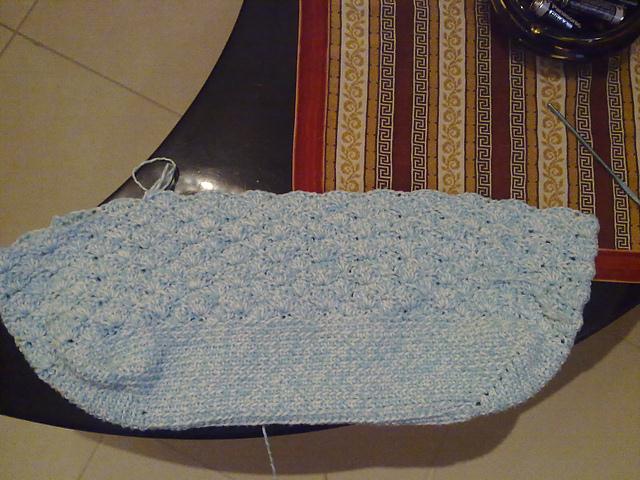
Part 2: The Sides & Textured Pattern
- Rnd 9: Join yarn with a sl st into any ch-2 corner space. Ch 3 (counts as first dc), work 3 dc into the same corner sp. Dc in every sc all the way around the bag. When you reach each ch-2 corner sp, work 3 dc into that space. Join with a sl st to the top of the beginning ch-3. (148 dc)
- Rnd 10: Ch 1, sc in the same st and in each dc around. Join with a sl st.
- Rnd 11: Ch 1, dc in the same st and in each sc around. Join with a sl st.
- Rnd 12: Ch 1, sc in the same st and in each dc around. Join with a sl st.
- Rnd 13 (Texture Begin): Ch 2 (does not count as a st), dc in the next 2 sc. Skip the next 2 sc, work 5 dc into the next sc. Skip the next 2 sc, dc in the next 2 sc. Repeat from *** around. You will end with a 5-dc group. Join with a sl st to the first dc. This creates the “2-dc group” and “5-dc group” pattern.
- Rnd 14: Ch 3 (counts as first dc). *Work 5 dc into the space between the first and second dc of the next 2-dc group. Dc in the space between the 2nd and 3rd dc of the next 5-dc group. Dc in the space between the 3rd and 4th dc of the same 5-dc group.* Repeat from * around. Join with a sl st to the top of the beginning ch-3. This round re-establishes the groups for the next pattern round.
- Rnds 15-37: Repeat Rounds 13 and 14 alternately. This will build the beautiful textured sides of your bag. The top might look a little wavy, which is perfect—we’ll even it out next!
- Rnd 38 (Evening Round): Ch 1. *Work 2 hdc into each dc of the 2-dc group. For the 5-dc group: work 1 hdc in the first st, 1 sc in each of the next 3 sts, 1 hdc in the last st.* Repeat from * around, adjusting with an extra hdc or sc if needed to keep the edge flat. Join with a sl st.
- Rnds 39-42: These rounds create a smooth top edge.
- Rnd 39: Ch 2, dc in each st around. Join with sl st.
- Rnd 40: Ch 1, sc in each st around. Join with sl st.
- Rnd 41: Repeat Rnd 39.
- Rnd 42: Repeat Rnd 40. Join with a sl st and fasten off.
Part 3: The Straps (Make 2)
Switch to your smaller hook (E or F) for extra strength.
- Foundation: Ch 8, leaving a very long tail (at least 18 inches) for sewing the strap to the bag.
- Row 1: Sc in the 2nd ch from hook and in each remaining ch across. Turn. (7 sc)
- Rows 2-126: Ch 1, sc in each st across. Turn. Work until the strap measures your desired length (approx. 42-45 inches is standard for a shoulder tote). Do not fasten off.
- Edging: Now, work sc evenly all the way around the entire strap. At each corner, work [1 sc, ch 1, 1 sc] to create a neat turn. Join with a sl st to the first sc and fasten off, leaving another long tail for sewing.
Finishing and Assembly
- Weave in Ends: Weave in all ends from the body of the bag.
- Position Straps: Fold the top of your bag flat. Measure 3.5 inches in from the side seam (or side edge). This is where the inside edge of your strap will go. Pin both straps in place, ensuring they are not twisted.
- Attach Straps: Use the long tails and your yarn needle to sew the straps very securely to the bag. For extra strength, you can first baste them in place with matching sewing thread as the designer suggests. Sew along all four sides of the strap end for the most secure hold.
- Final Check: Give your straps a gentle tug to ensure they are firmly attached. Weave in the final ends