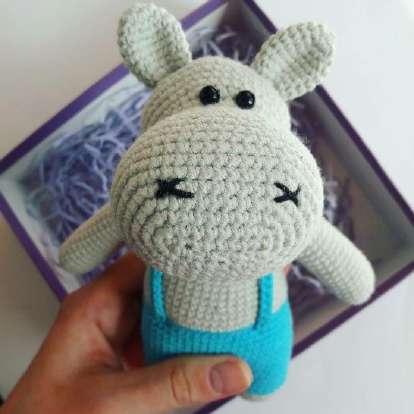
Crochet a Sweet Little Hippo (Begemotik)
Hello, lovely crocheters! Are you ready to create an utterly charming little friend? Today, we’re diving into a free pattern for a sweet hippo, lovingly called “Begemotik.” This project is perfect for anyone who loves amigurumi, from beginners looking for a clear, step-by-step guide to seasoned pros wanting a quick and satisfying make.
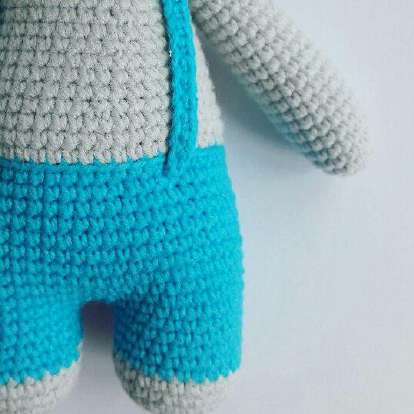
This little hippo, designed by Yulia Koroleva, is full of personality. With its simple shapes and cute details like overalls and ears, it’s a joy to bring to life with your hook and yarn. It’s the perfect project to use up your cotton yarn scraps and makes a wonderful gift for children and adults alike. So, grab your favorite soft yarn, and let’s get started on creating a huggable new pal
Materials You’ll Need
- Yarn: Worsted weight or DK cotton yarn is ideal.
- Main Color (Body): Grey or another hippo color of your choice.
- Contrasting Color (Overalls): Blue, denim, or any color you like for the pants.
- Crochet Hook: A hook size appropriate for your yarn (e.g., 2.5mm – 3.5mm).
- Notions:
- Scissors
- Yarn Needle
- Fiberfill Stuffing
- Safety Eyes or Black Yarn for Embroidering Eyes
Stitch Abbreviations (US Terms)
This pattern uses standard US crochet terms.
- ch: chain
- sc: single crochet
- inc: increase (2 sc in the same stitch)
- dec: decrease (sc 2 together)
- BLO: back loop only
Pattern Instructions
Part 1: Legs & Body (Worked as one piece)
We start by making two legs and then join them to form the body.
Leg (Make 2):
- Start with the main body color.
- Rnd 1: Make a magic ring and work 6 sc into the ring. (6)
- Rnd 2: Inc in each stitch around. (12)
- Rnd 3: (Sc 1, inc) repeat 6 times. (18)
- Rnd 4: (Sc 2, inc) repeat 6 times. (24)
- Rnds 5-7: Sc in each stitch around. (24)
- Rnds 8-10: Switch to the overalls color. Sc in each stitch around. (24)
- First Leg Only: Fasten off.
- Second Leg Only: Do NOT fasten off. You will use this yarn to join the legs.
Joining the Legs & Forming the Body:
10. With the second leg still on your hook, ch 2. Now, join to the first leg by working 1 sc into any stitch on the first leg. This is the first stitch of Rnd 11.
11. Work 23 more sc evenly around the first leg, making sure to work 2 inc (increases) on the sides of the leg (you can place these roughly where they look right).
12. Work 2 sc into the chain-2 space you just made.
13. Work 24 sc evenly around the second leg, again placing 2 inc on the sides.
14. Work 2 sc into the other side of the chain-2 space. You should now have 54 stitches. Join with a sl st to the first sc. You are now working in continuous rounds.
15. Rnds 12-16: Sc in each stitch around. (54)
16. Rnd 17: Work 2 dec (one on each side). (52)
17. Rnds 18-20: Sc in each stitch around. (52)
18. Rnd 21: Work 2 dec (one on each side). (50)
19. Rnd 22: Switch back to the main body color. Work this round in the BLO (back loops only). Sc in each stitch around. (50)
20. Rnd 23: Sc in each stitch around. (50)
21. Rnd 24: Work 2 dec (one on each side). (48)
22. Rnd 25: Sc in each stitch around. (48)
23. Rnd 26: (Sc 10, dec) repeat 4 times. (44)
24. Rnds 27-29: Sc in each stitch around. (44)
25. Rnd 30: (Sc 9, dec) repeat 4 times. (40)
26. Rnd 31: Sc in each stitch around. (40)
27. Rnd 32: (Sc 8, dec) repeat 4 times. (36)
28. Rnd 33: Sc in each stitch around. (36)
29. Rnd 34: (Sc 7, dec) repeat 4 times. (32)
30. Rnd 35: Sc in each stitch around. (32)
31. Rnd 36: (Sc 6, dec) repeat 4 times. (28)
32. Rnd 37: (Sc 5, dec) repeat 4 times. (24)
33. Rnd 38: Sc in each stitch around. (24)
34. Stuff the body firmly. Fasten off, leaving a long tail for sewing. Close the opening.
Part 2: Head
- Foundation: Ch 9.
- Row 1: Working in both sides of the foundation chain: Sc in the second ch from hook and in the next 6 ch. Work 3 sc in the last ch. Now, working along the other side of the foundation chain: Sc in the next 6 ch. Work 2 sc in the first ch (where you started). Join. (18)
- Row 2: Inc, sc 6, inc, inc, inc, sc 6, inc, inc. (24)
- Row 3: Sc 1, inc, sc 7, inc, sc 1, inc, sc 1, inc, sc 7, inc, sc 1, inc. (30)
- Row 4: Sc 2, inc, sc 8, inc, sc 2, inc, sc 2, inc, sc 8, inc, sc 2, inc. (36)
- Row 5: Sc 3, inc, sc 9, inc, sc 3, inc, sc 3, inc, sc 9, inc, sc 3, inc. (42)
- Row 6: Sc 4, inc, sc 10, inc, sc 4, inc, sc 4, inc, sc 10, inc, sc 4, inc. (48)
- Rnds 7-12: Sc in each stitch around. (48)
- Rnd 13: (Sc 6, dec) repeat 6 times. (42)
- Rnd 14: Sc in each stitch around. (42)
- Rnd 15: (Sc 5, dec) repeat 6 times. (36)
- Rnd 16: Sc in each stitch around. (36)
- Rnd 17: (Sc 4, dec) repeat 6 times. (30)
- Rnd 18: Sc in each stitch around. (30)
- Rnd 19: (Sc 4, inc) repeat 6 times. (36) This creates the snout.
- Rnd 20: (Sc 5, inc) repeat 6 times. (42)
- Rnd 21: (Sc 6, inc) repeat 6 times. (48)
- Rnds 22-25: Sc in each stitch around. (48)
- Rnd 26: (Sc 6, dec) repeat 6 times. (42)
- Rnd 27: (Sc 5, dec) repeat 6 times. (36)
- Rnd 28: (Sc 4, dec) repeat 6 times. (30)
- Now, start stuffing the head firmly.
- Rnd 29: (Sc 3, dec) repeat 6 times. (24)
- Rnd 30: (Sc 2, dec) repeat 6 times. (18)
- Rnd 31: (Sc 1, dec) repeat 6 times. (12)
- Rnd 32: Dec 6 times. (6)
- Fasten off and use a yarn needle to weave the tail through the front loops of the remaining 6 stitches. Pull tight to close the hole and secure.
Part 3: Arms (Make 2)
- Start with the main body color.
- Rnd 1: 6 sc in a magic ring. (6)
- Rnd 2: Inc in each stitch around. (12)
- Rnd 3: (Sc 1, inc) repeat 6 times. (18)
- Rnds 4-22: Sc in each stitch around. (18)
- Rnd 23: (Sc 1, dec) repeat 6 times. (12)
- Rnd 24: Sc in each stitch around. (12)
- Stuff the arms. Do not close the opening. Flatten the top and sew it closed by working a round of sc through both layers to create a flat edge for sewing.
Part 4: Ears (Make 2)
- Rnd 1: 6 sc in a magic ring. (6)
- Rnd 2: Inc in each stitch around. (12)
- Rnd 3: Sc in each stitch around. (12)
- Rnd 4: (Sc 1, inc) repeat 6 times. (18)
- Rnds 5-6: Sc in each stitch around. (18)
- Fasten off, leaving a long tail for sewing. Do not stuff. Flatten the ear
Assembly & Finishing
- Sew the Head: Attach the head securely to the body.
- Sew the Arms: Sew the flat top of the arms to the sides of the body.
- Sew the Ears: Sew the flattened ears to the top of the head.
- Embroider the Face: Using black yarn or safety eyes, create a cute face for your hippo. Embroider a simple straight or smiling mouth.
- Suspenders (Optional): To make the overalls have suspenders, attach yarn to the back of the overalls (around row 22). Chain a long enough length to go over the shoulder. Turn, and sc in each chain back to the body. Sew the end of the strap to the front of the overalls. Repeat for the other side.