Crochet a Festive Favorite: Jolly Santa with Adorable Friends Pattern
Ho, ho, hello, wonderful maker! Are you ready to embark on a festive crochet adventure that fills your home with holiday spirit? Today, we’re diving into a truly delightful and detailed pattern: the Jolly Santa complete with his own cute teddy bear and reindeer friends!
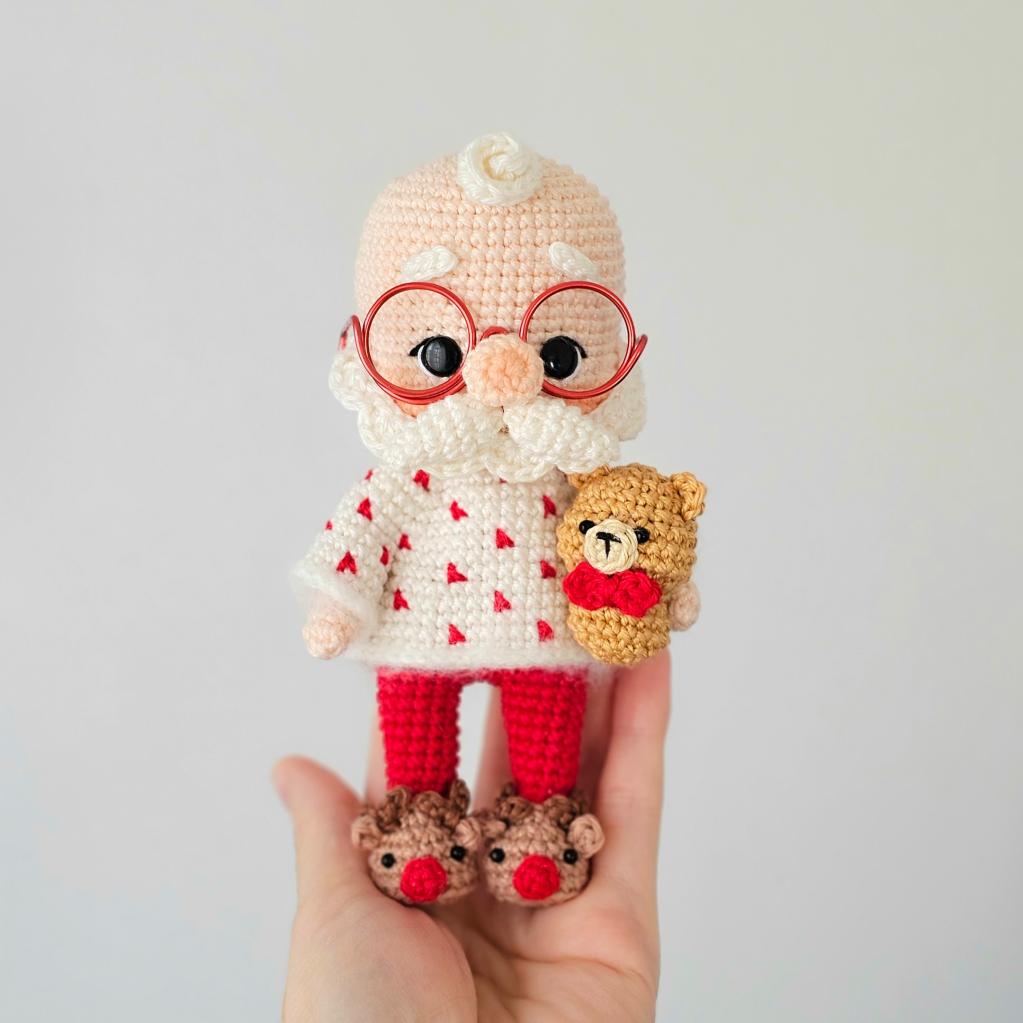
This isn’t just any Santa pattern—it’s a whole holiday scene in one! Designed by the talented Burcu Bülbül (Shirli_Halka), this project features a beautifully sculpted Santa with a twinkling expression, a fluffy beard, and a cozy striped sweater. But the magic doesn’t stop there! The pattern also includes instructions for crafting an adorable teddy bear and tiny reindeer accessories (nose, ears, and horns), letting you create a heartwarming festive family.
Imagine this cheerful set gracing your mantel, sitting under the tree, or being gifted as a priceless handmade treasure. The intricate details, like the shaped eye sockets, wired poseable arms, and carefully placed colorwork, make this a satisfying project for crocheters looking to level up their amigurumi skills. It’s perfect for those who love a challenge that results in something truly special and full of character.
This pattern is a labor of love shared for your personal enjoyment. You are welcome to sell the finished toys you create, but please remember that the pattern itself is for personal use only and should not be copied, shared, or distributed. The designer would be absolutely thrilled to see your creations! If you share them on Instagram, be sure to tag @shirli__halka.
So, gather your vibrant reds, soft skin tones, and earthy browns, and prepare your favorite 2.20 mm hook. This journey involves shaping, sewing, and adding those perfect little details that make a project sing. Let’s grab our yarn and spread some handmade holiday joy, one stitch at a time!
Materials & Tools You’ll Need
- Yarn (Sport/Fingering Weight):
- Catania Originals or Similar: Skin Color, Signal Red, Nature (Beige), Sun Kissed (Yellow), Chestnut, Camel, Sand.
- Nako Paris or Similar: Off White.
- Eyes:
- 8mm safety eyes (for Santa & Bear).
- 3mm safety eyes (for Reindeer details, if using).
- Notions: Black and white embroidery thread, fiberfill stuffing, stitch markers, scissors, tapestry needle, and strong craft glue.
- Special Supplies:
- A 12 cm length of 2mm wire (for poseable arms).
- A small plastic sheet (for reinforcing the feet).
- Blush or pink paint (for Santa’s cheeks).
- Crochet Hook: 2.20 mm.
- Note: The charming glasses shown in some photos are for display only and are not part of the crochet instructions.


Crochet Abbreviations & Terms
Let’s decode the pattern language so you can follow along with confidence!
- Ch: Chain
- Mr: Magic Ring
- Sc: Single Crochet
- Inc: Increase (2 sc in same stitch)
- Dec: Decrease (sc 2 stitches together)
- Sist/Sl St: Slip Stitch
- St: Stitch
- W: 3 sc into the same stitch (a special increase)
- 3tog: Crochet three stitches together (a special decrease)
- Flo: Work in Front Loop Only
- Blo: Work in Back Loop Only
- Hdc: Half Double Crochet
- Hdcinc: Half Double Crochet Increase (2 hdc in same stitch)
- Dc: Double Crochet
- Tr: Treble Crochet
- (…)*: Repeat the instructions inside the parentheses.
Step-by-Step Crochet Instructions
We’ll build our holiday friends piece by piece. Remember to stuff as you go where indicated!
Part 1: Santa’s Head & Face
Using Skin Color yarn. Stuff firmly as you crochet.
- 6 sc in Mr.
- 6 inc (12).
- (1 sc, inc) x6 (18).
- (2 sc, inc) x6 (24).
- 1 sc, inc, (3 sc, inc) x5, 2 sc (30).
- (4 sc, inc) x6 (36).
- (5 sc, inc) x6 (42).
- 3 sc, inc, (6 sc, inc) x5, 3 sc (48).
- 19 sc, inc, 7 sc, inc, 20 sc (50).
- Rounds 10-14: 50 sc.
- 19 sc, dec, 7 sc, dec, 20 sc (48).
- Rounds 16-18: 48 sc.
- 15 sc, 4 inc, 9 sc, 4 inc, 16 sc (56).
- Rounds 20-23: 56 sc.
- EYE PLACEMENT: Attach the 8mm safety eyes between Rounds 18 and 19, with 5 stitches between them. Center the face between the increases made in Round 19.
- 2 sc, dec, (5 sc, dec) x7, 3 sc (48).
- 1 sc, dec, (4 sc, dec) x7, 3 sc (40).
- (Dec, 3 sc) x8 (32).
- (2 sc, dec) x8 (24).
- (2 sc, dec) x6 (18).
- Rounds 29-35: 18 sc. Fasten off.
- SHAPING: Push the portion crocheted from Round 29 inward to shape the chin/neck area as shown in the pattern diagrams.
- EYE SOCKETS: Use a needle and yarn to sculpt the eye sockets. Insert the needle at the outer edge of an eye, bring it out at the chin, and pull gently to create definition. Repeat for a natural look.


Part 2: Santa’s Facial Features
- Beard (Nature yarn): Ch 33. Starting from 2nd ch: 30 sl st. Turn, work on the other side of the chain: Ch 2, (in last st: 4 dc, skip 1 st, 1 sl st, skip 1 st) x8, ch 2, 1 sl st. Leave a long tail. Sew or glue the beard to align with Round 18 of the head.
- Nose (Skin Color): 1) 6 sc in Mr. 2) 6 inc (12). 3) 12 sc. 4) 6 dec (6), sl st. Leave a tail. Sew to Round 19 of the head.
- Mustache x2 (Nature yarn): 1) 3 sc in Mr. 2) 3 inc (6). 3) 6 sc. 4) (2 sc, inc) x2 (8). 5) 8 sc. 6) (3 sc, inc) x2 (10). 7) 5 dec (5), sl st. Sew below the nose.
- Eyebrows x2 (Nature yarn): Ch 5. Starting from 2nd ch: 4 sl st. Sew to Rounds 11 & 13 of the head, with 6 stitches between them.
- Hair (Nature yarn): Ch 13. Starting from 3rd ch: (1 hdc, 1 hdc inc) x5, 1 hdc. Sew to Round 3 of the head.
Part 3: Santa’s Body, Arms & Legs
- Arms x2 (Skin Color, Do NOT Stuff): 1) 6 sc in Mr. 2-11) 6 sc. 12) 6 sc, sl st. Fasten off. Insert wire into arms later.
- Legs x2 (Sun Kissed yarn, Stuff): 1) 6 sc in Mr. 2) 6 inc (12). 3) (1 sc, inc) x6 (18). 4) Blo: 18 sc. 5-6) 18 sc.
- Insert the plastic sheet into the foot for stability.
- 7 sc, 4 dec, 3 sc (14).
- 5 sc, 4 dec, 1 sc (10).
- Switch to Signal Red yarn.
- Blo: 10 sl st.
- Blo: 1 sc, inc, 8 sc (11).
11-12) 11 sc. - 2 sc, inc, 8 sc (12).
14-15) 12 sc. - 3 sc, inc, 8 sc (13).
- Left Leg: Round 17: 1 sc, sl st. Fasten off.
- Right Leg: Round 17: 8 sc. Place marker. Do not fasten off; you will join to the body.
- Joining Legs & Body (Signal Red, Stuff): With the right leg still active, ch 3 to bridge to the left leg.
18) 13 sc (right leg), 3 sc (in chain), 13 sc (left leg), 3 sc (in chain) = 32 sc.
19) 5 sc, inc, 17 sc, inc, 8 sc = 34 sc.
20-24) 34 sc.- Switch to Skin Color yarn.
- Blo: 34 sc.
- 5 sc, dec, 17 sc, dec, 8 sc = 32 sc.
- (6 sc, dec) x4 = 28 sc.
- 28 sc.
- 2 sc, dec, (5 sc, dec) x3, 3 sc = 24 sc.
- Attach Arms: Position arms.
- 4 sc, 3 sc (through arm and body together), 9 sc, 3 sc (through arm and body together), 5 sc = 24 sc.
- 4 sc, 3 sc (in arm only), 9 sc, 3 sc (in arm only), 5 sc = 24 sc.
- Insert the wire into the arms now.
- (2 sc, dec) x6 = 18 sc.
- (4 sc, dec) x3 = 15 sc.
34-39) 15 sc. - (3 sc, dec) x3 = 12 sc.
- 6 dec (6), sl st. Fasten off and close the hole.
Part 4: Santa’s Sweater
- Main Sweater (Nature & Signal Red stripes): This is a tube worked in joined rounds. Follow the color pattern carefully from the written instructions (Rounds 1-12), as the photos may not match. It involves chains, “W” (3 sc) increases, and specific color changes to create stripes.
- Sweater Sleeves: Cuffs are worked in Off White (Round 13 of body: 44 sl st). Sleeve caps are worked in Nature with Signal Red stripes (follow Rounds 1-6 of “Sweater Sleeve” instructions, attaching to the armholes).
Part 5: The Adorable Teddy Bear
- Head/Body (Camel yarn, Stuff): 1) 6 sc in Mr. 2) 6 inc (12). 3) (1 sc, inc) x6 (18). 4-5) 18 sc. 6) 4 sc, 3 inc, 3 sc, 3 inc, 5 sc (24). 7-8) 24 sc. 9) 4 sc, 3 dec, 3 sc, 3 dec, 5 sc (18). 10) (1 sc, dec) x6 (12).
- Attach 8mm eyes between Rounds 6 & 7, 3 stitches apart.
- Flo: (1 sc, inc) x6 (18).
12-13) 18 sc. - (1 sc, dec) x6 (12).
- 6 dec (6), sl st. Fasten off and close.
- Nose (Sand yarn): 6 sc in Mr, sl st. Sew between Rounds 6-8. Embroider a line beneath it.
- Ears x2 (Camel yarn): 5 sc in Mr. Sew between Rounds 3 & 4, with 8 stitches between them (counted from Round 4).
- Bow (Signal Red): In Mr: (Ch 2, 1 dc, ch 2, sl st) x2. Fasten off, pulling tight to form a bow. Secure the center and attach to the bear’s neck.
Part 6: Reindeer Accessories
- Nose x2 (Signal Red): 5 sc in Mr, sl st. Sew to Rounds 4 & 5 of Santa’s head (for a rudolph effect!).
- Ears x4 (Sun Kissed): Ch 3. Starting from 3rd ch: 1 hdc, 1 sl st in the same stitch. Sew to Round 6 of Santa’s head, 4 stitches apart.
- Horns x4 (Chestnut): (Ch 3, starting from 2nd ch: 2 sl st) x2 (makes one forked horn). Sew to Round 7 of Santa’s head, 3 stitches apart.


Assembly & Final Touches
- Secure Head to Body: Before attaching hair or hats, you can secure the head. Insert a needle from the top of the head down through the neck and back up several times, then knot securely at the top to anchor it.
- Attach All Features: Sew or glue all facial features (beard, mustache, nose, eyebrows, hair) and accessories (reindeer parts, bear’s ears/nose/bow) securely in place according to the round placements given.
- Add Cheeks: Use a small amount of blush or pink paint to dab gentle circles on Santa’s cheeks for a jolly, rosy glow.
- Embroider Details: Use black embroidery thread for the bear’s mouth line and any other small details.
- Dress Santa: Slide the finished sweater over Santa’s head and arms. The sleeves should slide onto the wired arms.
Tips for a Successful & Jolly Creation
- Color Alert: The pattern strongly advises to follow the written yarn color instructions, not the photos, as photo colors may vary.
- Stuffing is Key: Stuff firmly and evenly as you go, especially for the head and body. Use a chopstick to get stuffing into small areas.
- Sculpting for Character: Don’t skip the eye-socket shaping step for Santa! It adds incredible depth and personality to his face.
- Wire the Arms: Inserting the wire allows you to pose Santa’s arms, perhaps to hold his teddy bear! Make sure the wire ends are blunt and tucked securely inside.
- Take Your Time: This is a detailed project with many parts. Work on one element at a time, and enjoy the process of seeing each piece come to life.
Congratulations! You’ve completed your very own Jolly Santa and his festive friends!