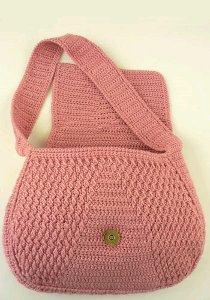
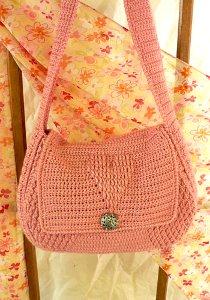
Crochet a Chic Textured Handbag
Materials & Tools You’ll Need
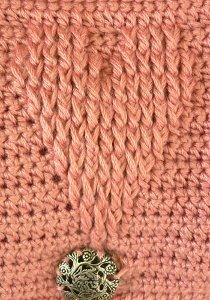
Yarn: 6 oz (2 skeins) of Naturally Caron Spa or similar worsted weight yarn (75% acrylic, 25% bamboo; 251 yds/230 m per 3 oz/85 g skein). Shown in #0001 Rose Bisque.
Crochet Hook: US D-3 (3.25mm) hook or size needed to obtain gauge.
Notions:
- 1 magnetic purse closure
- 1 large button (to cover the purse closure)
- Yarn needle
- Scissors
Crochet Abbreviations (US Terms)
- ch: chain
- sc: single crochet
- hdc: half double crochet
- dc: double crochet
- slip st: slip stitch
- rev sc: reverse single crochet
- FPdc: Front-post double crochet
- sc2tog: single crochet 2 together (decrease)
- dc2tog: double crochet 2 together (decrease)
Gauge & Finished Size
- Gauge: 22 stitches and 20 rows in pattern = 4″/10cm. Gauge is crucial for this bag to ensure the correct size and texture!
- Finished Size: Approximately 11″ (28 cm) wide x 7″ (18 cm) high (excluding the strap).
The Crochet Pattern: Textured Handbag

Special Stitches & Notes
- FPdc (Front-Post Double Crochet): Yarn over, insert your hook from the front to the back around the post of the stitch two rows below, and then back to the front. Yarn over and pull up a loop, complete as a normal dc. This stitch creates the beautiful raised texture.
- Important Note: When you make an FPdc, you will skip the stitch directly above it in the current row. Always work your FPdc into the stitch two rows below.
Part 1: Back and Front Flap (Worked in One Piece)
Back:
- Foundation: Ch 50.
- Row 1 (RS): Dc in the 3rd ch from hook, dc in each ch across. Turn. (48 dc)
- Row 2 (Increase): Ch 1, 2 sc in first st, sc in each st to last st, 2 sc in last st. Turn. (50 sts)
- Row 3: Ch 2, FPdc around the turning ch from Row 1 (2 rows below), skip next st, dc in next st, FPdc around next dc 2 rows below. Repeat from * across, ending with dc in last st. Turn.
- Rows 4-13: Repeat Rows 2 and 3 five more times. (60 sts after Row 13)
- Row 14: Ch 1, sc in each st across. Turn.
- Row 15: Ch 1, FPdc around first st 2 rows below, dc in next st, FPdc around next dc 2 rows below. Repeat from * across, end with dc in last st. Turn.
- Row 16 (Decrease): Ch 1, sc2tog, sc in each st to last 2 sts, sc2tog. Turn. (58 sts)
- Row 17: Ch 2, dc in first st, FPdc around next dc 2 rows below, dc in next st, FPdc around next dc 2 rows below, dc in next st. Repeat from * across, end with FPdc around last st 2 rows below. Turn.
- Rows 18-33: Repeat Rows 16 and 17 eight times. (42 sts after Row 33)
- Row 34 (Decrease): Ch 1, working in front loops only, sc2tog, sc in each st to last 2 sts, sc2tog. Turn. (40 sts) Do not fasten off.
Front Flap:
12. Row 35: Ch 2, dc in each st across. Turn.
13. Rows 36-39: Alternate rows of sc and dc (Rows 36 & 37 twice).
14. Row 40: Ch 1, working in front loops only, sc in each st across. Turn.
15. Row 41: Ch 2, dc in first 19 sts, dc2tog, dc in each rem st. Turn. (39 sts)
16. Rows 42-44: Work even in pattern (sc rows and dc rows).
17. Rows 45-62: Follow the pattern instructions to create the decreasing diamond texture on the flap with FPdc and hdc. The number of hdc increases and FPdc decreases on each row, shaping the flap.
18. Row 63: Ch 1, hdc in each st across. Turn.
19. Row 64: Ch 1, sc in each st across. Turn. Do not fasten off.
Edging (Front Flap & Back):
20. With the Right Side facing, ch 1. Work sc evenly around the entire piece, placing 2 sc in each corner. Join with a slip st to the first sc. Fasten off.
Part 2: Front Panel
- Foundation: Ch 50.
- Rows 1-14: Work exactly as for the Back, from Row 1 to Row 14. You should have 60 sts.
- Rows 15-33: Follow the pattern instructions for Rows 15-33. The pattern creates a textured panel in the center that decreases over time. The stitch count will decrease to 40 sts by Row 34.
- Edging: Work the edging round exactly as for the Back piece. Fasten off.
Part 3: Gusset and Strap (Worked in One Long Piece)
- Foundation: Ch 10.
- Row 1 (RS): Ch 2, hdc in 3rd ch from hook and in each ch across. Turn. (8 hdc)
- Row 2: Ch 1, sc in each st across. Turn.
- Row 3: Ch 2, hdc in each st across. Turn.
- Repeat Rows 2 and 3 until the piece measures 52 inches (132 cm) long.
- Fasten off, leaving a long tail (about 18 cm) for sewing.
- Use the yarn needle and tail to sew the two short ends of the strap together to form a big loop.
- Edging: With RS facing, work a round of sc evenly along each long edge of the strap.
Finishing and Assembly
- Sew Gusset to Panels: With Wrong Sides facing you, center the seam of the gusset at the bottom center of the Front panel. Sew the gusset to the Front panel by stitching through the back loops only of both pieces. Repeat to sew the gusset to the Back panel.
- Reverse Single Crochet Edging: With Right Side facing, join yarn at the top right corner of the Front panel.
- Ch 1, work reverse sc (crab stitch) evenly along the top flap edge to the other corner.
- Work rev sc along the strap edge (working through both loops).
- At the corner, slip st, then work rev sc across the top of the Front panel.
- Join with a slip st and fasten off.
- Repeat this edging around the Back panel and the top of the flap.
- Attach Closure: Center one part of the magnetic closure on the underside of the front flap. Attach it securely. Position the other part on the front panel, directly opposite the first. Attach it.
- Sew on Button: Sew your decorative button onto the right side of the front flap, covering the magnetic closure you just attached.
- Weave in Ends: Use your yarn needle to weave in all remaining loose ends.