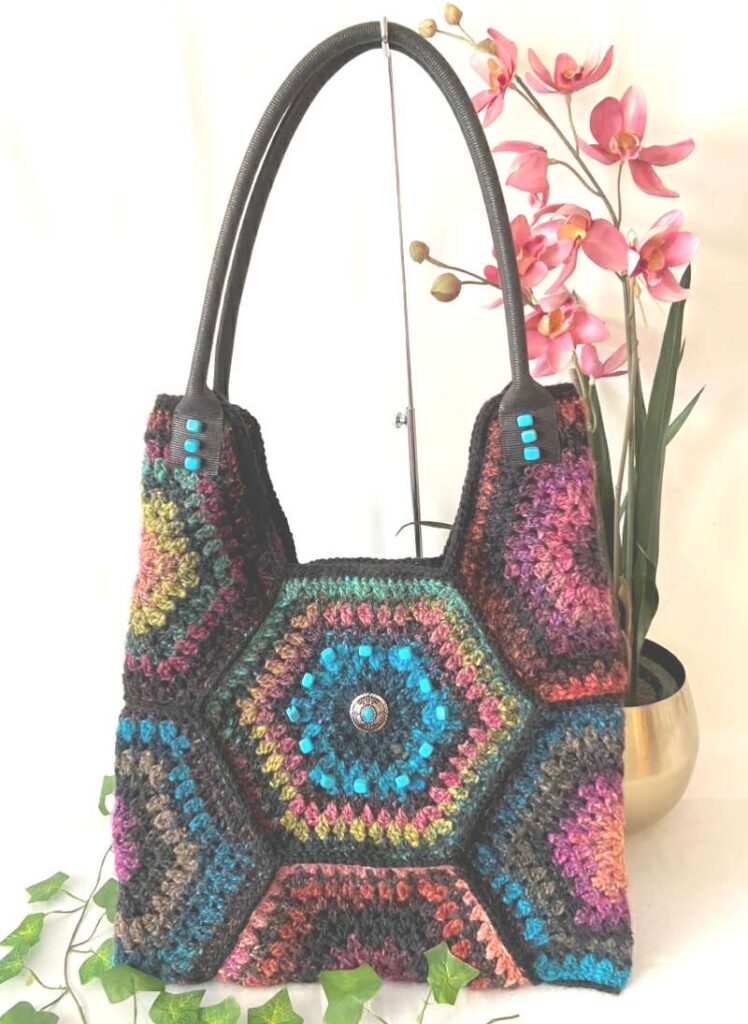
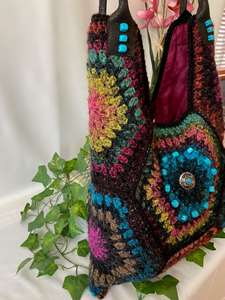
Crochet a Beautiful Hexagon Bag
Materials
- 5 balls of Noro Silk Garden yarn (approx. 250 g / 500 m total)
- 50 g plain yarn (for joining & top edging)
- 3 mm or 3.5 mm crochet hook (depending on tension; firm tension is best)
- Beads for decoration (optional, but fun!)
- Optional: lining fabric and a pair of store-bought bag handles

Abbreviations
- ch = chain
- dc = double crochet (UK terms)
- tr = treble
- ss = slip stitch
Finished Size
- Each hexagon (hexie) measures about 24 cm wide (point to point).
- The finished bag is created from 7 hexies
Instructions
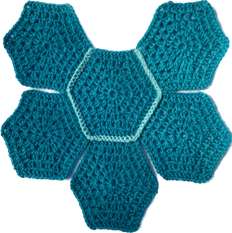
Step 1: Make the Hexies
You’ll need 7 hexagons in total.
- Round 1: Ch 4 and join with a ss (or use a magic loop). Ch 3 (counts as 1st tr), then work 11 tr into the ring. Join with a ss into the top of the starting ch 3. (12 tr)
- Round 2: Ss into the next space. Ch 3 (counts as 1 tr), 1 tr into the same space. Continue working 2 tr in each space around. Join with ss. (24 tr)
- Round 3: Ss into the next main space. (Ch 3, 1 tr, ch 2, 2 tr) in this corner space, then 2 tr in next space, (2 tr, ch 2, 2 tr) in next space (corner). Repeat around. Join with ss.
- Round 4: Ss into the next corner space. Work (ch 3, 1 tr, ch 2, 2 tr) in the corner. Then place 2 tr into each of the next 2 spaces. Continue this sequence of filling spaces and making corners around. Join with ss.
- Round 5–9: Continue in the same way as Round 4, increasing the number of filled spaces between corners each round (Round 5 = 3 spaces, Round 6 = 4 spaces … Round 9 = 7 spaces)
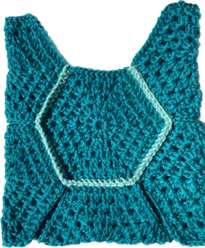
Step 2: Join the Hexies
- Using contrast yarn, lay the main centre hexie down. Arrange 5 hexies around it (like a flower). Leave the top edge of the centre hexie without a neighbor.
- With dc, join hexies together along their edges. Insert hook through both loops of each stitch (4 loops on hook total). Work from the outside of the circle.
- Fasten off, turn over, and fold the side and bottom hexies in half to shape the bag.
- Place the 7th hexie on the back of the bag and join it the same way.
- Continue joining all remaining seams with dc, including the bottom corners
Step 3: Add the Border
- Starting at the top edge, work 2 rows of dc all the way around. Add 2 dc in each outside corner for a neat square edge.
- Finish with 1 row of ss around
Step 4: Finishing Touches
- Sew on handles (store-bought or crocheted).
- Add beads or a statement button in the center for decoration.
- Line the bag if you’d like extra strength and a pop of color inside