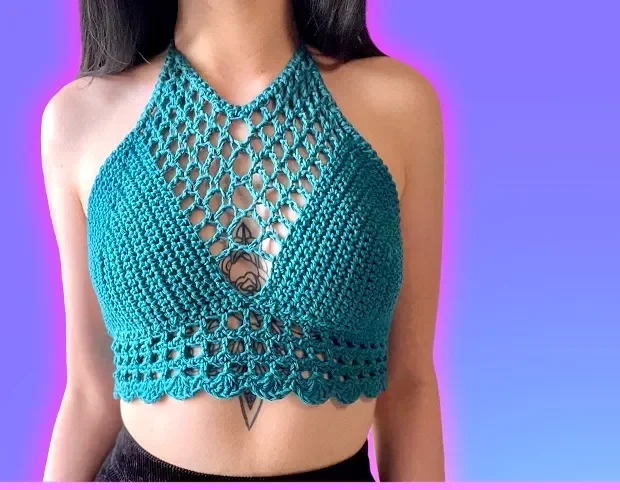
Create a Stunning Caged Halter Top: A DIY Crochet Tutorial for All Sizes
Part 6: The Chest Netting (Caged Detail)
Now we’ll create the beautiful caged netting that goes up the center of your chest!
Mark Your Starting Points
Using stitch markers, count 5 stitches from the bottom on each bra cup (toward the center). Skip the slip stitch that connects the cups – it’s hiding one of the stitches!
From the bottom (skipping the slip stitch): 1, 2, 3, 4, 5 – place your stitch marker here.
Do the same on the opposite cup. Double-check by counting from the top down to make sure your markers are on the same stitch count
Row 1 of Chest Netting
- Insert your hook into the very tip of the right bra cup
- Grab your yarn and pull it through (tie a knot right here)
- Insert your hook again and pull yarn through
- Ch 3
- Skip the next stitch
- Dc into the stitch after that
- Ch 1, skip 1, dc into the next stitch
- Repeat this all the way down until you reach your stitch marker
- Ch 1 and prepare to dc into the stitch where your marker is
- Remove the marker and insert that double crochet
Important note: This is the only row where we connect the cups with a ch 1 in between!
- Ch 1, skip 1, dc into the next stitch
- Continue all the way up to the tip of the other cup
Row 2 of Chest Netting (and beyond)
- Ch 3, turn your work
- Dc on top of the dc from the previous row
- Ch 1, skip the next chain space, dc on top of the next dc
- Repeat all the way down until you reach the second-to-last dc
- Now, here’s the change: When you reach the center, insert a dc on top of that second-to-last dc – but do NOT chain 1 this time. No more chaining in the center!
- Continue your pattern (ch 1, skip 1, dc) on the other side
To square off the edge:
- At the end of the row, ch 1 and insert a dc into the chain space (not into any particular stitch)
Repeat for 4-5 rows total. The sample uses 5 rows so the halter goes all the way up to the neckline. Some people prefer to stop at 4 rows – it’s totally up to you
Part 7: Adding the Straps & Final Edging
Now we’ll add single crochet reinforcement all around the top, plus the halter straps!
Step 1: Prepare Your Yarn
- Insert your hook into the very far corner
- Pull the yarn through and tie a knot
- Insert your hook again into the stitch beside it and pull yarn through
- Ch 1
Step 2: SC Along the Bra Cup
- Sc into the next stitch (weave in your tail as you go)
- Continue sc all along the bra cup edge
Step 3: SC Along the Netting
When you reach the chest netting:
- Put 2 sc into each double crochet chain space
Step 4: Make the First Strap
- When you reach the corner, ch 81 (this length works well for most sizes – you can adjust longer or shorter as needed)
- Sl st into the 2nd chain from the hook
- Continue sl st all the way down the chain
- After your last sl st, insert a sc into that chain space
- Sc on top of the double crochet stitch
- Continue (2 sc in each dc chain space) all along the top of the netting
Step 5: Make the Second Strap
- Repeat the same process: ch 81, sl st all the way back down
- After your last sl st, put 2 sc into every double crochet chain space
- Continue sc down the left side of the bra cup until you reach the body
Step 6: Secure Your Work
- Insert a sl st and pull your yarn through
- Another sl st
- Cut your yarn and pull it through again
- Weave in that last tail along the body portion
Part 8: The Corset Lace
To finish your top, you’ll need a long chain to lace up the back!
Ch 180 (or longer if you want extra length for wrapping)
This chain will weave through the reinforced side edges you created earlier, allowing you to cinch the top to your perfect fit – just like a corset
You Did It
Congratulations, beautiful! Your caged halter top is complete. This pattern works up so beautifully in any color – the sample uses a stunning teal, but imagine it in black for a night out, white for a boho festival look, or even rainbow stripes for a fun pop of color!
A few final tips:
- Always block your finished pieces for a professional look
- Hand wash your handmade top and lay flat to dry
- Experiment with different yarn weights for different seasons (lighter yarn for summer, cotton blends for breathability)