Craft Your Own Adorable Button Penguin: A Complete Step-by-Step Guide
“`html
How to Crochet a Cute Button Penguin: Step-by-Step Pattern
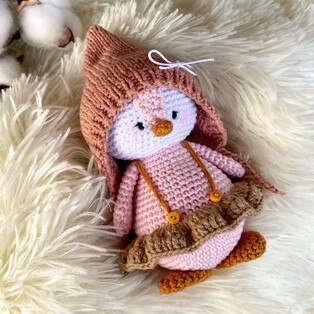
Create your own adorable companion with this detailed guide to making a “Button Penguin.” This intermediate-level project combines both crochet and a bit of knitting to create a cozy, dressed-up penguin that is perfect for gifts or collectibles. The finished toy stands approximately 12cm (about 4.7 inches) tall.
Materials Needed
- Yarn:
- Pink cotton yarn (for the body and hood)
- Beige cotton yarn (for the skirt)
- White cotton yarn (for the head)
- Brown yarn (for the knitted hat)
- Mustard yellow yarn (for the feet and beak)
- Tools:
- 2.0mm crochet hook
- 2.0mm knitting needles (for the hat)
- Tapestry needle
- Black embroidery floss or thread (for the eyes)
- Fiberfill stuffing
- Small buttons (for the strap details)
- Pink blush or eyeshadow (for the cheeks)
Pattern Abbreviations (US Terms)
- MR: Magic Ring
- SC: Single Crochet
- INC: Increase (2 SC in one stitch)
- DEC: Decrease (SC 2 together)
- CH: Chain
- DC: Double Crochet
- BLO: Back Loop Only
- SL ST: Slip Stitch
- K: Knit
- P: Purl
Step-by-Step Instructions
1. The Head (White Yarn)
- R1: 6 SC in MR (6)
- R2: 6 INC (12)
- R3: (1 SC, INC) * 6 (18)
- R4: (2 SC, INC) * 6 (24)
- R5: (3 SC, INC) * 6 (30)
- R6: (4 SC, INC) * 6 (36)
- R7: (5 SC, INC) * 6 (42)
- R8: (6 SC, INC) * 6 (48)
- R9: (7 SC, INC) * 6 (54)
- R10-16: 54 SC
- R17: (7 SC, DEC) * 6 (48)
- R18: (6 SC, DEC) * 6 (42)
- R19: (5 SC, DEC) * 6 (36)
- R20: (4 SC, DEC) * 6 (30)
- R21: (3 SC, DEC) * 6 (24)
- R22: (2 SC, DEC) * 6 (18)
- R23: (1 SC, DEC) * 6 (12)
- R24: 6 DEC. Fasten off and weave in ends.
2. The Hood/Cape (Pink Yarn)
- R1: 6 SC in MR (6)
- R2: 6 INC (12)
- R3: (1 SC, INC) * 6 (18)
- R4: (2 SC, INC) * 6 (24)
- R5: (3 SC, INC) * 6 (30)
- R6: (4 SC, INC) * 6 (36)
- R7: (5 SC, INC) * 6 (42)
- R8: (6 SC, INC) * 6 (48)
- R9: (7 SC, INC) * 6 (54)
- R10-15: 54 SC
Switching to rows (turn at the end of each row):
- Row 1: CH 1, 6 SC
- Row 2: CH 1, 1 DEC, 2 SC, 1 DEC
- Row 3: CH 1, 4 SC
- Row 4: CH 1, 4 SC
- Row 5: CH 1, 1 DEC, 2 SC
- Row 6: CH 1, 3 SC. Fasten off, leaving a long tail for sewing.
3. The Body (Pink Yarn)
- R1: 6 SC in MR (6)
- R2: 6 INC (12)
- R3: (1 SC, INC) * 6 (18)
- R4: (2 SC, INC) * 6 (24)
- R5: (3 SC, INC) * 6 (30)
- R6: (4 SC, INC) * 6 (36)
- R7: (5 SC, INC) * 6 (42)
- R8: (6 SC, INC) * 6 (48)
- R9: (7 SC, INC) * 6 (54)
- R10: 54 SC
- R11: (7 SC, DEC) * 6 (48)
- R12-13: 48 SC
- R14: 48 SC in BLO (Keep the front loops for the skirt)
- R15-16: 48 SC
- R17: (6 SC, DEC) * 6 (42)
- R18: 42 SC
- R19: (5 SC, DEC) * 6 (36)
- R20: 36 SC
- R21: (4 SC, DEC) * 6 (30)
- R22-26: 30 SC. Stuff firmly and leave a tail for sewing.
4. The Wings (Pink Yarn – Make 2)
- R1: 6 SC in MR (6)
- R2: 6 SC
- R3: 6 INC (12)
- R4-11: 12 SC
Do not stuff. Fold the wing in half and SC across the edge to close. Leave a tail for sewing.
5. The Feet (Mustard Yarn – Make 2)
- R1: 6 SC in MR (6)
- R2: 6 INC (12)
- R3-9: 12 SC
- R10: (1 SC, DEC) * 4 (8)
Close the hole and fasten off. Do not stuff. Leave a tail for sewing.
6. The Beak (Mustard Yarn)
- R1: 5 SC in MR (5)
- R2-4: 5 SC
Do not stuff. Fasten off and leave a tail for sewing.
7. The Skirt (Beige Yarn)
Attach your beige yarn to the front loops of Row 14 of the body.
- Row 1: (CH 3, 1 DC in same stitch), 2 DC in every stitch until the end of the round.
- Row 2: 1 DC in every stitch until the end of the round. Fasten off.
8. The Knitted Hat (Brown Yarn)
Note: This part is worked using knitting needles.
- Cast on 45 stitches.
- Work 4 rows of 1×1 ribbing (K1, P1).
- Work 24 rows of stockinette stitch (Knit all rows).
- Decreases: At the start of each row, perform 3 decreases:
- 1st decrease: K2tog.
- 2nd decrease: Move the resulting stitch back to the left needle and K2tog with the next stitch.
- 3rd decrease: Repeat the process once more.
- Continue these 3 decreases at the start of every row until only 3-4 stitches remain.
- Cut the yarn, pull it through the remaining stitches, and tighten.
- Sew the hat along the uneven edge to create the pointed shape.
- Tie Straps: Attach yarn to the bottom edge, CH 12, SC across the bottom edge of the hat, and CH 12 again. Fasten off.
Assembly and Finishing Touches
- Body and Head: Sew the head securely to the body.
- Hood: Sew the hood onto the head.
- Details: Sew the wings to the sides of the body and the feet to the bottom. Attach the beak to the center of the face.
- Face: Embroider two small eyes using black thread (approximately 1 SC in height). Apply a small amount of pink blush to the cheeks.
- Straps: Using a needle and mustard yarn, anchor the thread under the back of the skirt, run it over the shoulder, and anchor it under the front of the skirt. Repeat for the other side. Add buttons for decoration.
Your cute Button Penguin is now complete!
“`