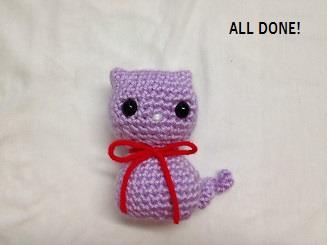
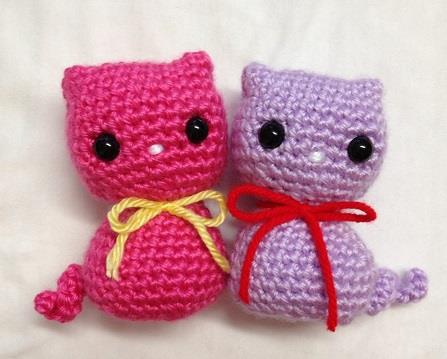
Adorable Sitting Little Kitty Amigurumi – A Quick & Cozy Project
Hello, crochet friends! Is there anything more heartwarming than a tiny, handmade cat sitting on your shelf? Today, I am so excited to share a truly special pattern for a Little Kitty Amigurumi.
What I love most about this sweet kitten is its charming sitting posture. Unlike many amigurumi that stand or lie down, this one is designed to sit up straight and keep you company. It stands at about 3.5 inches tall, making it a wonderful size for a quick weekend project or a thoughtful little gift for a cat-loving friend.
This project is worked in one main piece for the head and body, which means less sewing for you! We will even use a clever “simple stitch” technique at the very end to shape the ears right out of the top of the head. It feels like magic to watch the personality of your kitty emerge with just a few tugs of the yarn.
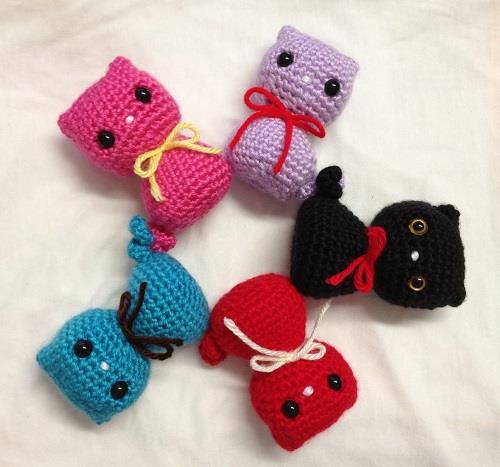
Whether you choose a classic purple like our sample or go for a realistic tabby color, this kitty is sure to be the purr-fect addition to your collection. So, grab your favorite mug of tea, find a cozy spot, and let’s start stitching this forest friend together
🧶 Materials & Tools
To bring your Little Kitty to life, you will need the following supplies:
- Yarn: #4 Worsted weight yarn (the designer uses Simply Soft) in your choice of Body Color (like Purple), a small amount of White for the nose, and Red for the neck bow.
- Hook: Size E / 3.5mm crochet hook.
- Eyes: One pair of 9mm safety eyes.
- Filling: Polyester fiber filling.
- Notions: Tapestry needle and a stitch marker.
📝 Abbreviations & Notes
Here are the terms we will use for this pattern:
- ch: Chain
- st: Stitch
- sc: Single Crochet
- sl st: Slip Stitch
- inc: Increase (make 2 single crochet in the same stitch)
- dec: Decrease (crochet 1 single crochet over the next two stitches)
- fo: Fasten off / finish
Special Note: We will start with a foundation chain and then work in continuous rounds. Make sure to move your stitch marker to the last stitch of every round to keep your place!
🐈 Little Kitty Pattern Instructions
The Head & Neck
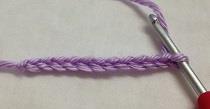
We start at the top of the head with a foundation chain.
- Foundation: Chain 10 + 1 (11 chains total).
- Round 1: 1 sc in next 9 chains, 3 sc in the next chain. Turn to work on the opposite side of the chain: 1 sc in next 8 chains, then 2 sc in the last chain. Sl st to the first sc to join and ch 1. (22 sts)
- Round 2: 1 sc in each stitch around. Sl st to join, ch 1. (22 sts)
- Round 3: 1 sc in next 10 sts, inc in next st, 1 sc in next 10 sts, then inc in the last st. Do not slip stitch from here on—place your marker! (24 sts)
- Round 4: 1 sc in next 3 sts, inc. Repeat 6 times. (30 sts)
- Rounds 5 – 9: 1 sc in each stitch around. (30 sts)
- Round 10: 1 sc in next 4 sts, dec. Repeat 6 times. (24 sts)
- Round 11:1 sc in next 3 sts, dec. Repeat 6 times. (18 sts)
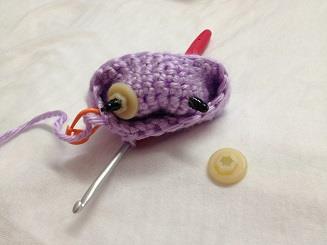
- Tip: Now is a great time to insert your safety eyes between Rounds 7 and 8, about six stitches apart.
- Round 12: 1 sc in next 2 sts, dec. Repeat 6 times. (12 sts)
Creating the Neck:
- Round 13: 1 sc in next 2 sts, inc. Repeat 4 times. (16 sts)
- Round 14:1 sc in next 3 sts, inc. Repeat 4 times. (20 sts)
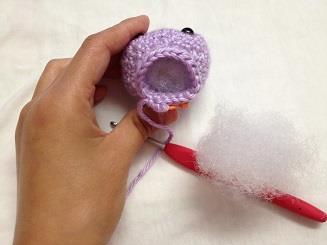
- Note: Stuff the head firmly with fiber filling now.
The Body
- Round 15: 1 sc in each stitch around. (20 sts)
- Round 16: 1 sc in next 4 sts, inc. Repeat 4 times. (24 sts)
Shaping for the Tail (Choose your side!): You can decide if you want the kitty’s tail to lean to the right or the left.
- For a RIGHT-leaning tail:
- Round 17R: 1 sc in next 6 sts, repeat 5 sc, inc 2 times, then 1 sc in last 6 sts. (26 sts)
- Round 18R: 1 sc in next 5 sts, inc, repeat 6 sc, inc 2 times, 1 sc in next 5 sts, then inc in the last st. (30 sts)
- For a LEFT-leaning tail:
- Round 17L: 5 sc, inc, 1 sc in next 12 sts, then 5 sc, inc. (26 sts)
- Round 18L: 6 sc, inc once, repeat 5 sc, inc 2 times, then 6 sc, inc once. (30 sts)
Finishing the Body:
- Rounds 19 – 21: 1 sc in each stitch around. (30 sts)
- Round 22: 4 sc, dec. Repeat 6 times. (24 sts)
- Round 23: 3 sc, dec. Repeat 6 times. (18 sts)
- Round 24: 2 sc, dec. Repeat 6 times. Stuff the body now, but do not stuff too firmly so the cat sits straight! (12 sts)
- Round 25: Repeat dec 6 times. Sl st and fasten off, leaving a long tail for assembly. (6 sts)
✨ Assembly & Finishing Touches
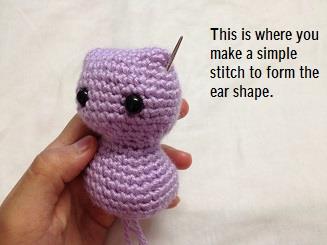
Forming the Ears
This is the clever part! We will use the long yarn tail left from the body.
- Thread your tapestry needle with the tail and draw the yarn from the bottom all the way up to the side of the head where an ear should be.
- Make two “simple stitches” through the top corners of the head to pinch them into a pointy ear shape.
- Stitch between the two points to define the ear shape, then hide the remaining yarn inside the body.
The Tail
- Instructions: Chain 12 + 1.
- Finish: Sc in the 2nd chain from the hook and in every chain across. Fasten off and sew it securely to the back of the body.
Final Details
- Nose: Use a little bit of white yarn to embroider a small nose onto the face.
- Bow: Take a piece of red yarn and tie a sweet bow around the kitty’s neck.
And just like that, you are all done! You have a charming little companion ready to brighten your day. Happy crocheting