Adorable Amigurumi Snail Crochet Pattern
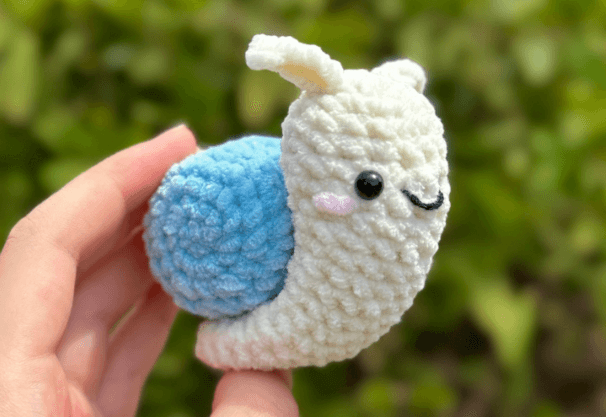
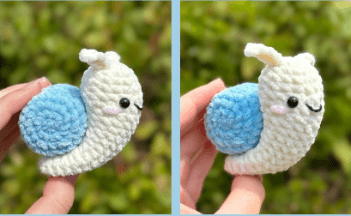
Who can resist a sweet little snail with a colorful shell? This free amigurumi pattern is designed to bring a smile to your face—whether you’re making it for yourself, a child, or a friend who loves tiny handmade treasures. With its squishy body and spiral shell, this snail is a joy to create and even more fun to snuggle
This pattern is perfect for beginners looking to practice basic stitches like single crochet (sc), increases (inc), and decreases (dec). Worked in continuous rounds with plush chenille yarn, the snail comes together quickly and has minimal sewing—just attach the shell to the body, add safety eyes, and voilà! Instant charm.
I love how customizable this project is: use pastel yarn for a fairy-tale vibe or bright colors for a playful twist. The tiny blush cheeks and embroidered smile add just the right amount of personality. Plus, it’s a fantastic stash-buster for leftover yarn
Why You’ll Love This Pattern:
- Beginner-friendly: Clear instructions and simple stitches.
- Quick project: Finish in an afternoon!
- Adorable result: Perfect for nurseries, gifts, or desk buddies.
Grab your hook, pick your favorite colors, and let’s make some snail magic
Materials
- Yarn: Loops & Threads Skinny Chenille in white (body), blue (shell), and pink (blush) (or any worsted-weight yarn)
- Hook: 3mm crochet hook (adjust size if using thicker yarn)
- Notions:
- 6mm safety eyes
- Black embroidery thread (for the smile)
- Yarn needle
- Stuffing
- Scissors
- Stitch marker
- Fabric/hot glue (optional, for attaching the shell)
Abbreviations
- R = Round/Row
- Mr = Magic Ring
- Inc = Increase (2 sc in the same stitch)
- Sc = Single Crochet
- Dec = Invisible Decrease
- Ch = Chain
- BLO = Back Loop Only
- (#) = Stitch count at the end of the round
Pattern Instructions
Body (White Yarn)
- R1: Make a magic ring, 4 sc into the ring. Pull tight to close (4 sts).
- R2: Inc in each st around (8 sts).
- R3: This round shapes the snail’s head:
- Chain 5, turn. Starting in the 2nd chain from the hook, sc 4 down the chain.
- Work (sc, inc) x2 in the main ring.
- Chain 5 again, turn, and sc 4 down this chain.
- (Sc, inc) x2 in the main ring (12 sts total).
- R4: (2 sc, inc) x4 (16 sts).
- R5–8: Sc in each st around for 4 rounds (16 sts each round).
- R9: (6 sc, dec) x2 (14 sts).
Adding the Face:
- Between Rounds 7–8, attach 6mm safety eyes about 5 stitches apart.
- Use pink yarn to embroider tiny blush cheeks below each eye.
- With black thread, stitch a smile between the eyes on R7–8.
Stuffing Notes:
- Fully stuff Rounds 1–9 (head and body base).
- Lightly stuff Rounds 10–14 (neck). Do not stuff Rounds 15–22 (this part will bend around the shell).
- R10–21: Sc in each st around (14 sts per round, 12 rounds total)
- R22: Dec x7 (7 sts). Fasten off, leaving a long tail. Sew the opening closed
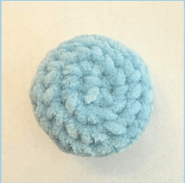
Shell (Blue Yarn)
- R1: 6 sc into a magic ring (6 sts).
- R2: Inc in each st around (12 sts).
- R3: (Sc, inc) x6 (18 sts).
- R4: (2 sc, inc) x6 (24 sts).
- R5: Sc in each st around (24 sts).
- R6: Sc in BLO only (24 sts). (This creates a ridge for the spiral effect!)
- R7–8: Sc in each st around (24 sts per round).
- R9: Sc in BLO again (24 sts).
- R10: Sc in each st around (24 sts).
- R11: (2 sc, dec) x6 (18 sts). Add stuffing here!
- R12: (Sc, dec) x6 (12 sts).
- R13: Dec x6 (6 sts). Fasten off and sew closed
Assembly
- Attach the Shell: Bend the snail’s body into a curve and position the shell against Rounds 9–21. Use fabric glue or hot glue to secure it, or sew the shell to the body with the yarn tail.
- Final Touches: Fluff the stuffing to smooth any lumps, and adjust the face embroidery if needed.
Tips for Beginners
- Magic Ring Trick: If you’re new to magic rings, try starting with a chain 2 and working your first round into the first chain.
- Stitch Marker Help: Mark the first stitch of each round to avoid losing count.
- Chenille Yarn Tip: This yarn is fluffy but can split—go slow and use a firm tension.