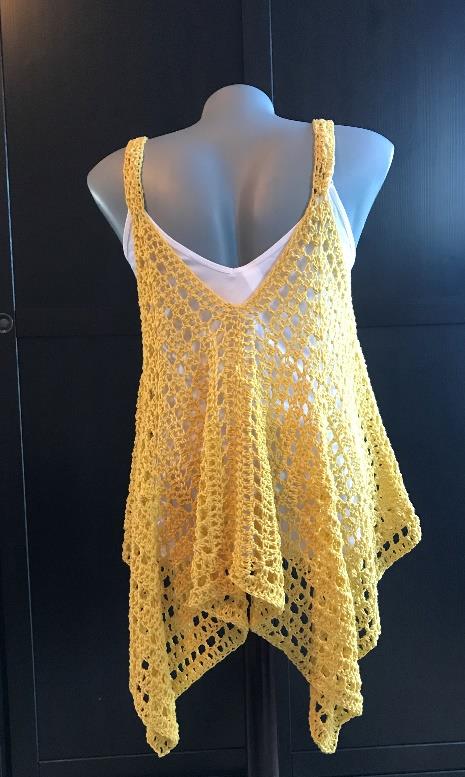
Crochet a Boho-Chic Summer Top: Free Kanata Kerchief Tank Pattern
Materials & Tools
- Yarn: Approximately 775 – 900 yards of DK weight yarn. The sample uses Vickie Howell Cotton-ish.
- Crochet Hook: 6.0 mm (US Size J/10).
- Notions: Tapestry needle for weaving ends and seaming.
- Optional but Recommended: Blocking mats and pins. Blocking will give your squares a perfect shape and beautiful drape.
Sizes & Gauge
- Sizes: Women’s S/M and L/XL. Detailed customization notes are included.
- Gauge:Not critical! This project is worked to measurement. Your squares should measure approximately:
- S/M: 18 inches square (or 16.5″ if using a blockable fiber like cotton).
- L/XL: 20 inches square (or 18.5″ if using a blockable fiber like cotton).
- Sample Gauge: Rows 1-3 after blocking = 4″ x 4″ square.
Crochet Abbreviations & Key Notes
Let’s get familiar with the language of this pattern. A couple of special notes make everything click!
- st: Stitch
- sk: Skip
- ch: Chain
- sl-st: Slip Stitch
- sc: Single Crochet
- dc: Double Crochet
- Important Stitch Notes:
- The starting ch-3 always counts as a dc.
- Each corner is made with a shell: (2dc, ch2, 2dc).
- The special ending: Instead of a ch-2 in the first corner, you will work ch-1, then sc into the 3rd chain of the starting ch-3. This clever trick puts you in the right place and counts as the corner’s ch-2 space.
- Do not turn your work at the end of rows.
Step-by-Step Instructions
Part 1: Making the Squares (Make 4 Identical Squares)
Row 1: Create a Magic Ring (or ch 4, sl-st to first ch to form a ring). In the ring: Ch 3 (counts as dc), 2 dc. [Ch 2, 3 dc in ring] three times. Ch 1, sc into the 3rd ch of the starting ch-3. {12 dc, 4 ch-2 spaces}
Row 2: Over the sc you just made, ch 3, dc. [Ch 1, sk 1 dc, dc in next dc, ch 1, sk 1 dc. In the next ch-2 space, work (2 dc, ch 2, 2 dc)] three times. Repeat from * to * once. Work 2 dc in the first ch-2 space of the round. Ch 1, sc in 3rd ch of starting ch-3. {20 dc, 4 ch-2 spaces, 8 ch-1 spaces}
Row 3: Over the sc, ch 3, dc. [*Dc in each dc and in each ch across until you reach the ch-2 corner space.* In the ch-2 space, work (2 dc, ch 2, 2 dc)] three times. Repeat from * to * once. 2 dc in the first ch-2 space. Ch 1, sc in 3rd ch of starting ch-3. {44 dc, 4 ch-2 spaces}
Row 4: Over the sc, ch 3, dc. [*(Ch 1, sk 1 dc, dc in next dc) across to the dc right before the ch-2 corner space. Ch 1, sk 1 dc.* In the ch-2 space, work (2 dc, ch 2, 2 dc)] three times. Repeat from * to * once. 2 dc in the first ch-2 space. Ch 1, sc in 3rd ch of starting ch-3. {36 dc, 4 ch-2 spaces, 24 ch-1 spaces}
Continuing for Size:
- For Size S/M: Repeat Rows 3 and 4 until your square measures about 18 inches (or 16.5″ for blockable yarn), ending with a Row 3. On the final row, end with ch 2, sl-st to 3rd ch of starting ch-3 (instead of ch-1, sc). Fasten off.
- For Size L/XL: Repeat Rows 3 and 4 until your square measures about 20 inches (or 18.5″ for blockable yarn), ending with a Row 3. On the final row, end with ch 2, sl-st to 3rd ch of starting ch-3. Fasten off.
- Custom Size: Repeat Rows 3 and 4 to your desired measurement, ending with a Row 4. Fasten off.
Tip: Blocking your squares now will make assembly much easier and give a professional finish!
Part 2: Assembly (Creating the Tank Shape)
Refer to the diagram in the pattern. Lay your four squares in a 2×2 grid.
- You will be seaming the top and bottom points of the squares together to form the front and back of the tank.
- Starting at the outer edge, seam inward for:
- S/M: 12 inches
- L/XL: 13.5 inches
- Leave the center 6 inches (S/M) or 6.5 inches (L/XL) unseamed. This open section forms the deep, V-shaped kerchief neckline and armholes.
- For a custom size, seam about two-thirds of the length inward.
Part 3: Straps & Edging (Finishing the Armholes & Neckline)
Straps:
- Identify the four inner corners where the squares meet. Label them Corner 1 (top front), Corner 2 (top front), Corner 3 (top back), Corner 4 (top back).
- Left Strap: Join yarn to the ch-2 space in Corner 3. Ch 3 (counts as dc), 2 dc in same space. Turn. Row 2: Ch 3, dc in each of next 2 dc. Turn. Repeat Row 2 until strap measures approx. 9″ (S/M) or 10″ (L/XL). Sl-st the last row to the ch-2 space in Corner 1. Fasten off.
- Right Strap: Join yarn to the ch-2 space in Corner 4. Work exactly as the left strap, joining to Corner 2.
Armhole Edging (Do for both sides):
Join yarn to any stitch near the middle of an armhole opening. Ch 1, sc in each stitch around the entire armhole. When you get to a strap, work 2 sc into the side of each dc row along the strap to cover it evenly. Continue sc around. Sl-st to first sc to join. Fasten off.
Neckline Edging:
Join yarn to any stitch at the back of the neckline. Ch 1, sc in each stitch all the way around the deep V-neck. When you reach a strap, work 2 sc into the side of each dc row. Continue sc around the other side, repeating the 2-sc along the second strap. Sl-st to first sc to join. Fasten off.
Finishing Touches
Weave in all your ends thoroughly. Give your finished tank a gentle steam block or wet block to even out the stitches and let the beautiful drape shine.
Tips for a Perfect Kanata Tank
- Yarn Choice is Key: A DK weight cotton, cotton blend, or linen blend is ideal for summer wear. It provides structure, drape, and breathability.
- Trust the Process: The squares might look a little wonky or small at first, but they grow quickly. Trust the pattern and the measurements.
- Customization is Easy: To make a top with more or less coverage, simply adjust the length you seam the squares together. A shorter seam creates a deeper V-neck; a longer seam makes it more modest.
- Blocking is Your Friend: Seriously, don’t skip blocking the squares! It transforms them from slightly curly pieces of fabric into perfect geometric shapes that are easy to seam.
- Wear it Your Way: The kerchief neckline is versatile. You can wear it as a deep V in the front or flip it and wear the V in the back for a different look!
Congratulations! You’ve just created a stunning, handmade wardrobe staple