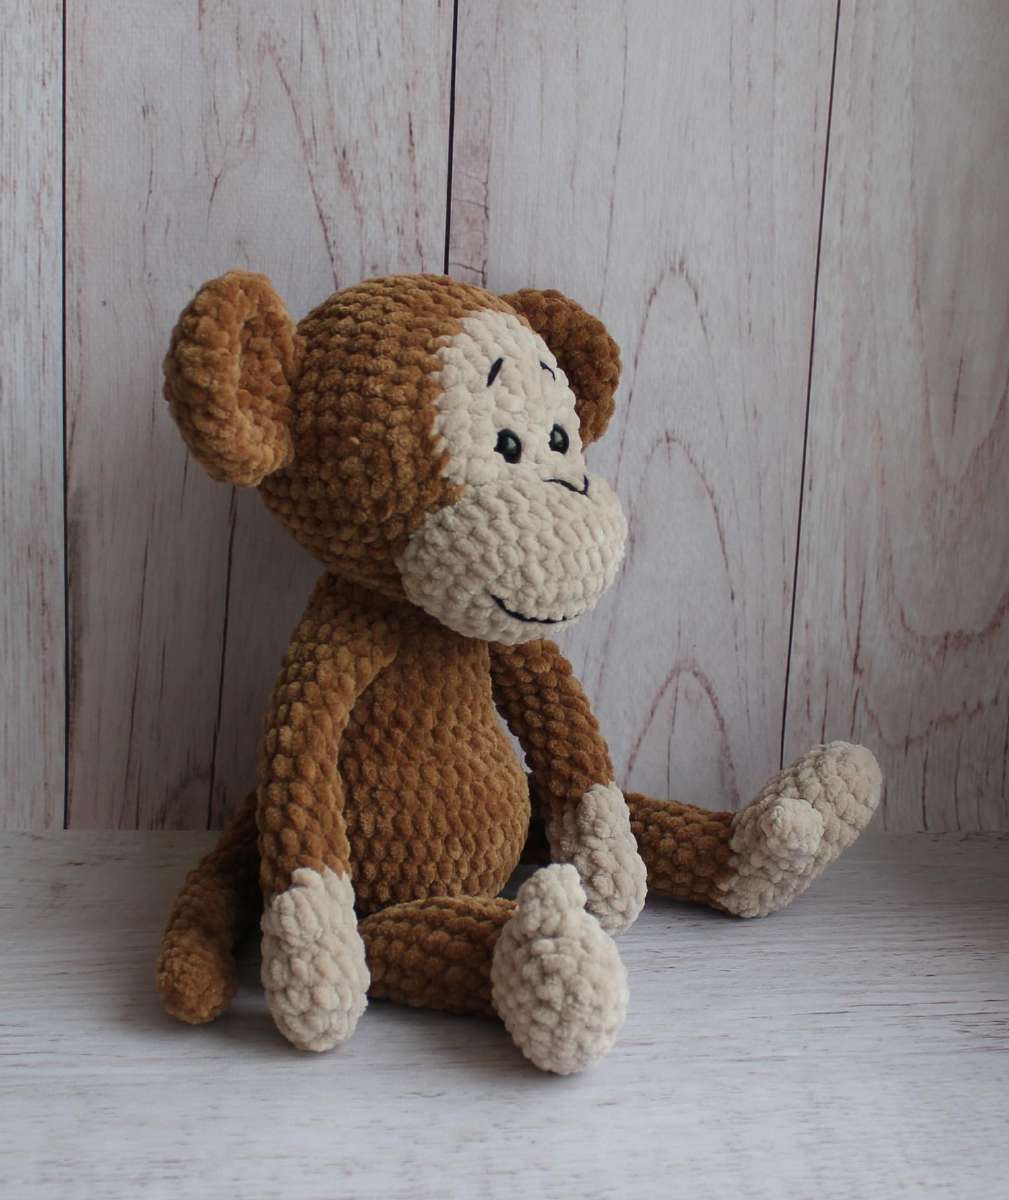
Amigurumi Monkey Free Crochet Pattern
Materials for Your Amigurumi Monkey
To crochet your adorable monkey, gather the following supplies:
- Plush Yarn: Himalaya Dolphin Baby or YarnArt Dolce. You will need:
- Main color: one skein
- Muzzle and paw color: a small amount
- Filler: Holofiber or synthetic fluff for stuffing
- Safety Eyes: 12 mm
- Embroidery Thread: For muzzle details and shaping
- Crochet Hook: 3.5 mm or 4 mm (choose based on your tension and desired fabric density)
- Needle: For sewing pieces together and making tightening stitches
- Strong Thread: For making facial tightening
Crochet Abbreviations Guide
Familiarize yourself with these standard crochet abbreviations used in this pattern:
- MR: Magic Ring
- sc: Single Crochet
- hdc: Half Double Crochet
- inc: Increase (make two single crochet stitches in the same stitch)
- hdc inc: Half Double Crochet Increase (make two half double crochet stitches in the same stitch)
- dec: Decrease (single crochet two stitches together)
- dc: Double Crochet
- ch: Chain Stitch
Finished Size
When completed, your charming crocheted monkey will stand approximately 30 cm tall, making it a perfect huggable companion
Crochet Monkey Pattern Instructions
Head
Start with the muzzle color for the initial rounds of the head.
- 6 sc in MR (6)
- Inc x 6 (12)
- (3 hdc inc, 3 sc) x 2 (18)
- (hdc, hdc inc) x 3, 3 sc, (hdc, hdc inc) x 3, 3 sc (24)
- (2 hdc, hdc inc) x 3, 3 sc, (2 hdc, hdc inc) x 3, 3 sc (30)
Change color to the main body color.
- (4 sc, inc) x 6 (36)
- (5 sc, inc) x 6 (42)
- (6 sc, inc) x 6 (48)
- Rows 9-13: 48 sc (5 rows)
- (6 sc, dec) x 6 (42)
- (5 sc, dec) x 6 (36)
- (4 sc, dec) x 6 (30)
- (3 sc, dec) x 6 (24)
- (2 sc, dec) x 6 (18)
- (1 sc, dec) x 6 (12)
- 6 dec (6)
Secure and cut yarn, leaving a long tail for sewing. Insert the 12 mm safety eyes between rows 2 and 3 of the head, securing them firmly.
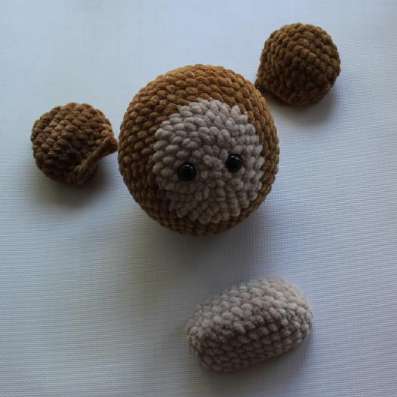
Muzzle
Using the muzzle color yarn:
- Chain 9.
- Starting from the 2nd chain from the hook: 7 sc, 3 sc in the last chain, turn your work, 7 sc along the other side of the chain, 3 sc in the last stitch (20)
- 7 sc, 3 inc, 7 sc, 3 inc (26)
- 7 sc, (sc, inc) x 3, 7 sc, (sc, inc) x 3 (32)
- Rows 5-6: 32 sc (2 rows)
Fasten off, leaving a long tail for sewing. This piece will be sewn onto the head later. Do not stuff the muzzle.
Ears (Make 2)
Using the main color yarn:
- 6 sc in MR (6)
- Inc x 6 (12)
- (1 sc, inc) x 6 (18)
- (2 sc, inc) x 6 (24)
- Rows 5-6: 24 sc (2 rows)
- (2 sc, dec) x 6 (18)
- (sc, dec) x 6 (12)
Fasten off, leaving a long tail. Fold each ear in half and crochet the edges together with a few single crochet stitches to close. Do not stuff.
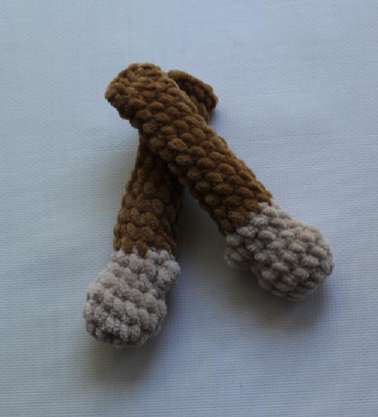
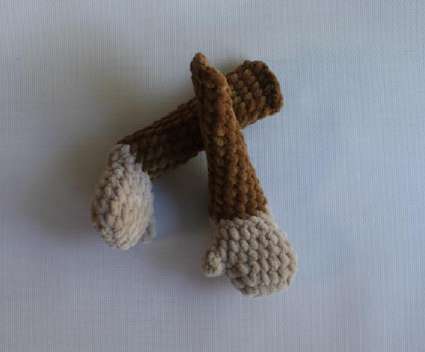
Arms (Make 2)
Begin with the paw color yarn:
- Chain 4.
- Starting from the 2nd chain from the hook: 2 sc, 3 sc in the last chain, turn your work, 2 sc along the other side of the chain, 3 sc in the last stitch (10)
- (2 sc, inc, sc, inc) x 2 (14)
- 14 sc
- (2 sc, dec, sc, dec) x 2 (10)
- 9 sc, then make a Bobble Stitch of 5 dc in the next stitch (to make a bobble stitch, crochet 5 unfinished double crochet stitches from one stitch, then yarn over and pull through all loops on the hook) (10)
- 10 sc
Change color to the main body color.
- Rows 8-19: 10 sc (12 rows)
Fasten off, leaving a long tail for sewing. Stuff only the paw section lightly, ensuring it remains relatively flat rather than becoming a firm ball.
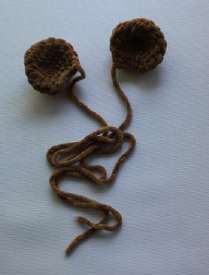
Thumb (Make 2)
Using the paw color yarn:
- 4 sc in MR (4)
- 4 sc (4)
Fasten off, leaving a tail of approximately 10 cm for joining the thumb to the arm/paw later.
Legs (Make 2)
Start with the paw color yarn:
- Chain 5.
- Starting from the 2nd chain from the hook: 3 sc, 3 sc in the last chain, turn, 3 sc, 3 sc in the last stitch (12)
- (3 sc, inc, sc, inc) x 2 (16)
- 16 sc
For the Right Leg:
- 7 sc along the paw, then join the thumb by making 3 sc through both the paw and the thumb, skip one stitch on the paw, and then crochet the remaining 8 sc on the paw (18)
For the Left Leg:
- 14 sc along the paw, then join the thumb by making 3 sc through both the paw and the thumb, skip one stitch on the paw, and then crochet 1 sc on the paw (18)
You will use the thread from the thumb to securely join it into the skipped stitches on the paw, making a seamless connection.
- 18 sc
- (dec, 4 sc, dec, sc) x 2 (14)
Now, we will crochet the heel to shape the foot:
- 6 sc, chain 1, turn
- 6 sc, chain 1, turn
- 6 sc, dec over the turning chain and the next sc, sc, 3 dec, sc, dec over the turning chain and the next sc (13)
Change color to the main body color.
- Rows 11-24: 13 sc (14 rows)
Fasten off, leaving a long tail for sewing. Stuff only the paw section lightly, ensuring it remains relatively flat and not overly stuffed into a ball shape.
Body
Using the main color yarn:
- 6 sc in MR (6)
- Inc x 6 (12)
- (1 sc, inc) x 6 (18)
- (2 sc, inc) x 6 (24)
- (3 sc, inc) x 6 (30)
- (4 sc, inc) x 6 (36)
- (5 sc, inc) x 6 (42)
- 7 sc, then join the left leg by making 6 sc through both the body and the leg, 15 sc on the body, then join the right leg by making 6 sc through both the body and the leg, 8 sc on the body (42)
- Rows 9-11: 42 sc (3 rows)
- 10 sc, dec, (2 sc, dec) x 5, 10 sc (36) – Ensure these decreases are centered for the tummy area.
- 36 sc
- 10 sc, dec, (1 sc, dec) x 5, 9 sc (30)
- Rows 15-16: 30 sc (2 rows)
- (8 sc, dec) x 3 (27)
- 27 sc
- (7 sc, dec) x 3 (24)
- 5 sc, then join one arm by making 5 sc through both the body and the arm, 6 sc on the body, then join the second arm by making 5 sc through both the body and the arm, 3 sc on the body (24)
- (2 sc, dec) x 3 (18)
Fasten off, leaving a long tail for sewing to the head. Stuff the body firmly as you go, ensuring a nice shape.
Tail
Using the main color yarn:
- 6 sc in MR (6)
- (sc, inc) x 3 (9)
- Rows 3-22: 9 sc (20 rows)
Fasten off, leaving a long tail for sewing. Lightly stuff the tail.
Assembly and Finishing Touches
Now that all your monkey’s parts are crocheted, it’s time to bring them all together:
- Head and Muzzle: Sew the muzzle onto the head between rows 1 and 9 of the head. Use strong thread to create indentations for the eyes and mouth, giving your monkey a charming facial expression. Embroider any desired details on the muzzle, such as a nose or smile.
- Ears: Sew the folded ears to the sides of the head, positioning them between rows 11 and 12.
- Body and Head: Firmly sew the body to the head using the long tail left on the body. Ensure a secure attachment so the head sits upright.
- Tail: Sew the stuffed tail to the back of the body.
- Final Stuffing: Check all parts and add any additional stuffing if needed to achieve your desired firmness and shape.
- Weave in Ends: Carefully weave in all remaining loose yarn ends to create a neat and professional finish.
Tips for Beginners
Crocheting amigurumi can be a delightful journey! If you’re new to some of these techniques:
- Magic Ring: Practice the magic ring until it feels comfortable. It creates a tight center, essential for amigurumi.
- Stitch Markers: Use a stitch marker to mark the beginning of each round, especially when working in a spiral, to avoid losing your place.
- Even Tension: Try to maintain an even tension throughout your work. This will result in a more uniform and neat toy.
- Stuffing: Stuff your pieces firmly but gradually. Use small pieces of filler to avoid lumps and achieve a smooth, well-shaped finish.
- Sewing: Take your time with sewing. Neatly attaching the parts makes a big difference in the final appearance of your monkey.
Enjoy making your adorable new plush monkey!