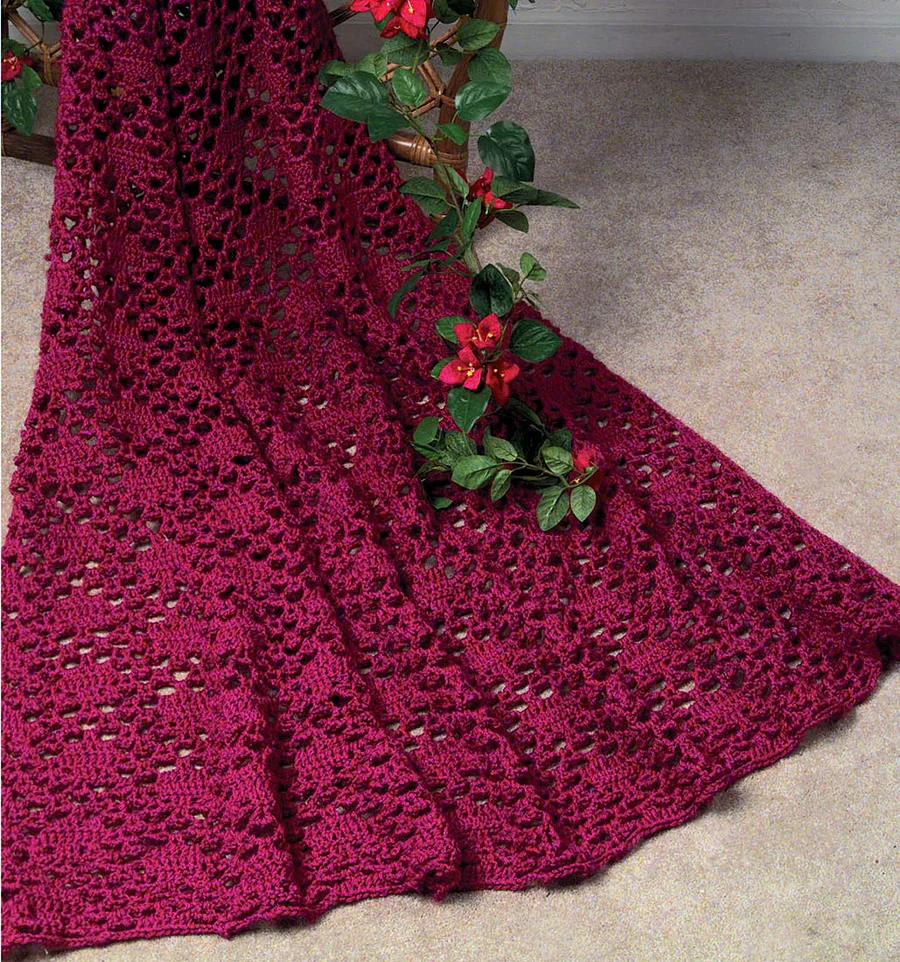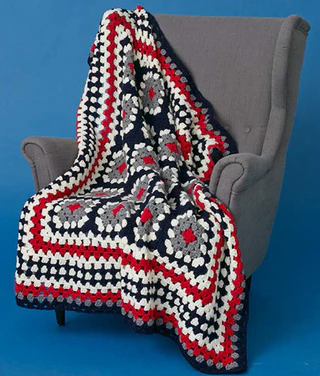
Patriotic Granny Throw Crochet Pattern
There’s something truly magical about a handmade granny throw—it’s like wrapping yourself in a hug made of yarn! This Patriotic Granny Throw is no exception, with its bold red, navy, and cream colors blending into a timeless design that’s perfect for picnics, cozy nights, or as a heartfelt gift for someone special.
Whether you’re a beginner looking to practice your granny square skills or an experienced crocheter craving a relaxing project, this blanket is a joy to make. The pattern uses simple stitches (mostly double crochet and chains) and works up quickly thanks to its modular design. Plus, the patriotic color scheme makes it ideal for holidays like the Fourth of July, Memorial Day, or as a year-round tribute to home and heritage.
Why You’ll Love This Pattern:
- Beginner-friendly: Basic stitches and clear instructions.
- Customizable: Swap colors to match your decor or favorite team
- Satisfyingly large: At 51″ x 57″, it’s the perfect lapghan or couch companion.
Grab your hook, pick up some soft Caron® United™ yarn, and let’s crochet a blanket that’s as full of love as it is of color
Materials
- Yarn: Caron® United™ (4 oz/113 g, 235 yds/215 m per skein) in:
- Contrast A: Aran (06002) (cream)
- Contrast B: Soft Grey Heather (06004) (light grey)
- Contrast C: Red (06008)
- Contrast D: Navy (06014)
- Hook: U.S. size I/9 (5.5 mm) or size needed to match gauge.
- Notions: Scissors, yarn needle, stitch markers (optional).
Gauge & Finished Size
- Gauge: 12 double crochet (dc) and 6 rows = 4″ (10 cm).
- Center Granny Motif: Approx. 7″ (18 cm) square.
- Finished Blanket Size: Approx. 51″ x 57″ (129.5 x 144.5 cm).
Tip: Make a test motif to check your gauge
Abbreviations
- Beg = Beginning
- Ch = Chain
- Dc = Double crochet
- Rep = Repeat
- Rnd(s) = Round(s)
- Sl st = Slip stitch
- Sp(s) = Space(s)
- St(s) = Stitch(es)
*Note: Ch-3 at the start of a round counts as a dc throughout
Pattern Instructions
Step 1: Center Granny Motifs (Make 20)
Motif Colors: Alternate between C (red), B (grey), A (cream), and D (navy) as follows:
Rnd 1 (Color C, red):
- Ch 4, join with sl st to form a ring.
- Ch 3 (counts as first dc), 2 dc into ring.
- *(Ch 2, 3 dc) 3 times into ring. Ch 2, join with sl st to top of ch-3. Fasten off.*
Rnd 2 (Color B, grey):
- Join B with sl st to any ch-2 sp. Ch 3, (2 dc, ch 2, 3 dc) in same sp.
- *Ch 1, (3 dc, ch 2, 3 dc) in next ch-2 sp. Repeat around, ending with ch 1. Join to ch-3.*
Rnd 3 (Color B, grey):
- Sl st to next ch-2 sp. Ch 3, (2 dc, ch 2, 3 dc) in same sp.
- *Ch 1, 3 dc in next ch-1 sp. Repeat (3 dc, ch 2, 3 dc) in corners and 3 dc in sides around. Join to ch-3.*
Rnd 4 (Color A, cream):
- Join A to any ch-2 sp. Repeat Rnd 3, but work (3 dc, ch 2, 3 dc) in corners and (3 dc) twice in side spaces.
Rnd 5 (Color D, navy):
- Join D to any ch-2 sp. Repeat Rnd 3, but work (3 dc) three times in side spaces.
Fasten off after each round.
Step 2: Joining Motifs
- Arrange motifs into 4 strips of 5 squares each.
- Join strips together to form the center section (approx. 28″ x 35″).
Step 3: Edging
Rnd 1 (Color A, cream):
- Join A to a corner ch-2 sp. Ch 3, (2 dc, ch 2, 3 dc) in same sp.
- *Work (3 dc in ch-1 sps) along sides and (3 dc, ch 2, 3 dc) in corners around the entire blanket. Join to ch-3.*
Rnds 2–16:
- Alternate colors (A, C, D, B) as follows:
- Even-numbered rnds: Repeat Rnd 1’s corner pattern, but work 3 dc in every ch-1 sp.
- Odd-numbered rnds: Join new color in a corner and repeat Rnd 1.
See PDF for full color sequence (Rnds 2–16 use A, C, D, B in rotation).
Tips for Beginners
- Magic Ring Alternative: If the starting ring is tricky, chain 4 and work your first round into the first chain.
- Stitch Markers: Use them to mark corners and keep track of rounds.
- Weaving in Ends: Do this as you go to avoid a pile at the end!
- Blocking: Lightly steam-block motifs before joining for a polished look.
Finishing
Weave in all ends securely. Give your blanket a gentle wash and lay flat to dry to soften the yarn and even out stitches.