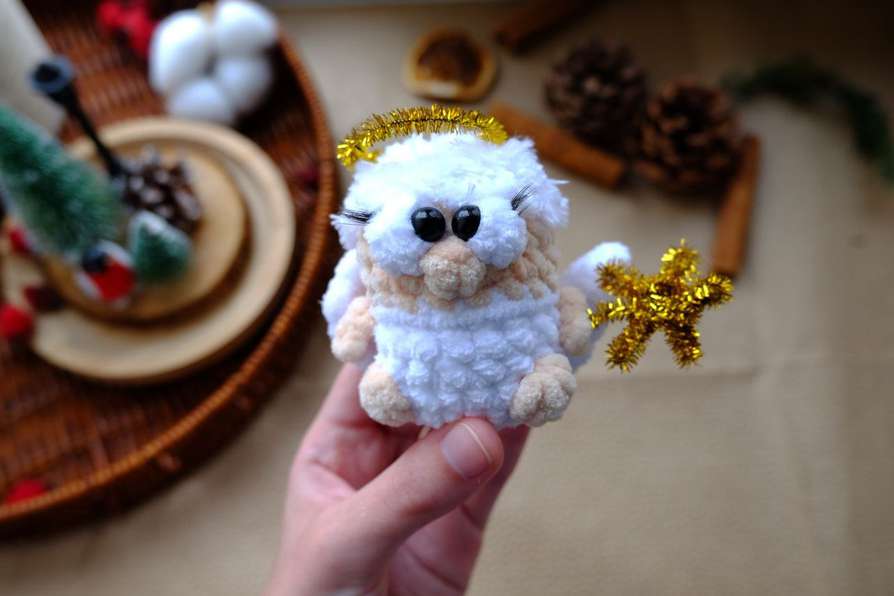
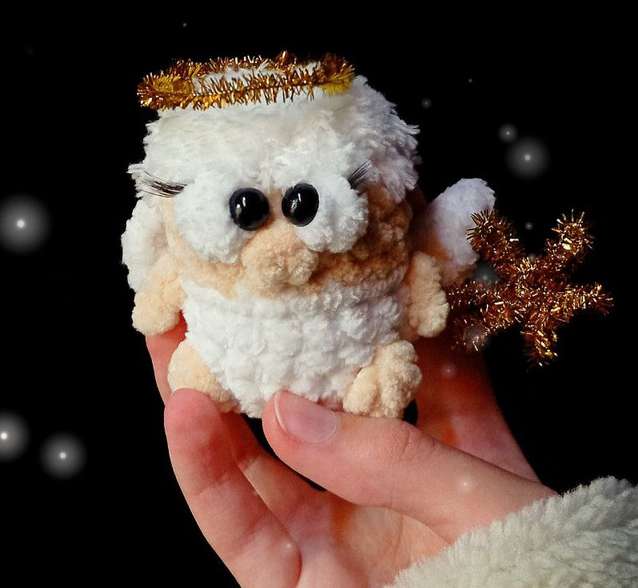
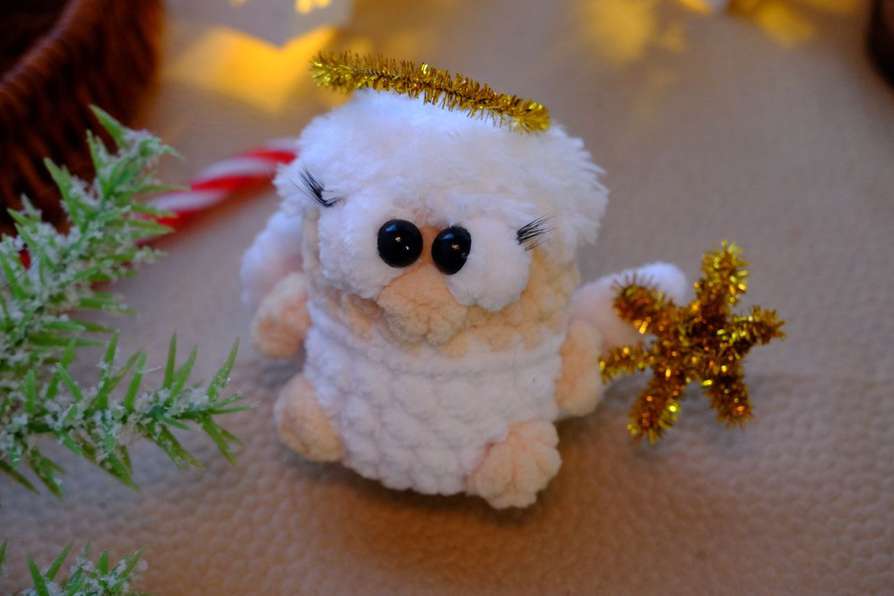
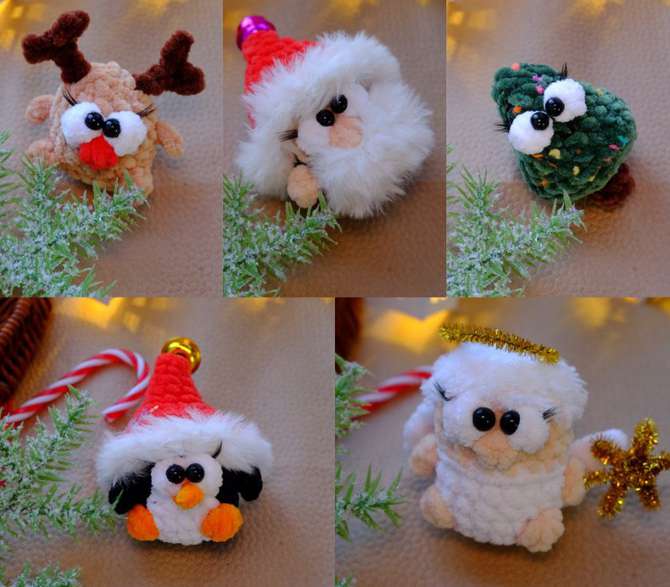
Meet “Luchik” the Angel: A Free Crochet Pattern
A Little Ray of Sunshine
Hello, dear crochet friend! If you’ve opened this pattern, it means you’re ready to create your very own “Luchik” the Angel – whose name means “little ray of sunshine” in Russian. This sweetheart is part of the “Big-Eyed Cuties” New Year’s collection, and she’s here to brighten up your holiday season!
There’s something so special about crocheting angels, isn’t there? They seem to carry a little piece of magic and comfort with them wherever they go. Little Luchik, with her fluffy hair, delicate wings, and those adorable big eyes, is no exception. She works up quickly with plush yarn and makes the most heartwarming gift for a loved one – or a wonderful treat for yourself!
This pattern is designed by Agnia Roginskaya of “Milota tois” (which means “Cuteness Toys”), and it’s perfect for crocheters who have mastered the basics and are ready for a fun, quick project with a few special touches. We’ll be using some fluffy “fur” yarn for her hair, creating little puff stitches for her eyes, and even making a golden wire halo. Sound exciting? Let’s gather our materials and get started
Materials You’ll Need
- Plush yarn in black, white, and orange, 100g/120m (sample uses Wolans Banny Baby in colors 01, 63, 42, 40)
- White fur yarn for the hair (sample uses “Vjaz Mekhovaya” and/or Himalaya Koala)
- Glue-on eyes 8mm or 10mm
- Stuffing (synthetic fiberfill)
- Crochet hook 3.0mm – 3.5mm (sample uses Clover 3.25mm)
- Scissors
- Glue for attaching eyes (sample uses “Moment Gel”)
- Yarn needle with a large eye or tapestry needle for closing the opening
- Eyelashes (a small piece, optional)
- Gold chenille wire (for the halo)
Abbreviations (US Terms)
- sc – single crochet
- hdc – half double crochet
- dc – double crochet
- tr – treble crochet (triple crochet)
- PS – puff stitch (4 hdc with a shared top worked into one stitch)
- ch – chain
- MR – magic ring
- sl st – slip stitch
- inc – increase (2 sc in one stitch)
- dec – decrease (sc two stitches together)
- BLO – back loop only
- Text in blue – work with white, textured/fur yarn
- Text in yellow – work with skin-toned yarn
Crocheting Luchik the Angel: Step-by-Step
Body and Head
We’ll work from the bottom up. Follow the color indications carefully!
- Round 1: 6 sc in MR (6)
- Round 2: 6 inc (12)
- Round 3: (1 sc, inc) * 6 (18)
- Round 4: 6 sc, Puff Stitch (PS) , 5 sc, PS , 5 sc (18) – Work the puff stitches with white yarn? The pattern text isn’t explicitly colored here, but based on context, these likely form the base for the eyes. Check the photos for placement!
- Round 5: 18 sc (18)
- Round 6: 5 sc, arm (ch 4, from 2nd ch from hook: 3 sl st), 9 sc, arm, 4 sc (18)
- Round 7: 18 sl st (18) – Do not cut the white yarn. Switch to skin-toned yarn.
- Round 8: BLO: 18 sc (18)
- Round 9: 9 sc, PS , 8 sc (18)
- Round 10: 8 sc, PS in white , 1 sc, PS in white , 7 sc (18)
Cut and fasten off both the white and skin-toned yarns.
- Round 11: 18 sc (18)
- Round 12: (1 sc, dec) * 6 (12)
Stuff firmly. - Round 13: 6 dec. Cut the yarn, fasten off, and close the opening by weaving the tail through the front loops of the last round and pulling tight.
Wings
The wings are worked directly onto the body. Use white plush yarn.
Right Wing:
Attach the yarn between rounds 3 and 4 on the right side of the body (with the angel’s back and side facing you). We will work from the bottom up.
- In one stitch: ch, 1 sc, hdc
- In one stitch: 2 dc, 1 tr, ch 3, from the 2nd ch from hook: 2 sl st, ch 2, sl st into the base.
Cut the yarn and fasten off.
Left Wing:
Attach the yarn between rounds 4 and 5 on the left side of the body. We will work from the top down.
- In one stitch: ch 6, from the 2nd ch from hook: 2 sl st, 1 tr, 2 dc
- In one stitch: 1 hdc, sc, sl st
Cut the yarn and fasten off.
Assembling and Finishing Your Angel
The Face – Bringing Luchik to Life!
- Attach the eyes: Glue the eyes onto the center of the white puff stitches (the ones from Round 4). If there’s a small gap between the puff stitches, you can gently pull it closed with a thin thread to make it neat.
- Add eyelashes (optional): If you’d like your angel to have lashes, glue a small piece of false eyelashes just below each eye.
- Create the halo: Shape the gold chenille wire into a small circle or a halo shape of your choice. Leave a small stem to attach it. Gently place or stitch it onto the top of the angel’s head, nestling it into the fluffy “hair.”
The Hair
The fluffy “fur” yarn is your magic ingredient here! Using the white fur yarn, you can create a sweet hairstyle for Luchik. You have a few options:
- Surface crochet: Using a smaller hook, you can pull loops of the fur yarn through the stitches on the head to create a fuzzy texture.
- Attach pre-made pieces: You could make a small cap of fur yarn and sew it on.
- Simply glue: For a simpler look, you can glue small tufts of the fur yarn to the top and sides of the head.
Look at the original photos for inspiration – the goal is to create a soft, fuzzy, halo of hair around that sweet face!
Congratulations! Your Luchik the Angel is Ready!
See how quickly that came together? Little Luchik is now ready to spread her ray of sunshine. She’s perfect for perching on a Christmas tree, sitting on a gift, or simply keeping you company on a cozy winter afternoon.
I hope you enjoyed making this little cutie as much as I enjoyed sharing the pattern with you. Remember, every stitch is made with love, and that’s what makes handmade gifts so incredibly special.
When you share your finished angels, be sure to tag the original creator, Agnia Roginskaya, and use the hashtag so we can all admire your work! Happy crocheting, and may your days be filled with little rays of sunshine!