Craft Your New Best Friend: The Ultimate Plush Bunny Amigurumi Guide
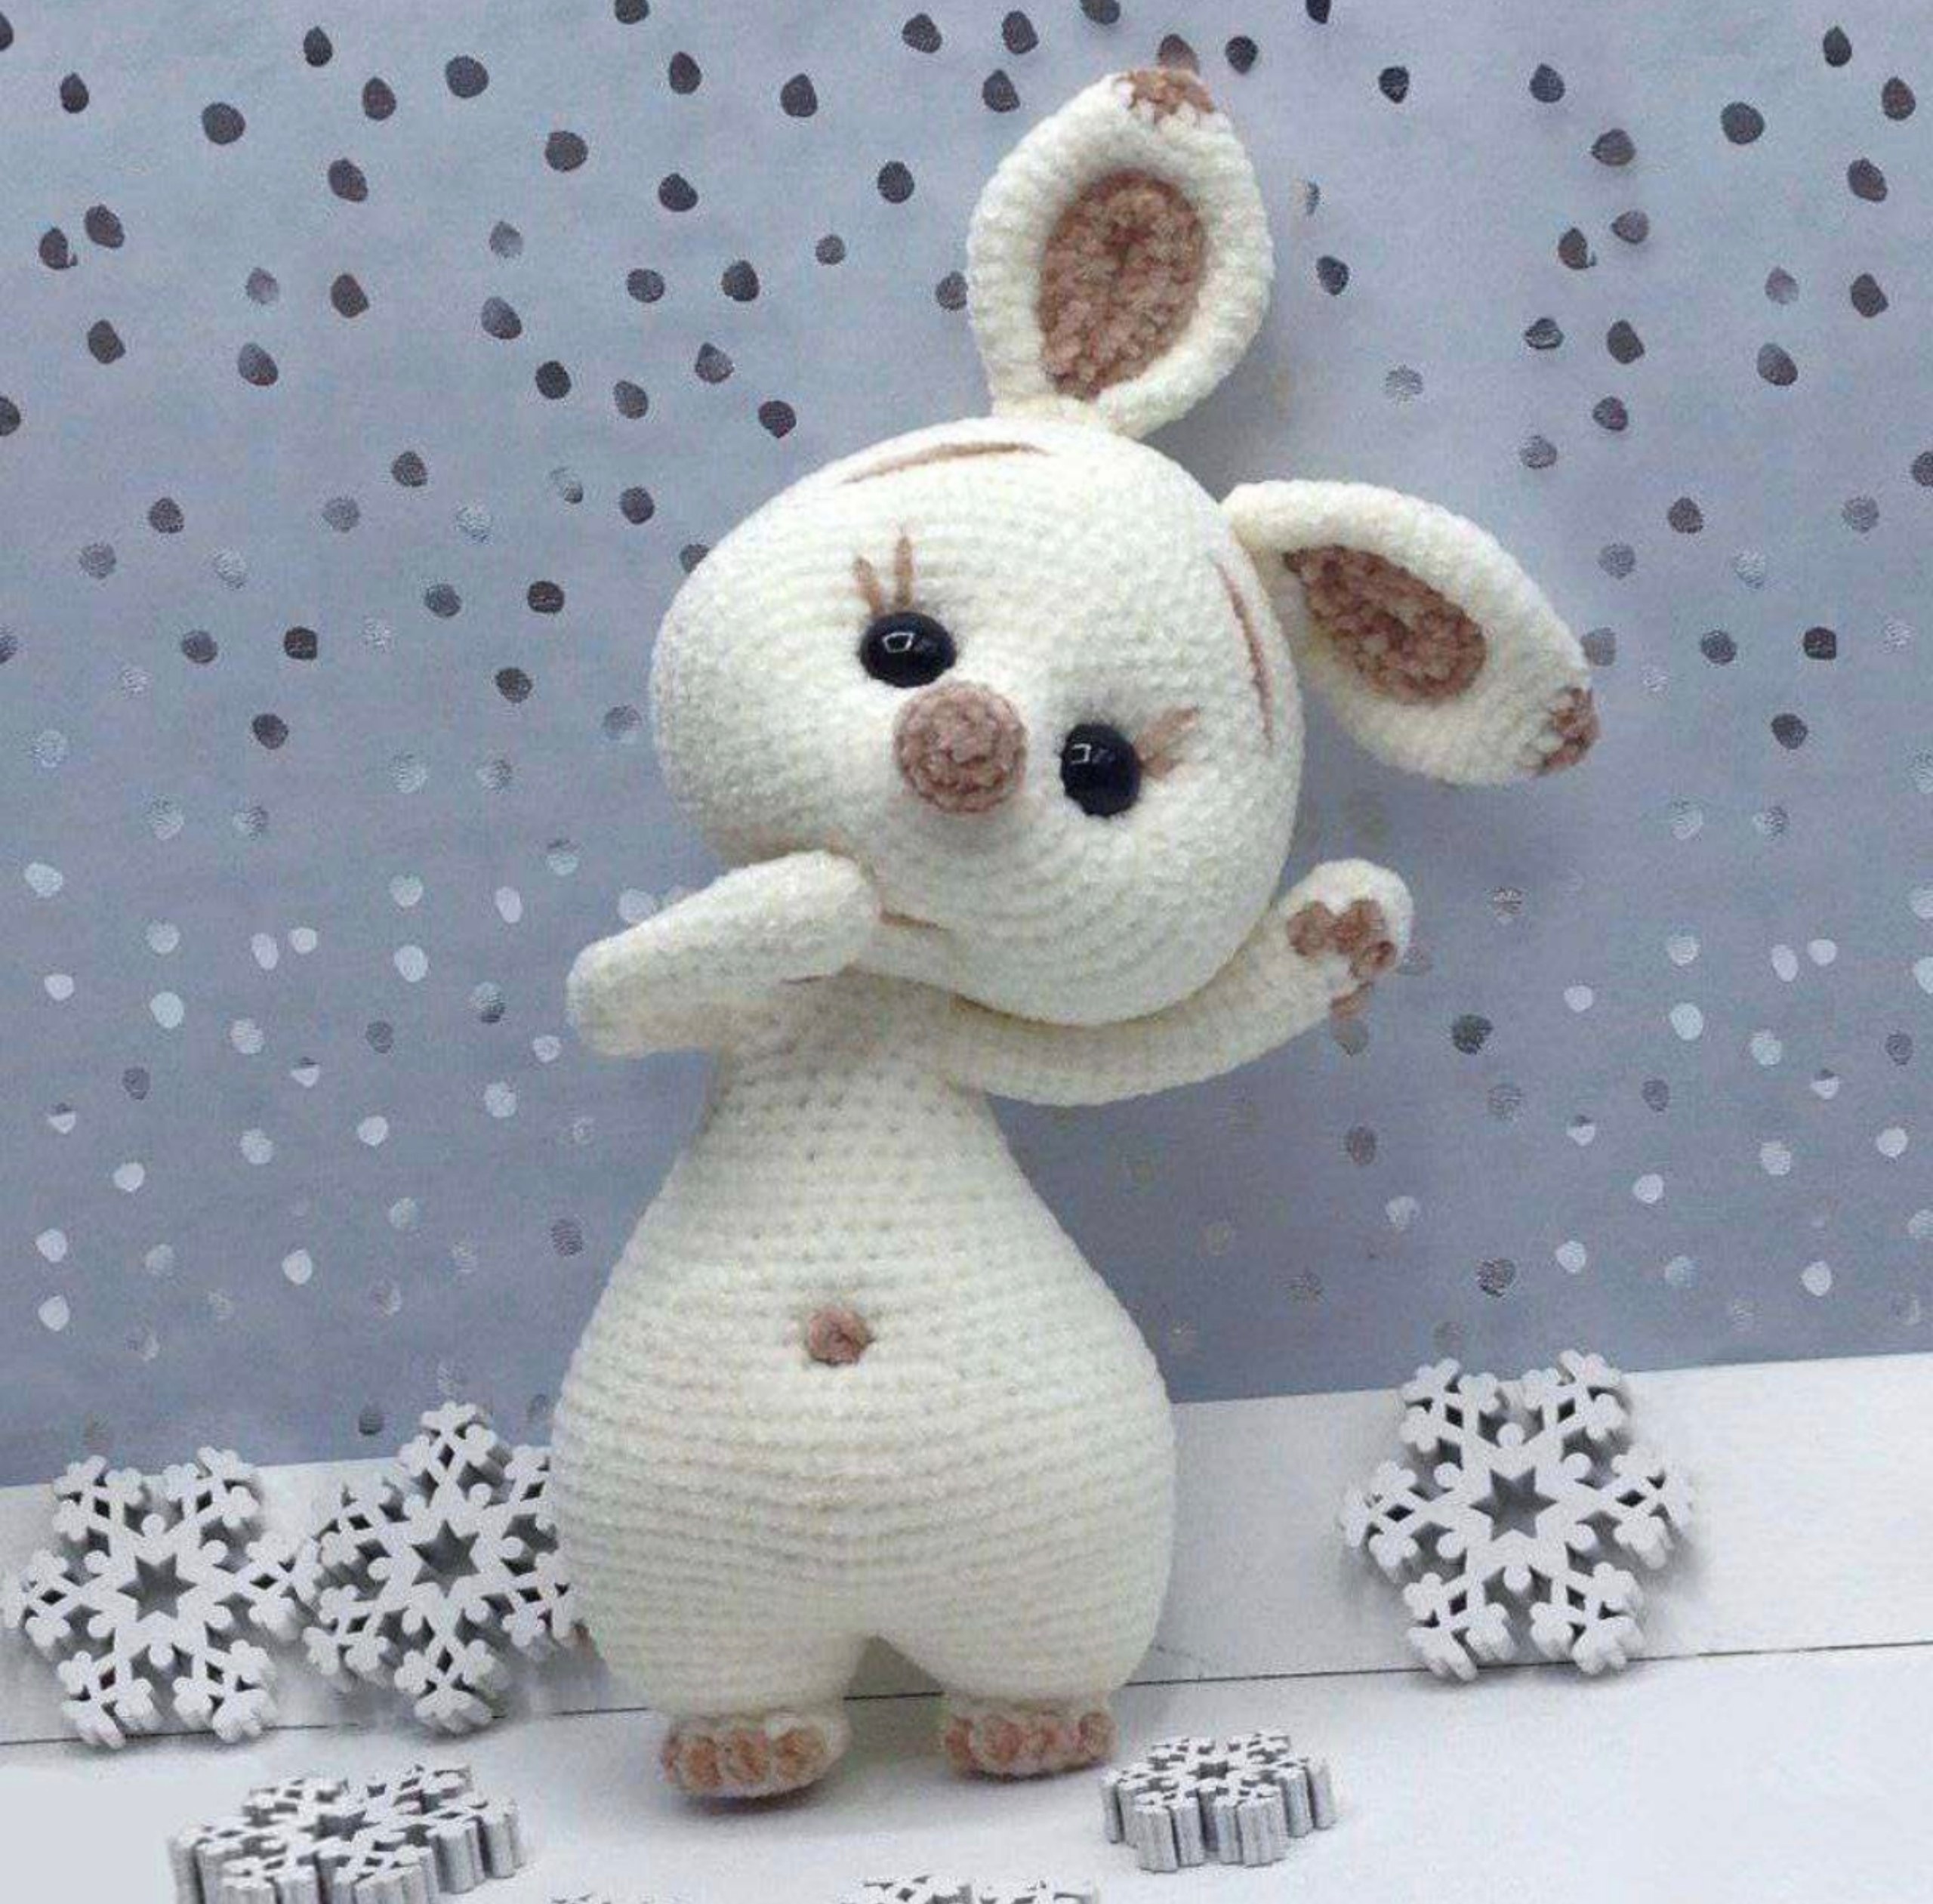
Cute Crochet Bunny Amigurumi Pattern
Create your own adorable, plush bunny with this detailed step-by-step crochet guide. This pattern is designed for those who love amigurumi and want to create a soft, huggable companion.
Materials Needed
- Plush yarn (Main color: White/Cream; Accent color: Pink/Brown)
- Crochet hook (appropriate size for your plush yarn)
- Safety eyes
- Fiberfill stuffing
- Stitch markers
- Yarn needle and strong thread for sculpting
- Small button (for the paw soles)
Abbreviations (US Terms)
- MR: Magic Ring
- sc: Single Crochet
- inc: Increase (2 sc in one stitch)
- dec: Decrease (sc 2 together)
- ch: Chain
- sl st: Slip Stitch
- dc: Double Crochet
- tr: Treble Crochet
- Puff: Puff stitch (3 dc in one stitch, worked together)
Step 1: Lower Legs (Make 2)
Work in a spiral. Use a stitch marker to track the start of each round. The marker should be placed in the center back.
- Round 1: 6 sc in MR (6)
- Round 2: inc * 6 (12)
- Round 3: (1 sc, inc) * 6 (18)
- Round 4: 5 sc, (puff stitch, 1 sc) * 4, 5 sc
- Round 5: 5 sc, dec * 4, 5 sc (14)
- Round 6: 14 sc (14)
- Round 7: 4 sc, inc * 6, 4 sc (20)
- Round 8: 4 sc, (1 sc, inc) * 6, 4 sc (26)
- Rounds 9-11: 26 sc (26)
- Round 12: 5 sc, (inc, 3 sc) * 4, inc, 4 sc (31)
Assembly of legs: For the left leg, leave the last 4 stitches unworked; cut the yarn and fasten off. For the right leg, work 3 sc and do not cut the yarn. Place the left leg against the right and join them by crocheting 5 sc across both. Fasten off and stuff. You may sew a small button onto the sole for detail.
Step 2: The Body
Continue crocheting from the legs. The marker should stay in the center of the back. Stuff as you go.
- Round 1: Place marker. 3 sc, (inc, 1 sc) * 3, inc, 9 sc, (inc, 2 sc) * 2, inc (working around the left leg), inc, (2 sc, inc) * 2, 9 sc, inc, (1 sc, inc) * 3, inc, 3 sc (working around the right leg) (66)
- Round 2: 66 sc (66)
- Round 3: 3 sc, (inc, 2 sc) * 3, 42 sc, (2 sc, inc) * 3, 3 sc (72)
- Rounds 4-8: 72 sc (72)
- Round 9: 5 sc, dec, (10 sc, dec) * 5, 5 sc (66)
- Round 10: 66 sc (66)
- Round 11: (9 sc, dec) * 6 (60)
- Round 12: 4 sc, dec, (8 sc, dec) * 5, 4 sc (54)
- Round 13: 54 sc (54)
- Round 14: (7 sc, dec) * 6 (48)
- Round 15: 48 sc (48)
- Round 16: 3 sc, dec, (6 sc, dec) * 5, 3 sc (42)
- Round 17: 42 sc (42)
- Round 18: (5 sc, dec) * 6 (36)
- Round 19: 36 sc (36)
- Round 20: 2 sc, dec, (4 sc, dec) * 5, 2 sc (30)
- Round 21: 30 sc (30)
- Round 22: (3 sc, dec) * 6 (24)
- Round 23: 24 sc (24)
- Round 24: (dec, 2 sc) * 6 (18)
- Rounds 25-32: 18 sc (18)
- Round 33 (Arm Holes): 3 sc, 3 ch, skip 3 sts, 6 sc, 3 ch, skip 3 sts, 3 sc
- Round 34: 3 sc, 3 sc in each ch, 6 sc, 3 sc in each ch, 3 sc (18)
- Rounds 35-37: 18 sc (18)
Cut the yarn and fasten off.
Step 3: Front Legs (Arms)
Do not stuff the arms. Attach yarn to the first skipped stitch of the arm hole.
- Round 1: 3 sc, 1 sc in the space between rows, 3 sc in chs, 1 sc in the space between rows (8)
- Rounds 2-21: 8 sc (8)
- Round 22: inc, 3 sc, inc, 3 sc (10)
- Round 23: inc, 4 sc, inc, 4 sc (12)
- Round 24: 2 sc, inc, 5 sc, inc, 3 sc (14)
Paw detail: Split the round in half. Skip 6 stitches, and in the 7th: (a) inc, 5 sc, inc (9), (b) 9 sc (9), (c) dec * 4, 1 sc. Fasten off and repeat the process for the other half of the paw.
Step 4: The Nose
Nose Part 1 (Accent Yarn):
- Round 1: 6 sc in MR (6)
- Round 2: inc * 6 (12)
- Round 3: (1 sc, inc) * 6 (18)
- Rounds 4-5: 18 sc (18)
- Round 6: (1 sc, dec) * 6 (12). Switch to main color for the next round.
Nose Part 2 (Secondary Yarn):
- Round 1: 6 sc in MR (6)
- Round 2: inc * 6 (12)
- Rounds 3-4: 12 sc (12)
- Round 5: dec * 6 (6)
- Round 6: Switch color, inc * 6 (12)
Step 5: The Head
Continuing from the nose, the marker should be at the chin and the center back of the head.
- Round 1: (1 sc, inc) * 6 (18)
- Round 2: 3 sc, inc * 3, 6 sc, inc * 3, 3 sc (24)
- Round 3: (3 sc, inc) * 6 (30)
- Round 4: 6 sc, inc * 3, 12 sc, inc * 3, 6 sc (36)
- Round 5: (5 sc, inc) * 6 (42)
- Round 6: 9 sc, inc * 3, 18 sc, inc * 3, 9 sc (48)
- Round 7: (7 sc, inc) * 6 (54)
- Round 8: (8 sc, inc) * 6 (60)
- Round 9: (9 sc, inc) * 6 (66)
- Round 10: (10 sc, inc) * 6 (72)
- Round 11: (11 sc, inc) * 6 (78)
- Round 12: (12 sc, inc) * 6 (84)
- Round 13: 37 sc, (inc, 2 sc) * 3, inc, 37 sc (88)
- Round 14: 88 sc (88)
- Round 15: 3 sc, (dec, 2 sc) * 5, dec, 12 sc, (inc, 2 sc) * 4, inc, 12 sc, (dec, 2 sc) * 5, dec, 4 sc (81)
- Round 16: dec, 79 sc (80)
- Rounds 17-18: 80 sc (80)
- Round 19: (2 sc, dec) * 4, 48 sc, (dec, 2 sc) * 4 (72)
Neck and Ear Openings
- Round 20 (Neck Hole): 70 sc, 2 ch, skip 2 sts (70)
- Round 21: 2 ch, skip 2 sts, 68 sc, 2 sc in ch (68)
- Round 22: 2 sc in ch, 70 sc (72)
- Round 23: 72 sc (72)
- Round 24: (10 sc, dec) * 6 (66)
- Round 25 (Ear Holes): 29 sc, 3 ch, skip 3 sts, 3 sc, 3 ch, skip 3 sts, 28 sc (60)
- Round 26: 29 sc, 3 sc in each ch, 3 sc, 3 sc in each ch, 28 sc (66)
- Round 27: (9 sc, dec) * 6 (60)
- Round 28: 4 sc, dec, (8 sc, dec) * 5, 4 sc (54)
- Round 29: (7 sc, dec) * 6 (48)
- Round 30: 3 sc, dec, (6 sc, dec) * 5, 3 sc (42)
- Round 31: (5 sc, dec) * 6 (36)
- Round 32: 2 sc, dec, (4 sc, dec) * 5, 2 sc (30)
- Round 33: (3 sc, dec) * 6 (24). Stuff the head.
- Round 34: (2 sc, dec) * 6 (18)
- Round 35: (1 sc, dec) * 6 (12)
- Round 36: dec * 6 (6). Fasten off.
Step 6: The Ears (Make 2)
Attach yarn to the first skipped stitch of the ear hole.
- Rounds 1-5: 6 sc (6)
- Round 6: inc, 2 sc, inc, 2 sc (8)
- Rounds 7-9: 8 sc (8)
- Round 10: inc, 3 sc, inc, 3 sc (10)
- Rounds 11-13: 10 sc (10)
- Round 14: inc, 4 sc, inc, 4 sc (12)
- Rounds 15-17: 12 sc (12)
- Round 18: inc, 5 sc, inc, 5 sc (14)
- Rounds 19-21: 14 sc (14)
- Round 22: inc, 6 sc, inc, 6 sc (16)
- Rounds 23-30: 16 sc (16)
- Round 31: inc, 7 sc, inc, 7 sc (18)
- Round 32: inc, 8 sc, inc, 8 sc (20)
- Round 33: inc, 9 sc, inc, 9 sc (22)
- Round 34: inc, 10 sc, inc, 10 sc (24)
- Round 35: 24 sc (24)
Dividing the ear: Find the middle of the ear. Skip 11 stitches, inc, 10 sc, inc (14). Round 2: 14 sc. Round 3: dec * 7 (7). Fasten off and repeat for the second half of the ear.
Step 7: Accessories
Hearts
- Large Heart (for ears/under eyes): In MR, ch 3, 4 tr, 3 dc, ch, sc, ch, 3 dc, 4 tr, ch 3, sl st. Pull ring tight.
- Small Heart (for paws/eyes): In MR, ch 2, 4 dc, 3 sc, ch, sc, ch, 3 sc, 4 dc, ch 2, sl st. Pull ring tight.
Tail
- Round 1: 6 sc in MR (6)
- Round 2: inc * 6 (12)
- Round 3: (1 sc, inc) * 6 (18)
- Round 4: (2 sc, inc) * 6 (24)
- Round 5: (sc, dec) * 3, inc * 6, (dec, sc) * 3 (24)
- Round 6: 24 sc (24)
Step 8: Assembly and Sculpting
To give the bunny a realistic expression, you will need to sculpt the face using a strong thread.
- Eyes: Position safety eyes between rounds 6-8, with 12 stitches between them. Use a needle to pull the thread from the neck hole to the eye area to create a slight indent.
- Mouth: Mark the mouth area between rounds 8-9, with 5 stitches between the corners. Pull the thread from the top of the head to the mouth corners to create a smile.
- Finishing: Sew the head to the body, attach the ears, tail, and hearts. Embroider the eyebrows and final mouth details