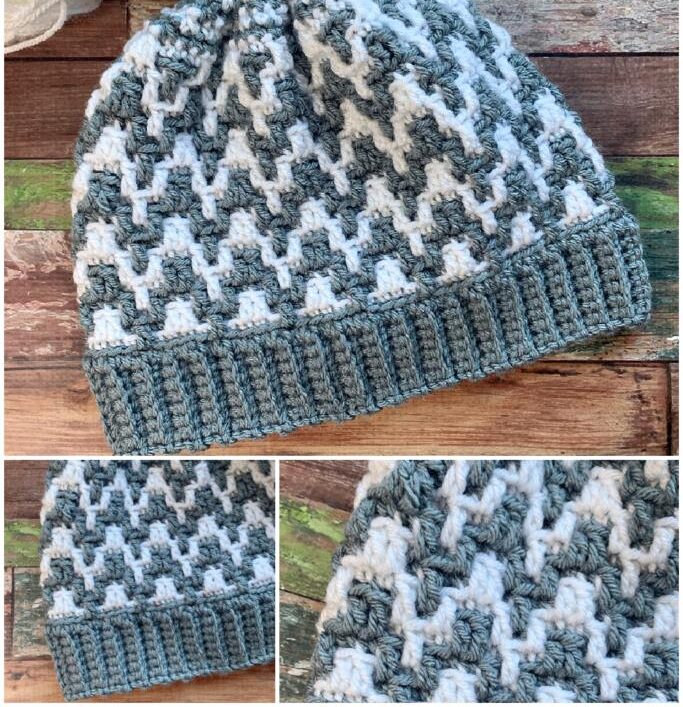
Mosaic Crochet Beanie Pattern for Beginners
Hello, lovely crocheters! There’s nothing quite like the satisfaction of creating a beautiful, functional accessory with your own two hands. If you’ve been dreaming of a project that combines style with coziness, you’re in the right place. Today, I’m thrilled to share this gorgeous Mosaic Beanie pattern—a perfect blend of texture, color, and comfort.
This beanie is not only warm and practical but also features a stunning mosaic stitch design that looks far more intricate than it actually is. Using just two colors of worsted weight yarn, you’ll create a hat that’s perfect for gifting, keeping for yourself, or even donating to a good cause. The pattern is designed to be worked from the bottom up, starting with a stretchy ribbed brim that ensures a snug and comfortable fit.
Whether you’re an intermediate crocheter or a confident beginner looking to try something new, this pattern is a fantastic way to expand your skills. The mosaic technique might sound fancy, but I’ll guide you through every step with clear, simple instructions. You’ll learn how to work into the back and front loops to create those beautiful raised stitches that make this hat so special.
So, grab your favorite hook, pick two colors that make your heart sing, and let’s dive into this rewarding and fun project. By the end, you’ll have a cozy, handmade beanie that’s sure to turn heads and keep you warm all season long
Materials You’ll Need
- Yarn: Worsted weight yarn (100g/152 yards per color). I used:
- Color A: Cobblestone Heather (main color)
- Color B: White (contrast color)
- Crochet Hook: 4.5 mm
- Notions:
- Yarn needle
- Scissors
Skill Level
Intermediate (confident beginners welcome)
Finished Size
Approximately 20 inches in circumference and 7.5 inches in height.
Abbreviations Glossary
- ch: chain
- sl st: slip stitch
- sc: single crochet
- dc: double crochet
- sc blo: single crochet in the back loop only
- ldc flo: long double crochet (worked in the front loop only of the stitch one row below)
- sc2tog: single crochet two stitches together (decrease)
Note: Written in US terms. ch 1 does not count as a stitch.
Pattern Notes
- This hat is worked from the bottom up, starting with the ribbed brim.
- The body is worked in joined rounds.
- Do not cut the yarn between color changes—carry the yarn up the inside of the work.
- A video tutorial is available for the mosaic stitch pattern (worked in rows) if you need visual guidance.
Let’s Get Started!
Step 1: The Ribbed Brim
We’ll begin by creating the brim, which is worked flat and then seamed.
- With Color A, chain 9.
- Row 1: Single crochet (sc) in the second chain from the hook and across each chain. (8 sc)
- Row 2: Chain 1, turn. Sc in the first stitch, then sc in the back loop only (sc blo) of the next 6 stitches, and sc in the last stitch. (8 sts)
- Repeat Row 2 until you have 80 rows total. Your ribbing should measure approximately 20 inches (the circumference of the hat). Tip: To adjust the size, add or remove rows in multiples of 5.
Step 2: Join the Brim
- Bring both ends of the ribbing together.
- Using your hook, single crochet through both ends to seam them together. Do not fasten off.
Step 3: Begin Working in Rounds
- Round 1: Chain 1. Work 1 sc evenly around the edge of the ribbing, working into the end of each row. Join with a slip stitch to the first sc. (80 sc)
Step 4: Mosaic Stitch Pattern
Now we’ll start the mosaic pattern. Change to Color B and carry the yarn up each round.
- Round 2: With Color B, ch 1. Sc blo in each stitch around. Join with sl st. (80 sc)
- Round 3: Ch 1. Sc blo in next 2 sts, ldc flo in next st, sc blo in next 2 sts. Repeat from * to * around. Join with sl st. (80 sts)
- Round 4: Ch 1. Ldc flo in first st, sc blo in next 3 sts, ldc flo in next 2 sts. Repeat from * to * around until last 4 sts. Sc blo in next 3 sts, ldc flo in last st. Join with sl st to first st. (80 sts)
- Round 5: Ch 1. Sc blo in next st, ldc flo in next, sc blo in next, ldc flo in next, sc blo in next. Repeat from * to * around. Join with sl st. (80 sts)
- Rounds 6–22: Repeat Rounds 3–5 in sequence. End after a repeat of Round 4.
Step 5: Decrease for the Crown
Switch back to Color A for the decreases.
- Round 23: Ch 1. Sc in next 3 sts, sc2tog. Repeat from * to * around. Join with sl st. (64 sc)
- Round 24: Ch 1. Sc in next 2 sts, sc2tog. Repeat from * to * around. Join with sl st. (48 sc)
- Round 25: Ch 1. Sc in next st, sc2tog. Repeat from * to * around. Join with sl st. (32 sc)
- Round 26: Ch 1. Sc2tog around. Join with sl st. (16 sc)
Step 6: Finishing
- Fasten off, leaving a long tail.
- Thread the tail through a yarn needle.
- Weave the needle through the front loops of the remaining 16 stitches.
- Pull tightly to cinch the top closed.
- Sew the opening shut and weave in all ends.
Tips for Success
- Tension Matters: Keep your tension consistent to ensure the mosaic pattern lies flat and even.
- Carrying Yarn: When changing colors, gently carry the unused yarn up the inside of the work. This reduces ends to weave in later!
- Blocking: For a polished finish, lightly steam block your beanie to help the stitches relax and even out
And You’re Done
Congratulations, you’ve just created a beautiful, textured mosaic beanie! Whether you keep it for yourself or gift it to someone special, this hat is sure to be loved for years to come