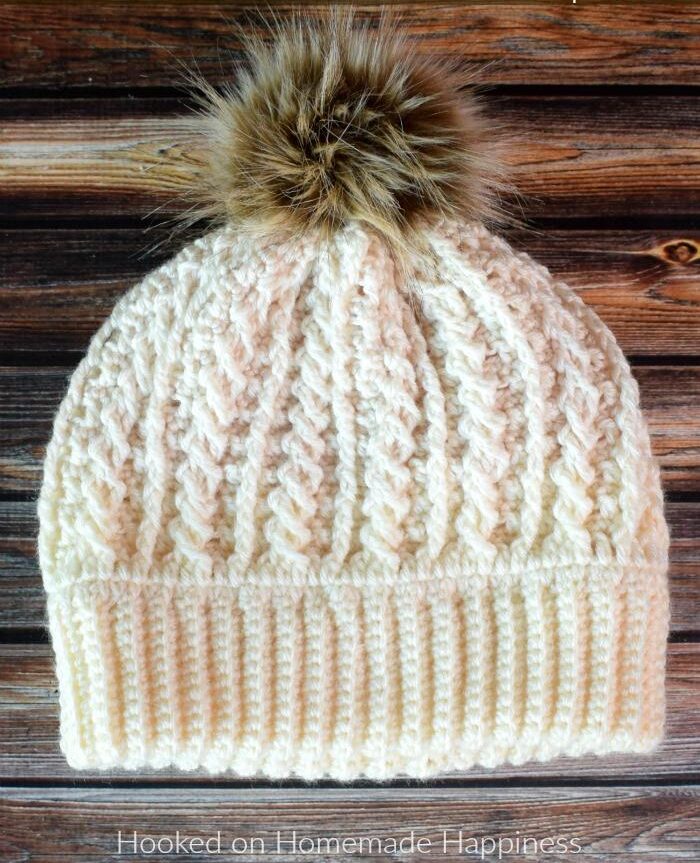
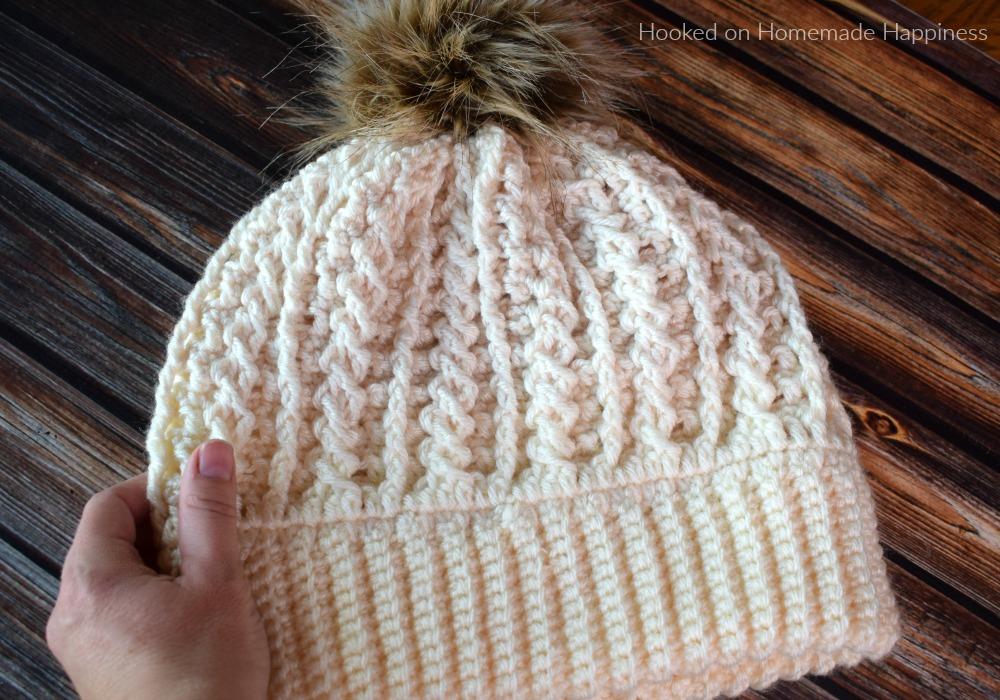
Free Double Brim Cable Crochet Beanie Pattern
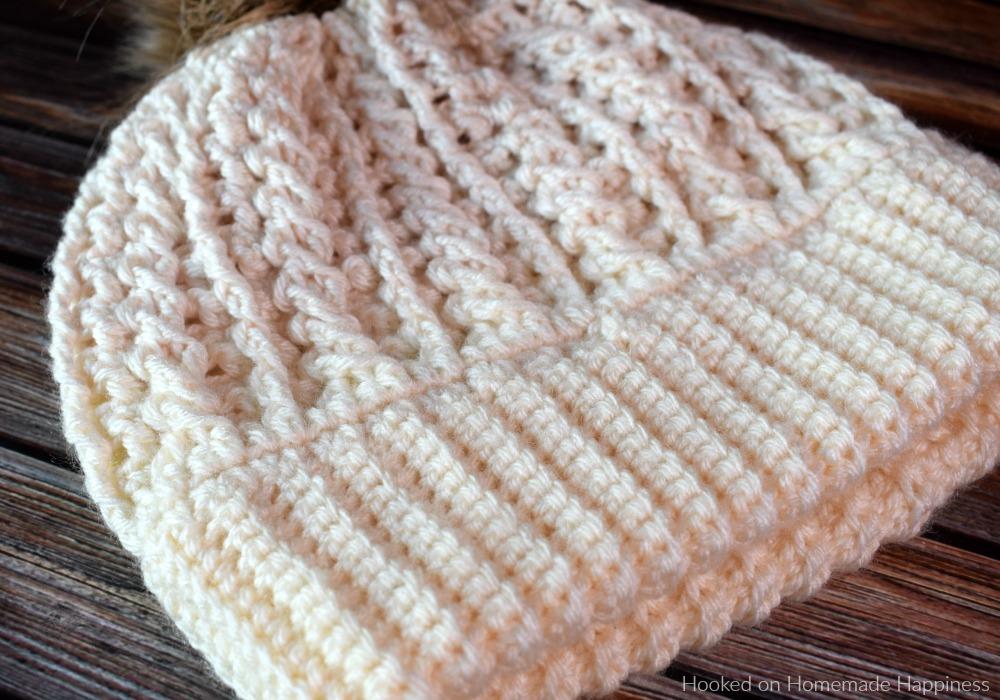
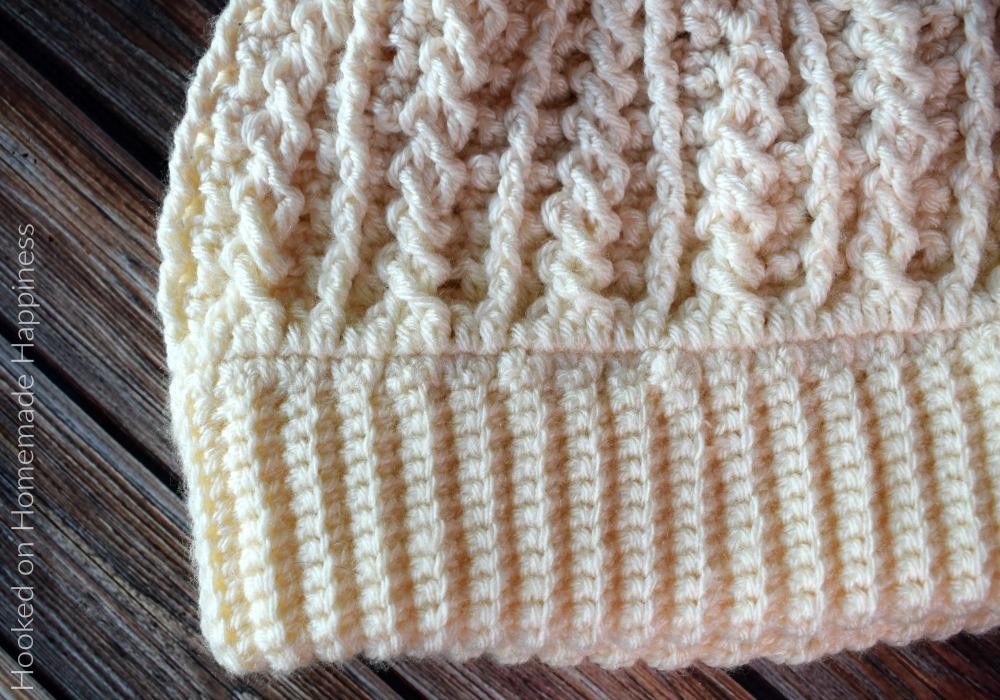
This hat is a true standout piece. As the name suggests, it features a wonderfully thick, double-layered brim that is designed to keep your ears extra toasty against the winter wind. But the coziness doesn’t stop there! The body of the hat is adorned with a beautiful and classic cable pattern that adds a touch of timeless elegance to your handmade wardrobe.
This pattern is perfect for the intermediate crocheter who is familiar with post stitches and ready to create something truly special. It’s an incredibly satisfying make—the kind of project you’ll be proud to wear yourself or gift to someone you love. Because of the double brim and dense cable texture, this beanie does use a bit more yarn than a typical hat, but the final result is so worth it.
So, if you’re ready to create a winter accessory that is both incredibly warm and stunningly beautiful, grab your softest worsted weight yarn and your trusty hook. Let’s crochet a hat that will become a cold-weather staple for years to come
Materials You’ll Need
- Yarn: Worsted weight yarn. You will need approximately 200 grams (or 2 skeins). The sample was made from a lovely stash yarn!
- Crochet Hook: 4.5 mm
- Notions:
- Yarn needle
- Scissors
- Optional: A pom-pom maker for the perfect finishing touch
Skill Level
Intermediate (This pattern uses front post stitches to create the cable design)
Finished Size
- Width: Approximately 10.5 inches (fits an average adult head)
- Length (without pom-pom): Approximately 9 inches
Abbreviations Glossary
- sl st: slip stitch
- ch: chain
- sc: single crochet
- sc blo: single crochet in the back loop only
- dc: double crochet
- fptr: front post treble crochet
- sc2tog: single crochet two stitches together (a decrease)
Note: ch-2 does not count as a dc
Pattern Notes
- The hat is worked in two parts: first, a long flat piece for the brim, which is then folded and seamed. Then, we work the body of the hat in continuous rounds from the brim.
- The cable pattern is created using front post treble crochet (fptr) stitches, which are worked around the post of a stitch from the round below.
Let’s Get Started
Part 1: Creating the Double Brim
We begin by crocheting a long, ribbed strip that will become our cozy double-layered brim.
- Foundation: Chain 25.
- Row 1: Make 1 single crochet (sc) in the second chain from your hook and in each chain across. You should have 24 stitches. This is the right side.
- Row 2: Chain 1 and turn your work. Sc in the first stitch. Now, work sc in the back loop only (sc blo) across the next 22 stitches. Sc in the last stitch normally. You should still have 24 stitches.
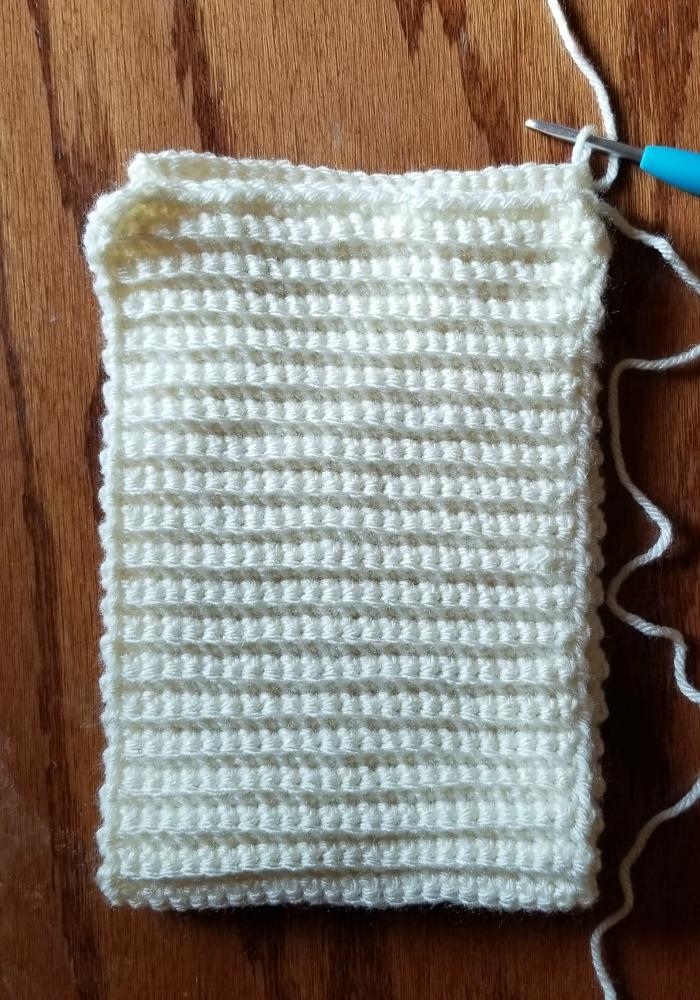
- Repeat Row 2 until your piece measures long enough to comfortably fit around the head of the intended wearer. The pattern suggests 79 rows total. The number of rows should be an odd number.
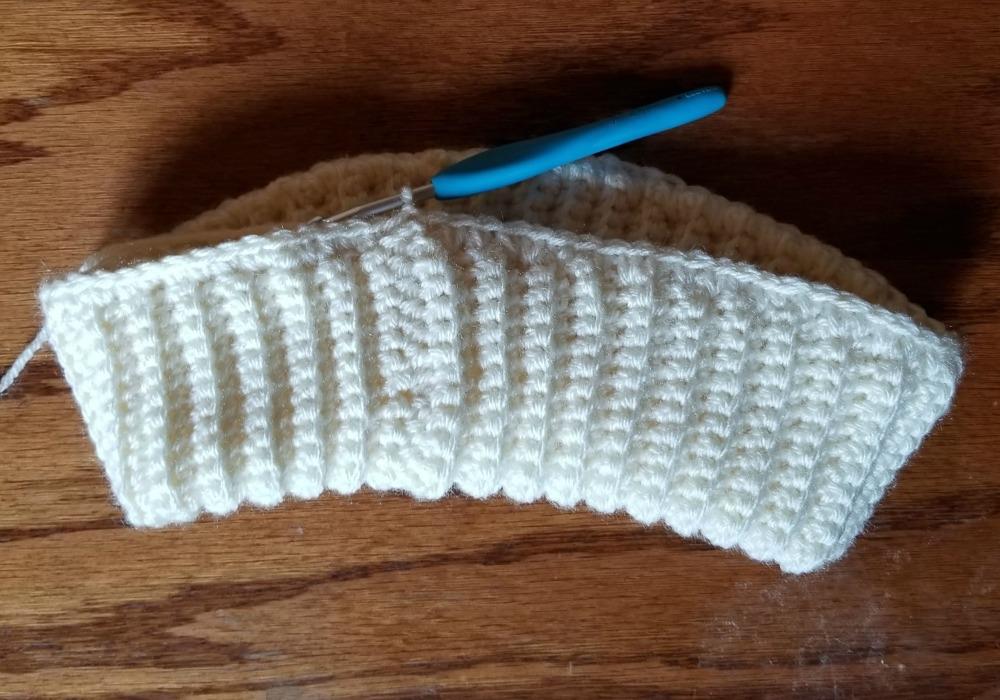
- Seam the Brim: Bring the two short ends of your long strip together. Using your yarn needle or crochet hook, sew the ends together using a whip stitch or by working a row of single crochet through both layers. Do not fasten off if you use the crochet method.
- Create the Double Layer: Now, fold the entire seamed tube in half horizontally, bringing the top edge down to meet the bottom edge. This creates your double-thick brim!
Part 2: Working the Body of the Hat
We will now work directly onto the folded edge of the brim to build the body of the hat upwards in rounds.
- Round 1: Insert your hook through both layers of the folded brim. Work 1 sc. Continue working 1 sc into the end of each row all the way around. Join with a sl st to the first sc. You should have 79 stitches.
- Round 2: Ch 2. Work 1 dc in each stitch around. Join with a sl st to the first dc. (79 sts)
- Round 3: Ch 1. Work 1 sc in each stitch around. Join with a sl st to the first sc. (79 sts)
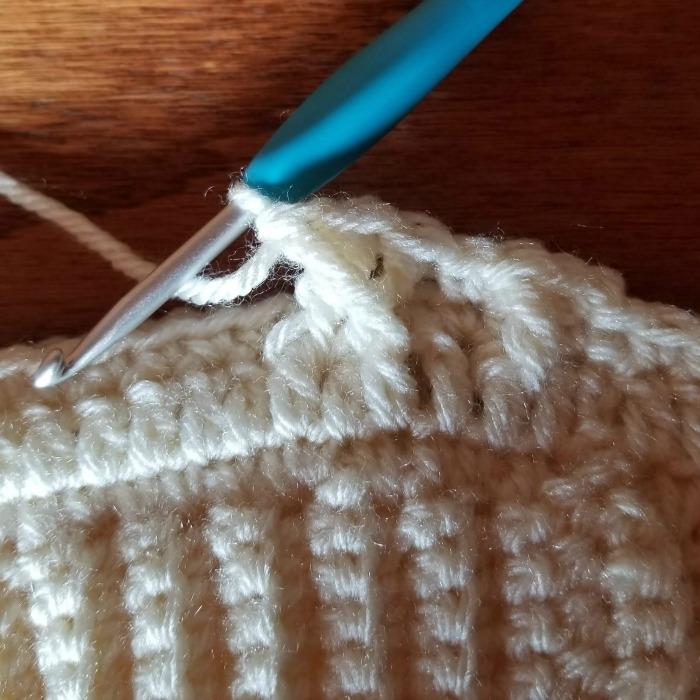
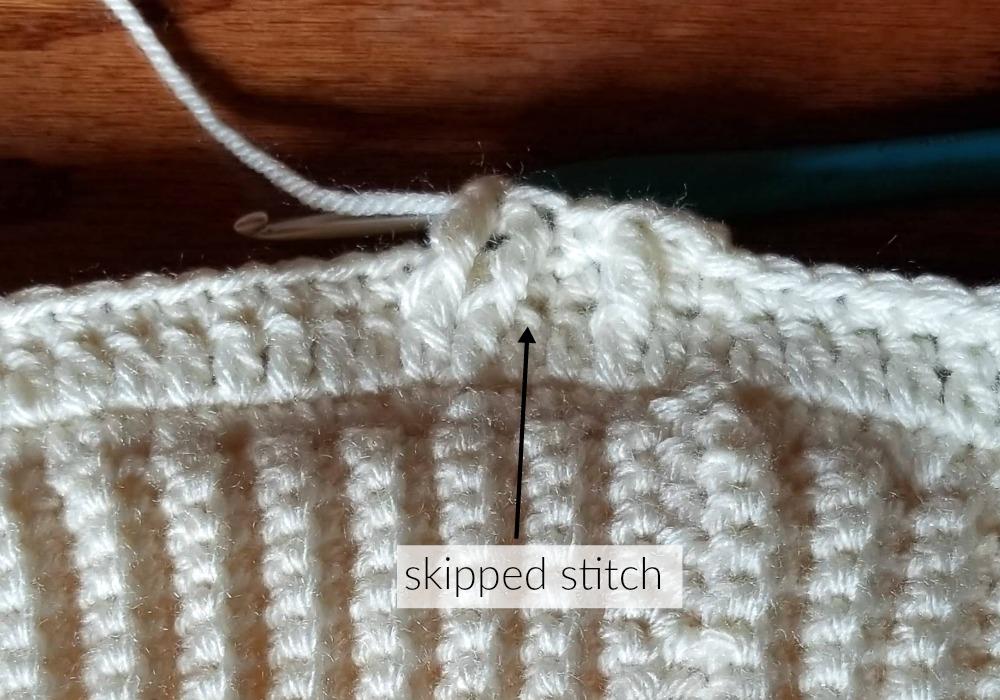
- Round 4 (Cable Round): This round creates the cable cross.
- Ch 2.
- *Work 1 dc in the next stitch.
- Work 1 fptr around the post of the dc from the round below the previous round (this will feel like you’re skipping back two rounds).
- Work 1 dc in the next stitch.
- Skip the next stitch.
- Work 1 fptr around each of the next 2 dc from the round below the previous round.
- Now, go back and work 1 fptr around the post of the skipped dc from the round below the previous round.*
- Repeat from * to * around until you have 1 stitch left.
- Work 1 dc in the last stitch.
- Join with a sl st to the first dc. (79 sts)
- Repeat Rounds 3 and 4 until you have completed a total of 22 rounds from the brim (or until the hat is as tall as you’d like).
Part 3: Decreasing for the Crown
Now we’ll decrease stitches to shape the top of the hat. Switch to a yarn needle for seaming when instructed.
- Round 23: Ch 1. *Sc in the next 4 stitches, sc2tog.* Repeat from * to * around until 1 stitch remains. Sc in the last stitch. Join with a sl st. (66 sts)
- Round 24: Ch 1. *Sc in the next 3 stitches, sc2tog.* Repeat from * to * around until 1 stitch remains. Sc in the last stitch. (53 sts)
- Fasten off, leaving a very long tail (about 24 inches) for sewing the top closed.
Part 4: Finishing
- Thread the long tail onto your yarn needle.
- Weave the needle through the front loops of the remaining stitches from the final round.
- Pull the tail tightly to cinch the top of the hat completely closed.
- Use the remaining tail to stitch the small opening shut securely.
- Weave in all other ends.
- Optional: Add a fabulous pom-pom to the top for a playful finish
You Did It!
Congratulations! You’ve just finished a beautifully textured and incredibly warm double brim cable beanie. This hat is a true testament to your skills and is sure to be a cherished accessory for many winters to come