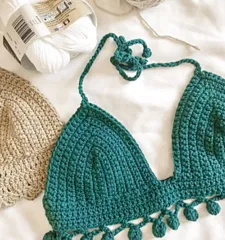
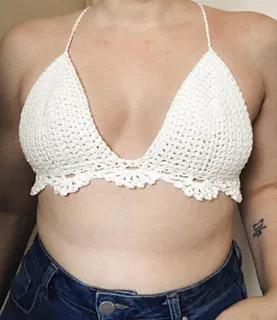
Bralette Cups Crochet Pattern
Materials
To crochet your own comfortable bralette cups, gather the following essential tools and materials:
- Any yarn (e.g., Lily Sugar n Cream 100% cotton yarn is a popular choice)
- 5mm crochet hook
- Measuring tape
- Tapestry needle
- Scissors
Recommended Yarn Substitutions for Bralette Cups
If you’re looking for alternative 100% cotton yarns that work well for this bralette cup pattern, consider these options:
- Peaches & Cream 100% cotton
- Paintbox Yarns Recycled Cotton Worsted
- Hobby Lobby I Love This Cotton
Abbreviations and Crochet Stitches Used
This crochet pattern is written using standard US crochet terms. Familiarize yourself with these abbreviations and basic stitches before you begin your project:
- St/sts: Stitch/stitches
- Chain (ch): Yarn over, pull through
- Yarn over (YO): Wrap yarn around hook
- Single crochet (sc): Insert hook into stitch, yarn over, pull through (2 loops on the hook), yarn over, pull through 2 loops
Crochet Gauge Information
A specific gauge is not provided for this adaptable bralette cup pattern. The design is intended to be flexible, allowing you to customize the fit based on your chosen yarn, hook, and personal measurements. Use the pattern as a guideline, adjusting as needed to achieve your desired cup coverage and shape.
Bralette Cup Instructions: Sizes XS to XL
This pattern guides you through creating individual bralette cups, suitable for various sizes from XS to XL. Each cup is worked by increasing stitches at the top center to form the classic cup shape. Remember to crochet two identical cups.
Crochet Bralette Cup Size XS
- Chain 12, then turn to work along the back bumps.
- Single crochet (sc) in the 2nd chain from the hook. Place 1 sc in each stitch until you have 1 stitch left.
- Place 3 scs in the last stitch (optionally, place a stitch marker in the 2nd sc to mark the center increase). Turn to work along the other side now.
- Place 1 sc in each stitch until the end (you should have 23 total stitches).
- Turn (do not chain at the start of the row). Place 1 sc in each stitch until you reach the middle stitch of the 3 scs at the top.
- Place 3 scs in this top middle stitch, then place 1 sc in each stitch until the end of the row (you should have 25 total stitches).
- Continue repeating steps 5-6 until you have a total of 39 stitches (this will be 9 rows altogether from step 1).
Crochet Bralette Cup Size S
- Chain 12, then turn to work along the back bumps.
- Single crochet (sc) in the 2nd chain from the hook. Place 1 sc in each stitch until you have 1 stitch left.
- Place 3 scs in the last stitch (optionally, place a stitch marker in the 2nd sc). Turn to work along the other side now.
- Place 1 sc in each stitch until the end (you should have 23 total stitches).
- Turn (do not chain). Place 1 sc in each stitch until the middle stitch of the 3 scs at the top.
- Place 3 scs in the top stitch, then place 1 sc in each stitch until the end (you should have 25 total stitches).
- Continue repeating steps 5-6 until you have a total of 43 stitches (this will be 11 rows altogether).
Crochet Bralette Cup Size M
- Chain 14, then turn to work along the back bumps.
- Single crochet (sc) in the 2nd chain from the hook. Place 1 sc in each stitch until you have 1 stitch left.
- Place 3 scs in the last stitch (optionally, place a stitch marker in the 2nd sc). Turn to work along the other side now.
- Place 1 sc in each stitch until the end (you should have 27 total stitches).
- Turn (do not chain). Place 1 sc in each stitch until the middle stitch of the 3 scs at the top.
- Place 3 scs in the top stitch, then place 1 sc in each stitch until the end (you should have 29 total stitches).
- Continue repeating steps 5-6 until you have a total of 51 stitches (this will be 13 rows altogether).
Crochet Bralette Cup Size L
- Chain 16, then turn to work along the back bumps.
- Single crochet (sc) in the 2nd chain from the hook. Place 1 sc in each stitch until you have 1 stitch left.
- Place 3 scs in the last stitch (optionally, place a stitch marker in the 2nd sc). Turn to work along the other side now.
- Place 1 sc in each stitch until the end (you should have 31 total stitches).
- Turn (do not chain). Place 1 sc in each stitch until the middle stitch of the 3 scs at the top.
- Place 3 scs in the top stitch, then place 1 sc in each stitch until the end (you should have 33 total stitches).
- Continue repeating steps 5-6 until you have a total of 59 stitches (this will be 15 rows altogether).
Crochet Bralette Cup Size XL
- Chain 18, then turn to work along the back bumps.
- Single crochet (sc) in the 2nd chain from the hook. Place 1 sc in each stitch until you have 1 stitch left.
- Place 3 scs in the last stitch (optionally, place a stitch marker in the 2nd sc). Turn to work along the other side now.
- Place 1 sc in each stitch until the end (you should have 35 total stitches).
- Turn (do not chain). Place 1 sc in each stitch until the middle stitch of the 3 scs at the top.
- Place 3 scs in the top stitch, then place 1 sc in each stitch until the end (you should have 37 total stitches).
- Continue repeating steps 5-6 until you have a total of 67 stitches (this will be 17 rows altogether).
Adjusting for Any Size: Custom Crochet Bralette Cups
This flexible crochet bralette cup pattern allows you to create a perfect custom fit beyond the standard sizes. Here’s how to tailor your cups:
- Determine your starting chain length: Measure from the bottom of your bust to your nipple. Your initial chain should be this exact length.
- Follow the general pattern structure: Proceed with steps 2-7 as outlined in any of the provided sizes. While your specific stitch and row counts will vary, the technique of increasing at the top center remains the same.
- Achieve desired coverage: Continue crocheting rows (repeating steps similar to 5-6) until you reach the exact cup coverage and shaping you prefer for a truly custom-fit bralette.
Assembly and Finishing Your Crochet Bralette Cups
Once you have successfully crocheted two identical bralette cups, you’ll want to finish them neatly. While this pattern focuses on the cups themselves, here are the typical next steps for assembly and finishing:
- Weaving in ends: Use your tapestry needle to securely weave in all loose yarn tails for a clean, professional look.
- Blocking (optional): Gently block your finished cups to help them achieve their final shape and size, and to even out your stitches.
- Bralette construction (optional): If you plan to create a full bralette, you would then attach these cups to a bralette band and add straps according to your preferred design.
Tips for Beginners: Crocheting Your First Bralette Cups
This bralette cup pattern is designed with flexibility in mind, making it an excellent project for crocheters of various skill levels. Here are some beginner-friendly tips:
- Prioritize the Fit: Don’t be afraid to adjust the number of rows or stitches to get the perfect fit for your body. The specific numbers provided are a guide, but your comfort and coverage are key.
- Utilize Stitch Markers: When working the 3 single crochets at the top of the cup, placing a stitch marker in the second (middle) sc can make it much easier to identify where to place your increases in subsequent rows. This ensures consistent shaping.
- Maintain Consistent Tension: Striving for even tension throughout your work will result in a more uniform and aesthetically pleasing finished product. If you’re new to single crochet, a little practice swatch can help.