Create Your Own Cuddly Companion: The Ultimate Velvet Plush Bunny Crochet Guide
Adorable Plush Crochet Bunny Pattern: Step-by-Step Guide
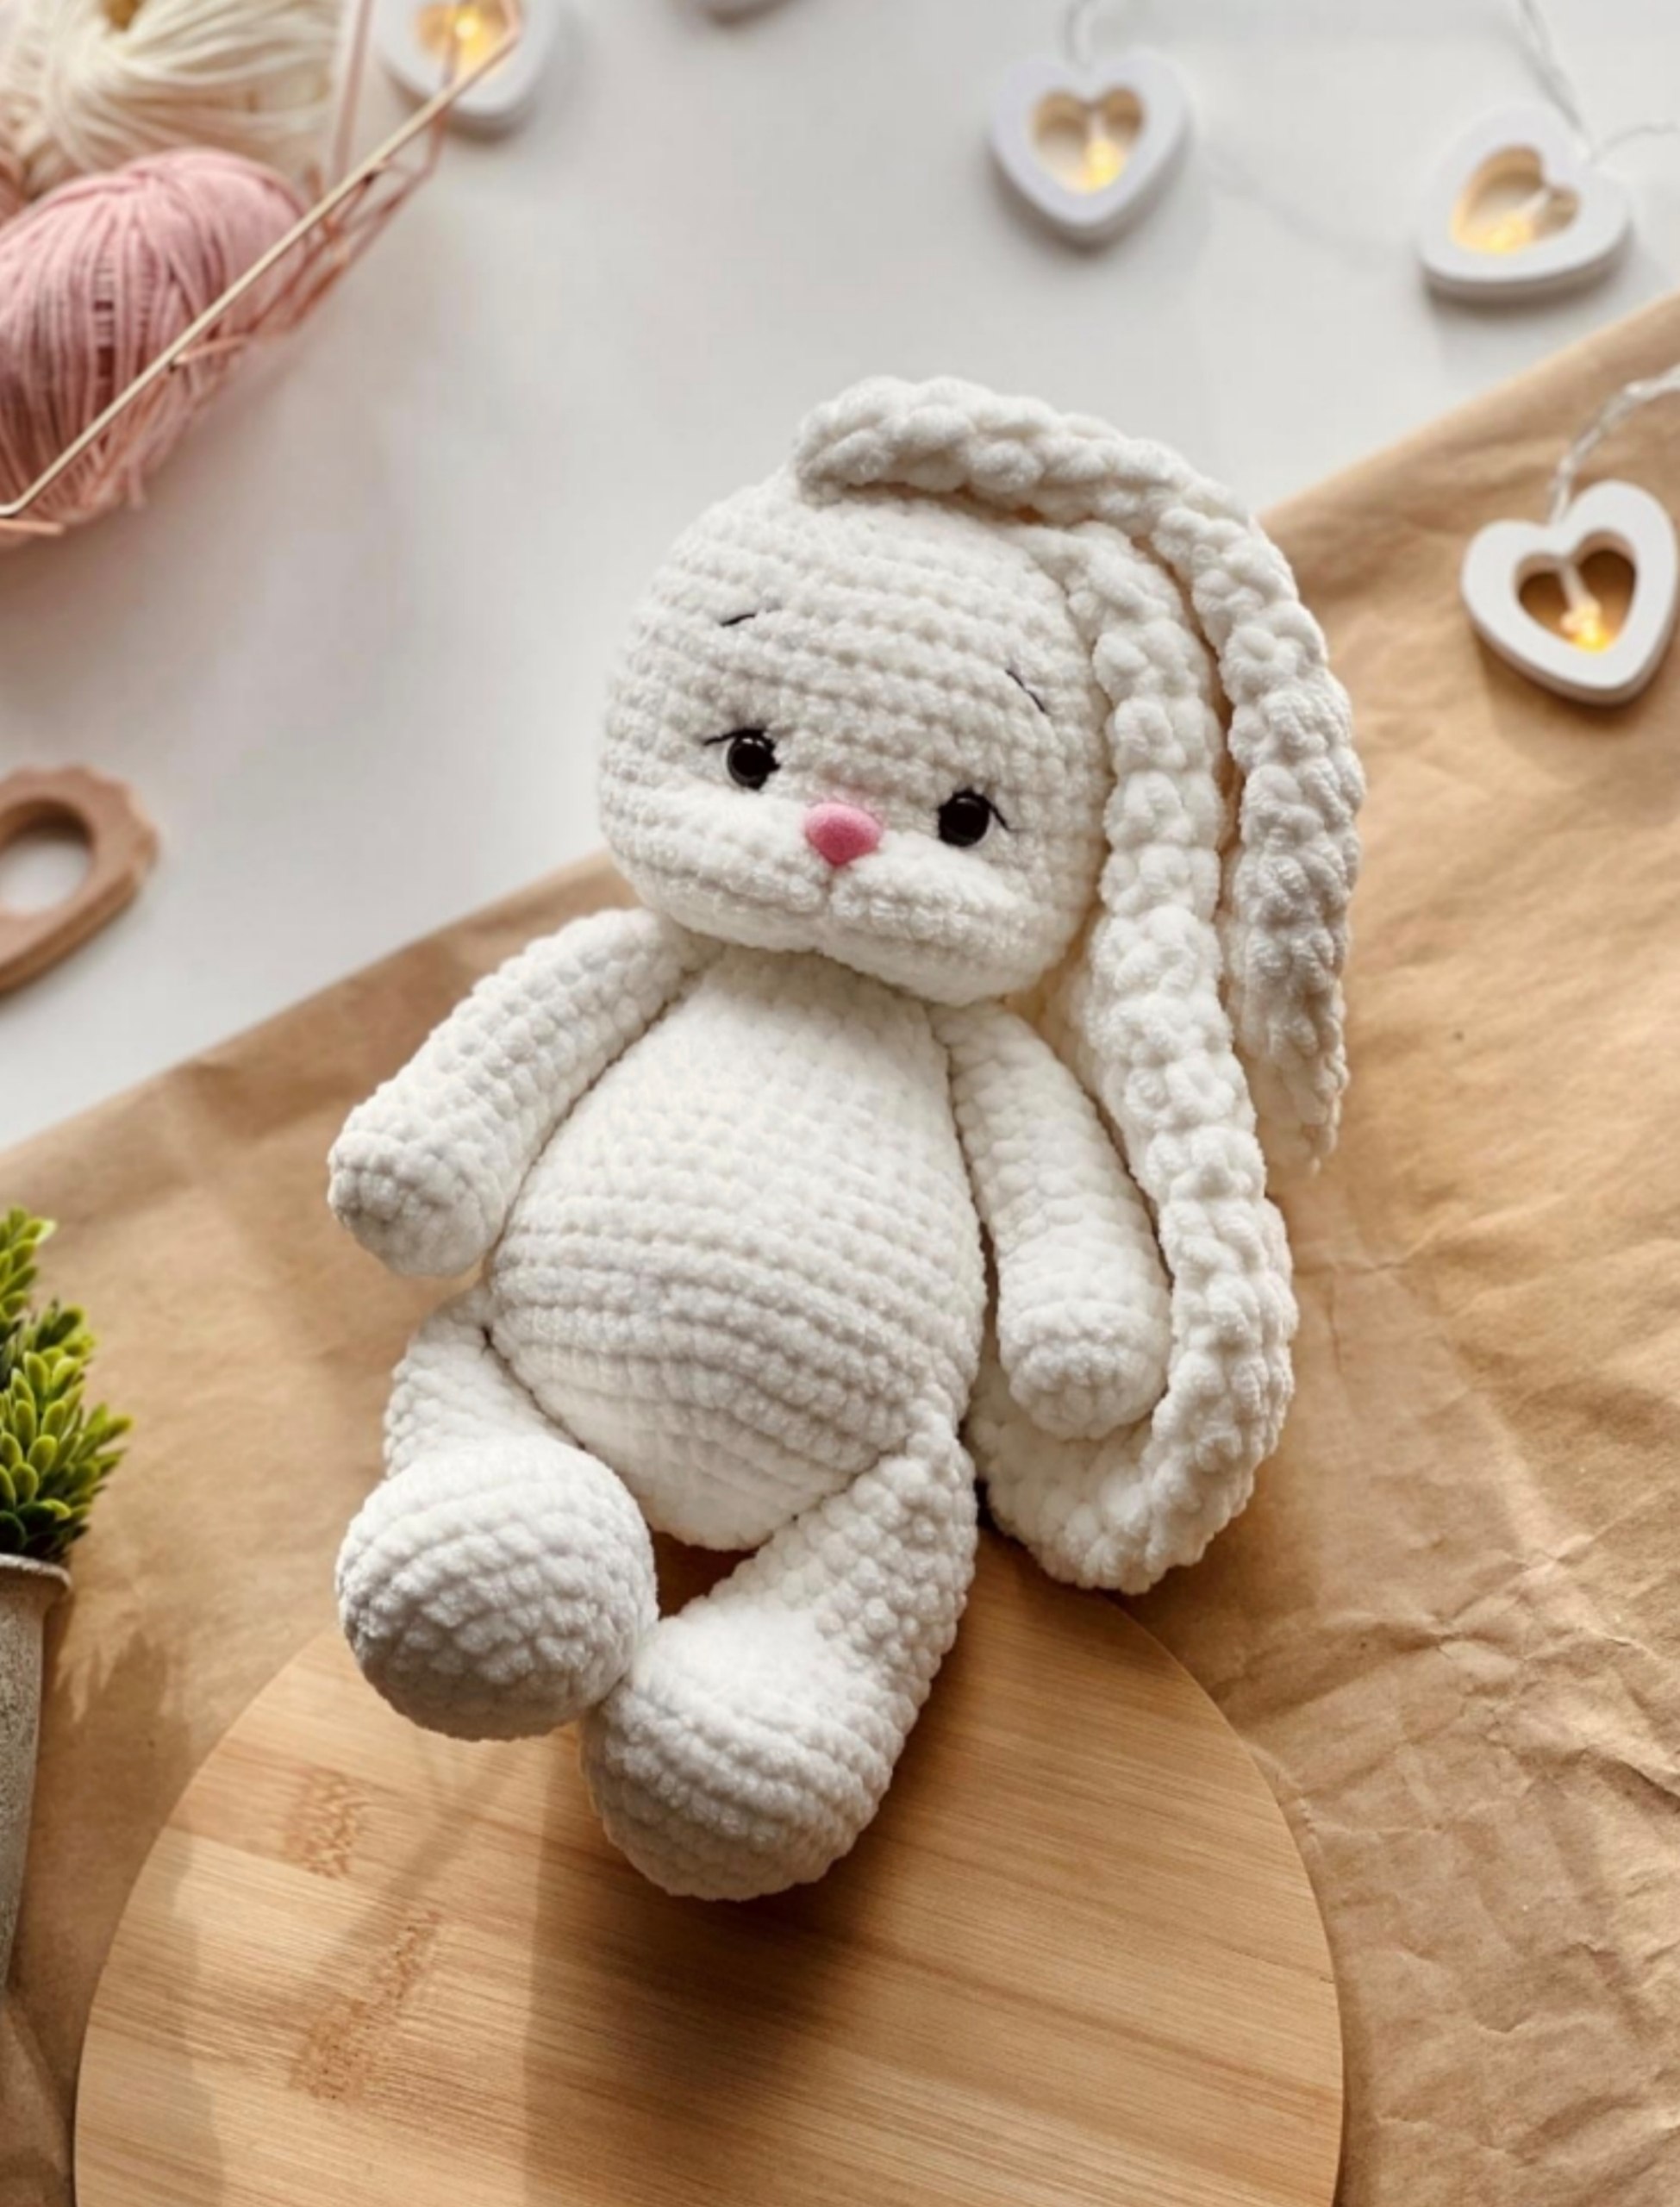
Create your own cuddly companion with this detailed crochet pattern for a plush bunny. This pattern uses velvet-style yarn to achieve a soft, huggable texture, resulting in a finished toy approximately 11 inches (28 cm) tall.
Materials and Tools Needed
- Yarn:
- Main color: Plush velvet yarn (e.g., Himalaya Dolphin Baby) – approximately 1.5 skeins.
- Detail colors: Small amounts of black yarn (for lashes and brows), white yarn (for eye whites), and a matching yarn color for facial sculpting.
- Accent color: A small amount of pink thread for the nose area.
- Crochet Hooks:
- 3.75mm to 4mm hook for the body.
- 6mm hook for the ears.
- Filling: Approximately 200g of polyester fiberfill (hollofiber).
- Safety Eyes: 12mm black safety eyes.
- Safety Nose: 12mm or 14mm safety nose.
- Accessories:
- Tapestry needle with a wide eye.
- Stitch markers.
- Strong fabric glue (e.g., Moment Crystal).
Crochet Abbreviations (US Terms)
- MR: Magic Ring
- ch: Chain
- sc: Single crochet
- hdc: Half double crochet
- inc: Increase (two sc in one stitch)
- dec: Decrease (sc two stitches together)
- ( ): Final stitch count for the round
Step-by-Step Pattern
The Legs (Make 2)
- R1: 6 sc in MR (6)
- R2: inc in each st (12)
- R3: (1 sc, inc) x 6 (18)
- R4: (2 sc, inc) x 6 (24)
- R5: (3 sc, inc) x 6 (30)
- R6-7: sc in each st (30)
- R8: 11 sc, 4 dec, 11 sc (26)
- R9: 9 sc, 4 dec, 9 sc (22)
- R10: 8 sc, 3 dec, 8 sc (19)
- R11: 6 sc, 3 dec, 7 sc (16)
- R12-15: sc in each st (16)
- R16: 6 sc, dec, 6 sc, dec (14)
- R17: sc in each st (14)
Assembly: Stuff the foot tightly up to the shin, then stuff the upper leg moderately so the bunny can sit. Fold the leg in half and sc 7 across both sides to close. You may need to add 2-3 offset stitches at the end to ensure the leg is parallel to the foot.
The Arms (Make 2)
- R1: 8 sc in MR (8)
- R2: inc in each st (16)
- R3-4: sc in each st (16)
- R5: (2 sc, dec) x 4 (12)
- R6-13: sc in each st (12)
- R14: (4 sc, dec) x 2 (10)
Assembly: Stuff the arm with medium density. Fold in half and sc 5 across both sides to close.
The Body
- R1: 6 sc in MR (6)
- R2: inc in each st (12)
- R3: (1 sc, inc) x 6 (18)
- R4: (2 sc, inc) x 6 (24)
- R5: (3 sc, inc) x 6 (30)
- R6: (4 sc, inc) x 6 (36)
- R7: (5 sc, inc) x 6 (42)
- R8: (6 sc, inc) x 6 (48)
- R9: 9 sc, attach first leg (sc through 7 sts of leg, toes facing left), 17 sc, attach second leg (sc through 7 sts of leg, toes facing right), 8 sc (48)
- R10-11: sc in each st (48)
- R12: (6 sc, dec) x 6 (42)
- R13: sc in each st (42)
- R14: (5 sc, dec) x 6 (36)
- R15: sc in each st (36)
- R16: (4 sc, dec) x 6 (30)
- R17: sc in each st (30). Begin stuffing the body gradually.
- R18: (3 sc, dec) x 6 (24)
- R19-20: sc in each st (24)
- R21: (2 sc, dec) x 6 (18)
- R22: 4 sc, attach first arm (sc through 5 sts of arm), 4 sc, attach second arm (sc through 5 sts of arm) (18)
- R23: sc in each st (18)
Assembly: Stuff the body firmly up to the neck. Use your hands to push the filling toward the sides first, then fill the center. Do not cut the yarn, as you will continue with the head.
The Head
- R24: 18 inc (36)
- R25: (5 sc, inc) x 6 (42)
- R26: (6 sc, inc) x 6 (48)
- R27-35: sc in each st (48)
Eyes: Insert safety eyes between rounds 30 and 31, with 8 stitches between them.
- R36: (6 sc, dec) x 6 (42)
- R37: (5 sc, dec) x 6 (36)
- R38: (4 sc, dec) x 6 (30)
- R39: (3 sc, dec) x 6 (24)
- R40: (2 sc, dec) x 6 (18)
- R41: (1 sc, dec) x 6 (12)
- R42: 6 dec (6)
Assembly: Stuff the head firmly, paying special attention to the cheeks to give them a plump look. Close the remaining hole using a needle or hook.
Long Ears (Make 2)
Note: Use the 6mm hook and hdc for a loftier, airier ear.
- R1: 6 sc in MR (6)
- R2: 6 inc (12)
- R3: (1 hdc, inc) x 6 (18)
- R4: (2 hdc, inc) x 6 (24)
- R5: (3 hdc, inc) x 6 (30)
- R6-7: hdc in each st (30)
- R8: (3 hdc, dec) x 6 (24)
- R9-10: hdc in each st (24)
- R11: (2 hdc, dec) x 6 (18)
- R12: 18 hdc (18)
- R13: (1 hdc, dec) x 6 (12)
- R14-19: hdc in each st (12)
Assembly: Fold the ear in half and sc 6 across both sides. Sew the ears to the head around rounds 38-39.
Short Ears (Alternative Option – Make 2)
- R1: 6 sc in MR (6)
- R2: 6 inc (12)
- R3: 12 sc (12)
- R4: (1 sc, inc) x 6 (18)
- R5: (5 sc, inc) x 3 (21)
- R6-10: sc in each st (21)
- R11: (5 sc, dec) x 3 (18)
- R12: 9 dec (9)
Assembly: Leave a tail for sewing. Fold the ear in half and sew the base closed.
The Tail
- R1: 7 sc in MR (7)
- R2: inc in each st (14)
- R3: sc in each st (14)
- R4: 7 dec (7)
Assembly: Stuff the tail and leave a 20cm tail for sewing to the body.
Face Shaping and Finishing Touches
Facial Sculpting (Utyazhka)
To give the bunny a professional, expressive face, use a tapestry needle and matching yarn to pull the face into shape:
- Step 1: Insert needle at the base of the neck $\rightarrow$ bring out at the bottom right corner of the right eye $\rightarrow$ insert at the bottom left corner of the right eye $\rightarrow$ bring out at the base of the neck $\rightarrow$ insert at the base of the neck $\rightarrow$ bring out at the bottom left corner of the left eye $\rightarrow$ insert at the bottom right corner of the left eye $\rightarrow$ bring out at the base of the neck. Tighten gently and knot.
- Step 2: Perform a vertical pull from the bridge of the nose down toward the neck to create a defined muzzle.
Final Details
- Nose: Glue the safety nose in the center between the eyes. If the nose post is too long, you can trim it with a heated knife before gluing.
- Muzzle Detail: For extra cuteness, embroider a small pink line vertically along the muzzle.
- Finishing: Secure all yarn ends by weaving them into the stuffing