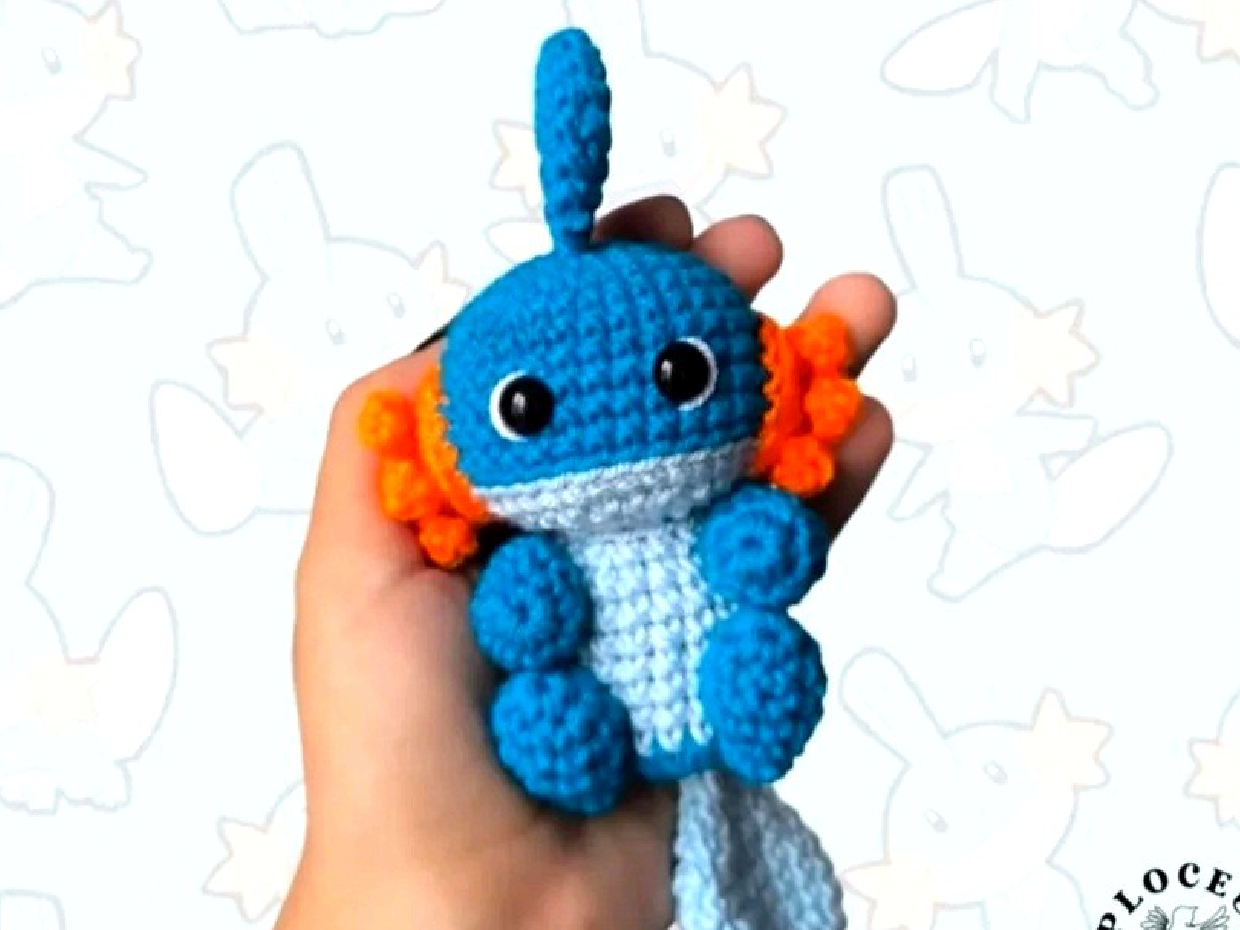
Adorable Axolotl Crochet Pattern: Easy Guide to Your New Squishy Friend!
The Ultimate No-Sew Axolotl Crochet Pattern (Free!)
Welcome, crochet lovers! If you’ve been searching for your next delightful and charming project, you’ve landed in the perfect spot. There’s a special kind of joy in transforming a simple skein of yarn into a three-dimensional creature, and today, we’re diving into one of the most popular amigurumi projects around: the adorable axolotl. These real-life “walking fish” have captured hearts worldwide with their quirky smiles and frilly gills, making them a top request for handmade plushies. This article provides a comprehensive, no-sew axolotl crochet pattern that’s perfect for both seasoned crocheters and adventurous beginners. We’ll guide you through every step, from selecting the perfect squishy yarn to crocheting the final frill on the tail. Get your hooks ready to create a cuddly companion that’s bound to be a bestseller at markets and a treasured gift for loved ones.
Why Everyone Loves a Crocheted Axolotl
The popularity of axolotl-themed items, especially in the craft world, has skyrocketed. These unique amphibians have become a sensation, and it’s easy to see why. Their naturally smiling faces and fascinating appearance make them an irresistible subject for creative projects. For crocheters, an axolotl crochet pattern offers a wonderfully rewarding experience.
The Adorable Appeal of the Real-Life “Walking Fish”
Real axolotls are amphibians native to just two lakes near Mexico City, making them critically endangered. Their most unique trait is that they exhibit neoteny, meaning they reach adulthood without undergoing metamorphosis. So, they keep their feathery external gills and remain aquatic their whole lives. This “forever young” quality, combined with their sweet, simple faces, translates perfectly into amigurumi design. Creating a crochet version allows people to have a cuddly, everlasting version of this rare and precious creature. The simple body shape is a fantastic canvas for color experimentation, and the gills provide a fun, textural contrast that makes the finished object truly stand out. This easy amigurumi axolotl pattern is a great way to pay homage to this amazing animal.
A Perfect Project for Markets and Gifts
For those who sell their crochet creations, the axolotl is a certified bestseller. They are incredibly popular online and fly off the tables at craft markets. Their small size means they work up relatively quickly, allowing you to build up stock efficiently. The “no-sew” aspect of this particular axolotl crochet pattern is a massive bonus, saving you hours of tedious assembly. You can create a whole army of these little guys in a rainbow of colors to attract customers. They make fantastic gifts for children (using embroidered eyes for those under three), gamers who love their appearance in popular games like Minecraft, and any adult who simply appreciates cute and quirky decor.
Gathering Your Materials for the Perfect Axolotl Plushie
Before you dive into the pattern, let’s get all your supplies in order. Using the right materials, especially the yarn, is key to achieving that irresistibly soft and squishy axolotl plushie. This amigurumi axolotl pattern is designed for plush yarn, but can be adapted for other yarn weights.
Choosing the Right Yarn (and Colors!)
For that classic, cuddly feel, a super bulky (CYC 6) chenille or blanket yarn is highly recommended. Brands like Hobbii Baby Snuggle, Bernat Blanket, or Himalaya Dolphin Baby are excellent choices. You will need two different colors:
- Main Color (MC): This will be for the head and body. About 80-100 yards should be plenty.
- Secondary Color (SC): This is for the gills and the tail frill. You’ll only need 20-30 yards.
The magic of the axolotl crochet pattern comes alive in the color combinations! High-contrast pairings work wonderfully. Think of a light pink body with vibrant hot pink gills, a soft blue with a deep navy, or a mint green with a darker forest green. Don’t be afraid to experiment with bold and creative palettes!
Essential Tools and Notions
Beyond the yarn, you’ll need a few standard crochet tools:
- Crochet Hook: A 5.0mm (H-8) hook is recommended for super bulky yarn to create dense stitches so the stuffing won’t show through.
- Safety Eyes: 12mm safety eyes give the axolotl a charming, professional look. *Note: For toys given to children under 3, it is crucial to embroider the eyes instead for safety.*
- Stuffing: A good quality polyester fiberfill (like Poly-fil) to give your axolotl a firm but huggable shape.
- Stitch Marker: Essential for keeping track of the beginning of your rounds when working in a spiral.
- Tapestry Needle: For weaving in the final ends. A thicker needle can help with poking in any stray yarn tails.
- Scissors: A sharp pair for clean yarn cuts.
Crochet Abbreviations and Special Stitches
This pattern uses standard US crochet terminology. If you’re new to amigurumi, here’s a quick rundown of the terms and a special stitch used in this axolotl crochet pattern.
Standard Amigurumi Terms
- MR: Magic Ring (or Magic Circle)
- Rnd: Round
- st(s): Stitch(es)
- sc: Single Crochet
- inc: Increase (work 2 sc in the same stitch)
- dec: Invisible Decrease (insert hook into the front loop only of the next two stitches, yarn over, and pull through both loops, yarn over and pull through the remaining two loops)
- ch: Chain
- sl st: Slip Stitch
- […]: Repeat the instructions within the brackets the specified number of times.
- (…): The number in parentheses at the end of a round indicates the total stitch count.
Mastering the Bobble Stitch (bo) for Perfect Feet
The little feet of the axolotl are made using a bobble stitch. It creates a wonderful, bumpy “pop” of texture that forms the leg without any sewing. Here’s how you do it:
- Yarn over, insert your hook into the designated stitch, yarn over and pull up a loop. Yarn over and pull through the first two loops on your hook. (2 loops left on hook)
- Repeat the process: Yarn over, insert hook into the same stitch, yarn over, pull up a loop, yarn over, pull through two loops. (3 loops left on hook)
- Repeat two more times until you have 5 loops on your hook.
- Yarn over one last time and pull through all 5 loops on the hook to close the stitch.
- Give the bobble a gentle push from the inside to ensure it pops out on the right side of your work.
The Complete No-Sew Axolotl Crochet Pattern: Step-by-Step
Now for the fun part! This pattern is worked in a continuous spiral from the head down to the tail. The gills and legs are crocheted directly into the body, making this a true no-sew amigurumi axolotl. Remember to use your stitch marker to mark the last stitch of each round.
Starting the Head (Rounds 1-5)
Using your Main Color (MC) yarn:
- Rnd 1: Start with 6 sc in a MR. (6)
- Rnd 2: [inc] 6 times. (12)
- Rnd 3: [1 sc, inc] 6 times. (18)
- Rnd 4: [2 sc, inc] 6 times. (24)
- Rnd 5: [sc] in all 24 sts around. (24)
Creating the Iconic Gills (Round 6 – The Tricky Part!)
This is the most complex round, involving color changes to create the three gills on each side of the head. Take your time and remember to prepare your color change on the stitch before you need the new color.
Using MC and your Secondary Color (SC):
- With MC, sc in the next 4 sts. In the 5th st, insert your hook, pull up a loop, but finish the stitch by yarning over with your SC. (You’ve now completed 5 sc in MC).
- First Gill: With SC, [ch 5]. Starting in the 2nd ch from the hook, sc in the next 3 chains. In the last (4th) chain, insert your hook, pull up a loop, but finish the sc by yarning over with MC.
- With MC, sc in the next st on the head, but prepare to change back to SC by finishing the stitch with your SC yarn.
- Second Gill: Repeat step 2.
- With MC, sc in the next st on the head, finishing with SC.
- Third Gill: Repeat step 2.
- With MC, sc in the next st on the head. You can now continue with MC.
- Sc in the next 8 sts with MC. On the 9th stitch, prepare for a color change by finishing the stitch with SC.
- Gills 4, 5, and 6: Repeat steps 2-7 to create the three gills on the other side of the head.
- With MC, sc in the final 4 sts of the round. (24 sts in the round, plus the 6 gills popping out)
You can now cut your SC yarn, leaving a tail to tie securely to the starting tail inside the head.
Shaping the Head and Placing the Eyes (Rounds 7-9)
Continuing with MC:
- Rnd 7: [sc] in all 24 sts around. Be sure to crochet behind the gills, pushing them forward so they don’t get trapped in your stitches.
- Rnd 8: [2 sc, dec] 6 times. (18)
- Rnd 9: [1 sc, dec] 6 times. (12)
Pause here to place the eyes and stuff the head. Insert the 12mm safety eyes between Rnds 4 and 5, roughly aligned with the first and third gills on each side. Secure the washers firmly. Stuff the head with polyfill until it is firm and well-shaped. You can gently straighten the gills if they are curling.
Forming the Body and Front Legs (Rounds 10-14)
- Rnd 10: [1 sc, inc] 6 times. (18)
- Rnd 11 (Legs): sc in next 7 sts. Work a bobble stitch in the next st. sc in next 4 sts. Work a bobble stitch in the next st. sc in final 5 sts. (18)
- Rnd 12-14 (3 rounds): [sc] in all 18 sts around. Be careful going over the bobble stitches to maintain the correct stitch count.
Adding the Back Legs and Tapering the Tail (Rounds 15-22)
- Rnd 15 (Legs): sc in next 8 sts. Work a bobble stitch in the next st. sc in next 4 sts. Work a bobble stitch in the next st. sc in final 4 sts. (18)
- Rnd 16: [sc] in all 18 sts around.
Pause to stuff the body. Fill the body firmly with polyfill.
- Rnd 17: [1 sc, dec] 6 times. (12)
- Rnd 18: [sc] in all 12 sts around.
- Rnd 19: [1 sc, dec] 4 times. (8)
Add a little more stuffing to the tail as you go.
- Rnd 20: [sc] in all 8 sts around.
- Rnd 21: [1 sc, dec] 2 times, sc in last 2 sts. (6)
- Rnd 22: [sc] in all 6 sts around.
Cut the yarn, leaving a long tail for sewing. Using your tapestry needle, weave the tail through the front loops of the final 6 stitches and pull tight to close the hole. Weave in the end securely. This completes the main body of your axolotl crochet pattern!
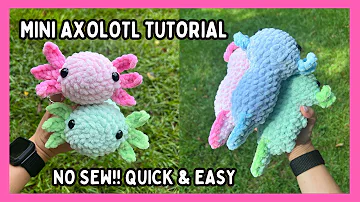
Watch The Video Tutorial
For visual learners who want to see this axolotl crochet pattern in action, the full video tutorial is an excellent resource. You can watch it here to follow along with each step, especially the tricky color changes for the gills.
Finishing Touches: Bringing Your Axolotl to Life
With the main construction complete, a few final details will make your creation truly special. These finishing touches are what give your amigurumi its unique personality.
The Optional Tail Frill for Extra Flair
To add an authentic and adorable detail, you can add a frill down the back of the tail using your Secondary Color.
- Rejoin your SC yarn with a slip stitch at the top of the tail, around where the decreasing began (approx. Rnd 19).
- Working down the center of the back, work a line of half double crochets (hdc) into the spaces between the stitches, going all the way down and around the tip of the tail.
- Continue up the underside until you are opposite your starting point.
- Fasten off, leaving tails to weave into the body securely.
This little detail adds a professional touch and makes this free axolotl crochet pattern look even more impressive.
Tips for Stuffing and Shaping
Proper stuffing is an art form in amigurumi! Don’t be afraid to use more stuffing than you think you need. The goal is a firm plushie that will hold its shape over time. Use small bits of stuffing at a time to avoid lumps. When you’ve finished, gently roll and squish the axolotl in your hands to evenly distribute the stuffing and perfect its final shape. Make sure to press down on the gills to make them lie flat and straight.
Customization Ideas for Your Axolotl Crochet Pattern
One of the best things about a great axolotl crochet pattern is using it as a jumping-off point for your creativity. Here are a few ideas to make your axolotl one-of-a-kind.
Experimenting with Colors and Yarn Textures
While plush yarn is fantastic, don’t hesitate to try other fibers. A worsted weight cotton yarn will create a smaller, more keychain-sized axolotl. You could even use a variegated or rainbow yarn for the gills to create a stunning effect against a solid-colored body. Imagine a strawberry-themed axolotl in pink with a green tail frill, or a galaxy-themed one in dark blues and purples with sparkly gills!
Adding Tiny Accessories
Why not give your axolotl a little extra personality? You could crochet a tiny top hat, a small bow to sit by one of the gills, or even a little scarf for the winter months. Embroidering small details like rosy cheeks with a strand of pink yarn can also add an extra layer of cuteness to your finished plushie.
Quick Takeaways
- No-Sew Design: This axolotl crochet pattern is designed to be completely no-sew, with gills and legs worked directly into the body.
- Best Yarn: Super bulky (CYC 6) chenille or blanket yarn creates the softest and most cuddly result.
- Key Stitches: The pattern relies on basic single crochet, increases, decreases, and a special bobble stitch for the feet.
- Tricky Part: Round 6, where the gills are made, involves several color changes. Take your time with this step for the cleanest result.
- Customizable: Easily change the look of your axolotl by experimenting with different color combinations and yarn types.
- Market Favorite: These plushies are extremely popular and sell well at craft fairs and online.
- Safety First: Always opt for embroidered eyes instead of plastic safety eyes if the toy is for a child under three years old.
Frequently Asked Questions (FAQ)
- Is this axolotl crochet pattern beginner-friendly?
- This pattern is great for an adventurous beginner. The majority of the stitches are simple, but the color-changing technique for the gills in round 6 can be challenging. The linked video tutorial is a great help for visual learners tackling this step for the first time.
- How long does it take to make one axolotl?
- For an experienced crocheter, this project can be completed in just a couple of hours. A beginner might take 3-4 hours. Its quick work-up time makes it an excellent choice for market prep.
- Can I use a different yarn weight for this pattern?
- Absolutely! Using a worsted weight yarn with a smaller hook (e.g., 3.5mm) will create a much smaller, palm-sized axolotl perfect for a keychain. Just be sure to adjust your eye size accordingly (e.g., 8-10mm).
- My gills are curling up. How can I fix this?
- Gill curling is very common with this type of pattern. Once your axolotl is finished and stuffed, you can simply press them down firmly with your fingers to flatten them. Some crafters even use a hair straightener on a very low setting for a brief moment to set them, but do this with extreme caution as synthetic yarns can melt.
- What is the best way to attach the safety eyes?
- The best time to attach safety eyes is before you’ve fully stuffed the head and decreased too far. This gives you room to work from the inside. Place the eyes, check their alignment from the front to make sure you’re happy, and then securely snap the plastic washers onto the back. You should hear a click when they are properly fastened.
Conclusion
Creating an amigurumi plushie is more than just a craft; it’s an act of bringing joy and personality to life through yarn. This no-sew axolotl crochet pattern is a truly delightful project that offers a satisfying creative journey from start to finish. With its clever construction, you can avoid the hassle of sewing on multiple small parts and instead watch your adorable creature come together seamlessly on your hook. The result is a charming, squishy friend that captures the unique appeal of one of nature’s most whimsical animals. Whether you are making one for yourself, as a heartfelt gift, or to stock your craft market table, this pattern is a reliable and rewarding choice. We hope you have a wonderful time creating your own colorful collection of these lovable amphibians.
We’d love to see your finished creations! What color combination will you choose for your axolotl? Share your projects and tag us on social media, and if you have any questions, feel free to drop them in the comments below!
References
- All About Ami – A blog featuring amigurumi patterns and inspiration.
- Moogly Blog – A popular resource for free crochet patterns and tutorials.
- Repeat Crafter Me – A blog with a wide variety of crochet patterns, including cute critters.