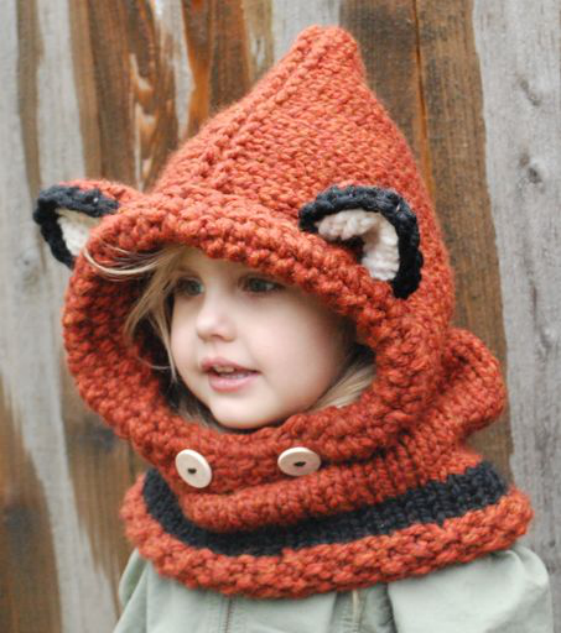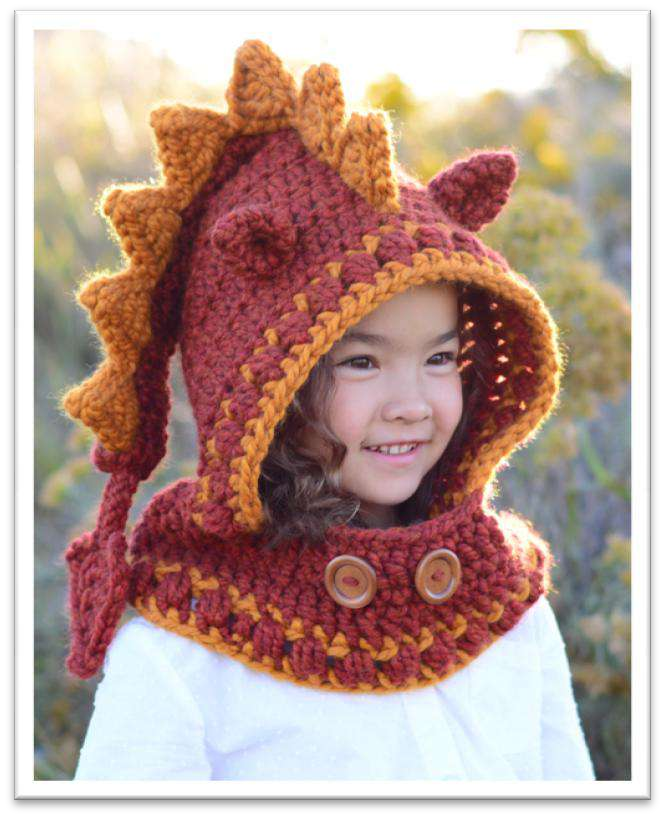
Lucky Dragon Hood and Cowl Crochet Pattern
Materials
To create your cozy Lucky Dragon Hood & Cowl, gather the following high-quality materials:
- Yarn: Super Bulky (6) weight yarn – Lion Brand Wool-Ease Thick & Quick (170g / 106yds per skein)
- Main Color (MC) – Spice: 2 skeins for Toddler or Child size, 3 skeins for Adult size
- Accent Color (AC) – Butterscotch: 1 skein (for all sizes)
- Crochet Hook: Size N-15 (10mm)
- Tapestry Needle: For weaving in ends and assembly.
- Buttons: 2 buttons – size 1 3/8″ (35mm)
Finished Sizes
This versatile crochet pattern is available in three sizes, ensuring a perfect fit for everyone:
- Toddler: 13″ height, 14″ long
- Child: 15 ½” height, 19″ long
- Adult: 18″ height, 25 ½” long
Note: Height is measured as COWL + HOOD. Length measurements are taken from the front of the hood to the tail (excluding the tail spike).
Gauge
Achieving the correct gauge is crucial for the final size and drape of your project. Using a Size N hook and super bulky (6) weight yarn:
- 8 dc (double crochet) = 4″
- 4 dc rows = 4″
- 8 sc (single crochet) = 4″
- 8 sc rows = 4″
Abbreviations Used
Familiarize yourself with these standard crochet abbreviations for a smooth crafting experience:
- yo: yarn over
- sl st: slip stitch
- tr: treble crochet
- sp: space
- sc: single crochet
- puff st: puff stitch
- st(s): stitch(es)
- hdc: half double crochet
- MC: Main Color
- ch: chain
- dc: double crochet
- AC: Accent Color
Important Crochet Notes
Before you begin, please review these essential pattern notes:
- The pattern begins at the tip of the tail and is worked in the round until the hood section.
- The hood is then worked back and forth in rows.
- Without breaking yarn, the cowl is added to the hood and worked in the round.
- Each round/row begins with a ch-1 for single crochet rounds/rows or a ch-2 for double crochet rounds/rows. These beginning chains do NOT count as the 1st stitch.
- When working in the round, sl st join to the 1st sc or 1st dc of the round, not the beginning chain.
- To start the next round, chain and work the 1st sc (or 1st dc) into the 1st sc (or 1st dc) from the previous round. Using a stitch marker on the 1st stitch of each round can be very helpful, especially for beginners.

Puff Stitch (puff st) Tutorial
The puff stitch adds a wonderful textured element to your dragon hood. Here’s how to create it:
- (Yarn over, insert hook into stitch, pull up a loop) – Repeat this step 2 more times.
- You will now have 7 loops on your hook.
- Yarn over, pull through all 7 loops on hook to complete the puff stitch.
Crochet Instructions
The Tail
Begin your Lucky Dragon Hood & Cowl by crafting the whimsical tail, working in continuous rounds with your Main Color (MC).
Begin with an adjustable ring & MC.
- Round 1 (all sizes): ch 1 (does not count as 1st sc), 9 sc into ring, sl st join to 1st sc – 9 sc
- Round 2 (all sizes): ch 2 (does not count as 1st dc), 1 dc in each st around, sl st join to 1st dc
- Round 3:
- Size Toddler: ch 1, 2 sc in same st, 1 sc in each of next 7 sts, 2 sc in last st, sl st join to 1st sc – 11 sc
- Size Child, Adult: ch 1, 1 sc in each st around, sl st join to 1st sc
- Round 4:
- Size Toddler: ch 2, 2 dc in same st, 1 dc in each of next 9 sts, 2 dc in last st, sl st join to 1st dc – 13 dc
- Size Child, Adult: repeat Round 2
- Round 5:
- Size Toddler: ch 1, 2 sc in same st, 1 sc in each of next 11 sts, 2 sc in last st, sl st join to 1st sc – 15 sc
- Size Child, Adult: repeat Round 3
- Round 6:
- Size Toddler: ch 2, 2 dc in same st, 1 dc in each of next 13 sts, 2 dc in last st, sl st join to 1st dc – 17 dc
- Size Child, Adult: repeat Round 2
- Round 7:
- Size Toddler: ch 1, 2 sc in same st, 2 sc in next st, 1 sc in each of next 13 sts, 2 sc in each of next 2 sts, sl st join to 1st sc – 21 sc
- Size Child: ch 1, 2 sc in same st, 1 sc in each of next 7 sts, 2 sc in last st, sl st join to 1st sc – 11 sc
- Size Adult: repeat Round 3
- Round 8:
- Size Toddler: ch 2, 2 dc in same st, 2 dc in next st, 1 dc in each of next 17 sts, 2 dc in each of next 2 sts, sl st join to 1st dc – 25 dc
- Size Child: ch 2, 2 dc in same st, 1 dc in each of next 9 sts, 2 dc in last st, sl st join to 1st dc – 13 dc
- Size Adult: repeat Round 2
- Round 9:
- Size Toddler: ch 1, 2 sc in same st, 2 sc in next st, 1 sc in each of next 21 sts, 2 sc in each of next 2 sts, sl st join to 1st sc – 29 sc
- Size Child: ch 1, 2 sc in same st, 1 sc in each of next 11 sts, 2 sc in last st, sl st join to 1st sc – 15 sc
- Size Adult: repeat Round 3
- Round 10:
- Size Toddler: ch 2, 2 dc in same st, 2 dc in next st, 1 dc in each of next 25 sts, 2 dc in each of next 2 sts, sl st join to 1st dc – 33 dc
- Size Child: ch 2, 2 dc in same st, 1 dc in each of next 13 sts, 2 dc in last st, sl st join to 1st dc – 17 dc
- Size Adult: ch 2, 2 dc in same st, 1 dc in each of next 7 sts, 2 dc in last st, sl st join to 1st dc – 11 dc
- Round 11:
- Size Toddler: ch 1, 2 sc in same st, 2 sc in next st, 1 sc in each of next 29 sts, 2 sc in each of next 2 sts, sl st join to 1st sc – 37 sc; begin working HOOD
- Size Child: ch 1, 2 sc in same st, 1 sc in each of next 15 sts, 2 sc in last st, sl st join to 1st sc – 19 sc
- Size Adult: repeat Round 3
- Round 12:
- Size Child: ch 2, 2 dc in same st, 1 dc in each of next 17 sts, 2 dc in last st, sl st join to 1st dc – 21 dc
- Size Adult: ch 2, 2 dc in same st, 1 dc in each of next 9 sts, 2 dc in last st, sl st join to 1st dc – 13 dc
- Round 13:
- Size Child: ch 1, 2 sc in same st, 2 sc in next st, 1 sc in each of next 17 sts, 2 sc in each of next 2 sts, sl st join to 1st sc – 25 sc
- Size Adult: repeat Round 3
- Round 14:
- Size Child: ch 2, 2 dc in same st, 2 dc in next st, 1 dc in each of next 21 sts, 2 dc in each of next 2 sts, sl st join to 1st dc – 29 dc
- Size Adult: ch 2, 2 dc in same st, 1 dc in each of next 11 sts, 2 dc in last st, sl st join to 1st dc – 15 dc
- Round 15:
- Size Child: ch 1, 2 sc in same st, 2 sc in next st, 1 sc in each of next 25 sts, 2 sc in each of next 2 sts, sl st join to 1st sc – 33 sc
- Size Adult: repeat Round 3
- Round 16:
- Size Child: ch 2, 2 dc in same st, 2 dc in next st, 1 dc in each of next 29 sts, 2 dc in each of next 2 sts, sl st join to 1st dc – 37 dc
- Size Adult: ch 2, 2 dc in same st, 1 dc in each of next 13 sts, 2 dc in last st, sl st join to 1st dc – 17 dc
- Round 17:
- Size Child: ch 1, 2 sc in same st, 2 sc in next st, 1 sc in each of next 33 sts, 2 sc in each of next 2 sts, sl st join to 1st sc – 41 sc; begin working HOOD
- Size Adult: ch 1, 2 sc in same st, 1 sc in each of next 15 sts, 2 sc in last st, sl st join to 1st sc – 19 sc
- Round 18:
- Size Adult: ch 2, 2 dc in same st, 1 dc in each of next 17 sts, 2 dc in last st, sl st join to 1st dc – 21 dc
- Round 19:
- Size Adult: ch 1, 2 sc in same st, 1 sc in each of next 19 sts, 2 sc in last st, sl st join to 1st sc – 23 sc
- Round 20:
- Size Adult: ch 2, 2 dc in same st, 1 dc in each of next 21 sts, 2 dc in last st, sl st join to 1st dc – 25 dc
- Round 21:
- Size Adult: ch 1, 2 sc in same st, 2 sc in next st, 1 sc in each of next 21 sts, 2 sc in each of next 2 sts, sl st join to 1st sc – 29 sc
- Round 22:
- Size Adult: ch 2, 2 dc in same st, 2 dc in next st, 1 dc in each of next 25 sts, 2 dc in each of next 2 sts, sl st join to 1st dc – 33 dc
- Round 23:
- Size Adult: ch 1, 2 sc in same st, 2 sc in next st, 1 sc in each of next 29 sts, 2 sc in each of next 2 sts, sl st join to 1st sc – 37 sc
- Round 24:
- Size Adult: ch 2, 2 dc in same st, 2 dc in next st, 1 dc in each of next 33 sts, 2 dc in each of next 2 sts, sl st join to 1st dc – 41 dc
- Round 25:
- Size Adult: ch 1, 2 sc in same st, 2 sc in next st, 1 sc in each of next 37 sts, 2 sc in each of next 2 sts, sl st join to 1st sc – 45 sc; begin working HOOD
Crafting the Hood
Transitioning from the tail, the hood is worked in rows. Continuing with MC, turn your work to start the first row with the wrong side facing you.
- Row 1 (wrong side, all sizes): ch 2, dc in each st across, turn
- Size Toddler: 37 dc
- Size Child: 41 dc
- Size Adult: 45 dc
- Row 2 (right side, all sizes): ch 1, sc in each st across, turn
- Row 3 (all sizes): repeat Row 1
- Row 4 (all sizes): repeat Row 2
- Row 5 (all sizes): repeat Row 1
- Row 6 (all sizes): repeat Row 2
- Row 7 (all sizes): repeat Row 1
- Row 8:
- Size Toddler: drop MC, but do not fasten off, pull up AC, ch 1, sc in each st across, fasten off AC, do not turn
- Size Child, Adult: repeat Row 2
- Row 9:
- Size Toddler: with right side facing you, pull up MC in 1st sc from previous row, ch 3 (counts as 1st st, this row only), puff st in next st, (ch 1, skip 1 st, puff st in next st)(repeat across), end row with dc in last st, do not turn
At end of Row 9, remove MC loop from hook, but do not break yarn. MC will be picked up again after completing the next row.
- Size Child, Adult: repeat Row 1
- Size Toddler: with right side facing you, pull up MC in 1st sc from previous row, ch 3 (counts as 1st st, this row only), puff st in next st, (ch 1, skip 1 st, puff st in next st)(repeat across), end row with dc in last st, do not turn
- Row 10:
- Size Toddler: with right side facing you, pull up AC at top of ch-3 from previous row, ch 1, sc in same st, sc in each st across
At end of Row 10, pull up MC and fasten off AC: With last 2 loops of AC on hook, drop AC, add MC loop to hook, finish the last sc with MC. Fasten off AC. Begin working the COWL.
- Size Child: drop MC, but do not fasten off, pull up AC, ch 1, sc in each st across, fasten off AC, do not turn
- Size Adult: repeat Row 2
- Size Toddler: with right side facing you, pull up AC at top of ch-3 from previous row, ch 1, sc in same st, sc in each st across
- Row 11:
- Size Child: with right side facing you, pull up MC in 1st sc from previous row, ch 3 (counts as 1st st, this row only), puff st in next st, (ch 1, skip 1 st, puff st in next st)(repeat across), end row with dc in last st, do not turn
At end of Row 11, remove MC loop from hook, but do not break yarn. MC will be picked up again after completing the next row.
- Size Adult: repeat Row 1
- Size Child: with right side facing you, pull up MC in 1st sc from previous row, ch 3 (counts as 1st st, this row only), puff st in next st, (ch 1, skip 1 st, puff st in next st)(repeat across), end row with dc in last st, do not turn
- Row 12:
- Size Child: with right side facing you, pull up AC at top of ch-3 from previous row, ch 1, sc in same st, sc in each st across
At end of Row 12, pull up MC and fasten off AC: With last 2 loops of AC on hook, drop AC, add MC loop to hook, finish the last sc with MC. Fasten off AC. Begin working the COWL.
- Size Child: with right side facing you, pull up AC at top of ch-3 from previous row, ch 1, sc in same st, sc in each st across
- Row 13:
- Size Adult: drop MC, but do not fasten off, pull up AC, ch 1, sc in each st across, fasten off AC, do not turn
- Row 14:
- Size Adult: with right side facing you, pull up MC in 1st sc from previous row, ch 3 (counts as 1st st, this row only), puff st in next st, (ch 1, skip 1 st, puff st in next st)(repeat across), end row with dc in last st, do not turn
At end of Row 13, remove MC loop from hook, but do not break yarn. MC will be picked up again after completing the next row.
- Size Adult: with right side facing you, pull up AC at top of ch-3 from previous row, ch 1, sc in same st, sc in each st across
At end of Row 14, pull up MC and fasten off AC: With last 2 loops of AC on hook, drop AC, add MC loop to hook, finish the last sc with MC. Fasten off AC. Begin working the COWL.
- Size Adult: with right side facing you, pull up MC in 1st sc from previous row, ch 3 (counts as 1st st, this row only), puff st in next st, (ch 1, skip 1 st, puff st in next st)(repeat across), end row with dc in last st, do not turn
The Cowl
The cowl is worked in the round, with the right side facing you. With MC on hook, ch 12, sl st to 1st sc from the last row worked on HOOD.
Working into the back humps of the ch-12 will give the best results for a neat edge.
- Round 1:
- Size Toddler: ch 1, sc in each ch across, evenly space 30 sc around bottom edge of hood, sl st join to 1st sc – 42 sc
- Size Child: ch 1, sc in each ch across, evenly space 36 sc around bottom edge of hood, sl st join to 1st sc – 48 sc
- Size Adult: ch 1, sc in each ch across, evenly space 42 sc around bottom edge of hood, sl st join to 1st sc – 54 sc
- Round 2 (all sizes): ch 2, 1 dc in each st around, sl st join to 1st dc
- Round 3:
- Size Toddler: drop MC, but do not fasten off, pull up AC, ch 1, 1 sc in each st around, sl st join to 1st sc
- Size Child, Adult: ch 1, 1 sc in each st around, sl st join to 1st sc
- Round 4:
- Size Toddler: drop AC, but do not fasten off, pull up MC, ch 2, puff st in same st, ch 1, skip 1 st, (puff st in next st, ch 1, skip 1 st)(repeat around), sl st join to 1st puff st, fasten off MC
- Size Child, Adult: repeat Round 2
- Round 5:
- Size Toddler: pull up AC, ch 1, 1 sc in each st around, sl st join to 1st sc, fasten off AC, weave in ends
- Size Child: drop MC, but do not fasten off, pull up AC, ch 1, 1 sc in each st around, sl st join to 1st sc
- Size Adult: repeat Round 3
- Round 6:
- Size Child: drop AC, but do not fasten off, pull up MC, ch 2, puff st in same st, ch 1, skip 1 st, (puff st in next st, ch 1, skip 1 st)(repeat around), sl st join to 1st puff st, fasten off MC
- Size Adult: repeat Round 2
- Round 7:
- Size Child: pull up AC, ch 1, 1 sc in each st around, sl st join to 1st sc, fasten off AC, weave in ends
- Size Adult: drop MC, but do not fasten off, pull up AC, ch 1, 1 sc in each st around, sl st join to 1st sc
- Round 8:
- Size Adult: drop AC, but do not fasten off, pull up MC, ch 2, puff st in same st, ch 1, skip 1 st, (puff st in next st, ch 1, skip 1 st)(repeat around), sl st join to 1st puff st, fasten off MC
- Round 9:
- Size Adult: pull up AC, ch 1, 1 sc in each st around, sl st join to 1st sc, fasten off AC, weave in ends
Tail Spike Accent
Add a distinctive tail spike to the tip of your dragon’s tail for an authentic look.
With MC, ch 11
- Row 1: sl st in 2nd ch from hook, sl st in each of next 3 ch, (sl st, ch 5, tr)(in next ch), tr in next ch, dc in next ch, hdc in next ch, sc in next ch, sl st in last ch, ch 2
- Row 2 (work across the opposite side of foundation chain): sl st in 1st ch, sc in next ch, hdc in next ch, dc in next ch, tr in next ch, (tr, ch 5, sl st)(in next ch), sl st in each of next 4 ch, sl st in ch sp at end, leaving a 6″ yarn tail, fasten off.
Use the long yarn tail to tie the spike onto the tip of the hood’s tail and weave in the beginning yarn tail.
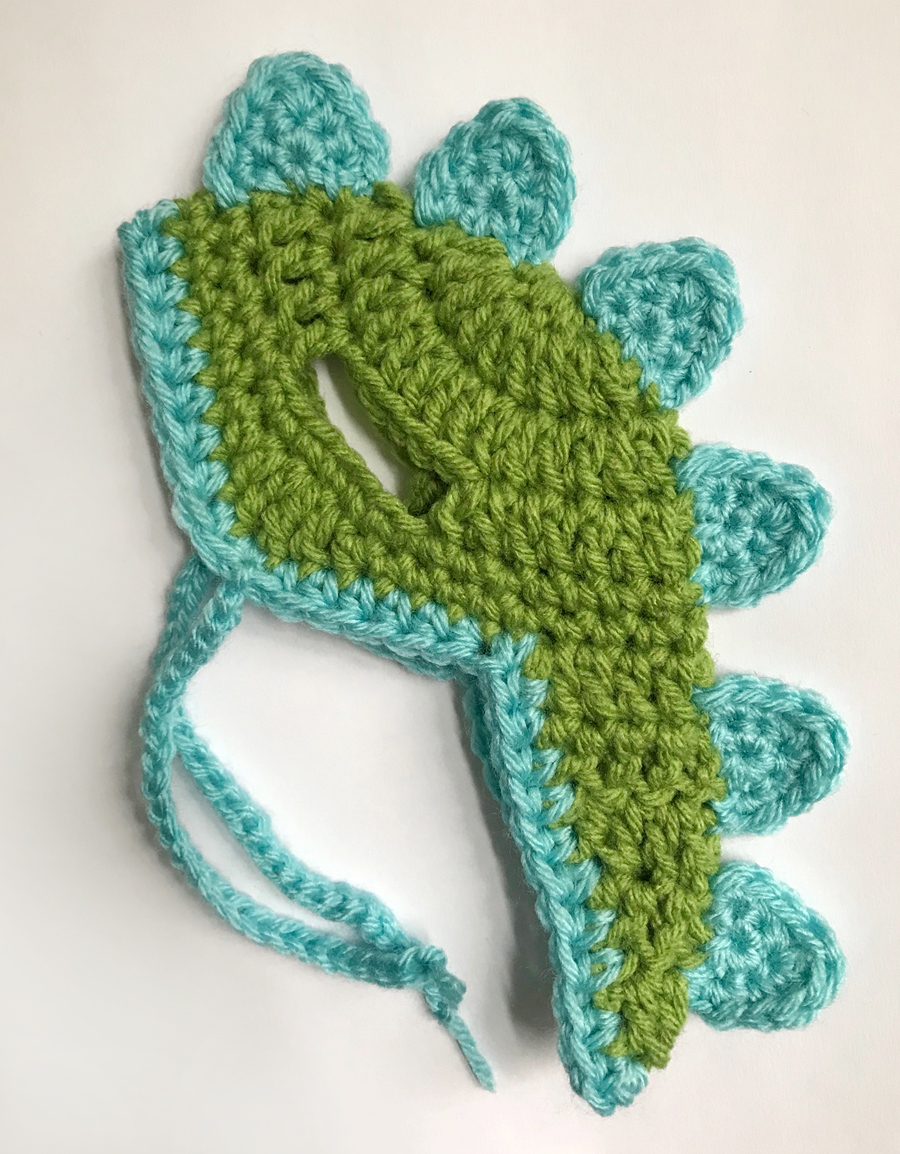
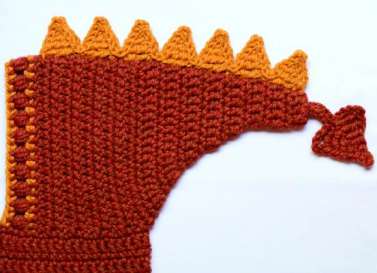
Hood Spikes
Create a row of bold spikes to run along the top of your dragon’s hood and tail.
Each finished spike measures 2 ½” wide at the base. For the child-sized hood pictured, 7 spikes were made and sewn into place. You can choose to add fewer, only on the hood, or make enough to extend the entire length of the hood and tail. Each spike is made by stitching 2 spike pieces together.
Follow the directions below to make the spike pieces. Once you have the length you like for your hood, continue to make spike pieces until you have twice the number of spikes needed (e.g., 14 spike pieces were needed to make the 7 finished spikes on the hood pictured).
- 1st spike piece: with AC, ch 6, sl st in 2nd ch from hook, sc in next ch, dc in next ch, 1 tr in each of next 2 ch, continue with AC for each consecutive spike piece.
- 2nd spike piece, et al.: (ch 7, sl st in 2nd ch from hook, sc in next ch, dc in next ch, 1 tr in each of next 2 ch)(repeat for desired number of spike pieces), do not fasten off.
Fold the length of spike pieces in half with wrong sides together then sl st the spike pieces together. When finished, leave a long yarn tail to sew spikes onto the hood, then fasten off. A length of yarn 3 times the length of your spikes is sufficient for sewing spikes to the hood.
Position spikes along the top of the hood & tail, then sew into place using a tapestry needle and the long yarn tail. Weave in loose ends.
Ears (Make 2)
Craft two adorable ears to complete your dragon’s charming look, working in continuous rounds.
Begin with an adjustable ring and MC.
- Round 1: ch 1 (does not count as 1st sc), 3 sc into ring, tighten ring
- Round 2: 2 sc in each of next 3 sts – 6 sc
- Round 3: (1 sc in next st, 2 sc in next st)(repeat 2 more times) – 9 sc
- Round 4: (1 sc in each of next 2 sts, 2 sc in next st)(repeat 2 more times) – 12 sc
- Round 5: 1 sc in each of next 12 sts, skip 1 st, sl st in next st, leaving an 18″ yarn tail, fasten off.
Fold the base of the ears in half then sew onto the hood using the long yarn tail. Ears pictured were placed 2″ from the spikes and 2½” from the front edge of the hood.
Assembly and Finishing
The final touches bring your Lucky Dragon Hood & Cowl to life
Lastly, sew the 2 buttons on the front of the cowl and weave in any remaining ends securely using your tapestry needle. Double-check all seams and attachments to ensure durability.