Crochet the Wrapped With Love Hat: A Free Pattern for All Ages
Hello, lovely crocheters! Is there anything more heartwarming than making a cozy, handmade hat for someone you love? Today, we’re diving into a pattern that is as sweet as it is simple: the Wrapped With Love Crochet Hat. This adorable beanie features a charming contrasting band and an attached bow, making it the perfect gift for literally anyone on your list—from brand new babies to grown-ups!
The beauty of this pattern lies in its simplicity. Worked entirely in half double crochet (hdc), it’s a fantastic project for beginners. The construction is a classic top-down design, which means you can easily adjust the size as you go. We’ve included instructions for eight different sizes, so you can create a matching set for the whole family or whip up the perfect gift for any occasion.
Using worsted weight yarn, this hat works up quickly and is wonderfully soft and warm. The added bow gives it a special, finished touch that’s sure to delight. So, pick out your favorite colors—a main color for the body and a contrasting accent for the band and bow—and let’s make something beautiful together!
Materials You’ll Need
- Yarn: Worsted weight (Category 4) yarn.
- Main Color (MC): For the majority of the hat.
- Accent Color (AC): For the contrasting band and bow.
- Crochet Hook: 5.0 mm (US H-8) hook, or the size needed to obtain the correct gauge.
- Notions:
- Yarn needle for weaving in ends.
- Scissors.
Gauge
- Gauge: 14 stitches and 12 rows in half double crochet (hdc) should measure 4 inches (10 cm).
- Why it matters: Checking your gauge is the secret to making a hat that fits perfectly! If your gauge is tighter, your hat will be smaller; if it’s looser, your hat will be larger. If needed, change your hook size to match the gauge.
Abbreviations (US Terms)
- ch: chain
- sl st: slip stitch
- hdc: half double crochet
Important Pattern Notes
- You can start the hat with a magic ring or with the chain method provided.
- The starting chain at the beginning of each round does not count as a stitch.
- Always start each new round in the same stitch where you made your starting chain.
- Join the end of each round with a sl st into the first hdc of that round (not into the chain).
- The instructions for the cute bow are at the very end of the pattern.
The Pattern: Choose Your Size
Below are the instructions for all eight sizes. Simply find the size you want to make and follow the rounds step-by-step. The pattern is worked in continuous rounds, joined at the end of each round.
Newborn (Head: 13″-15″, Hat: 13″ circ., 5″ tall)
- Rnd 1 (MC): Ch 2, work 8 hdc in the 2nd ch from hook. Join. (8)
- Rnd 2: Ch 1, 2 hdc in each st around. Join. (16)
- Rnd 3: Ch 1, hdc in next st, 2 hdc in next st. Rep around. Join. (24)
- Rnd 4: Ch 1, hdc in next 2 sts, 2 hdc in next st. Rep around. Join. (32)
- Rnd 5: Ch 1, hdc in next 3 sts, 2 hdc in next st. Rep around. Join. (40)
- Rnd 6: Ch 1, hdc in next 7 sts, 2 hdc in next st. Rep around. Join. (45)
- Rnd 7-10: Ch 1, hdc in each st around. Join. (45)
- Rnd 11-12 (AC): Ch 1, hdc in each st around. Join. (45)
- Rnd 13-15 (MC): Ch 1, hdc in each st around. Join. (45)
- Fasten off. Weave in ends. Attach bow.
0-3 Months (Head: 14″-16″, Hat: 14″ circ., 5″ tall)
- Rnd 1-5: Same as Newborn. (40 sts after Rnd 5)
- Rnd 6: Ch 1, hdc in next 4 sts, 2 hdc in next st. Rep around. Join. (48)
- Rnd 7-11: Ch 1, hdc in each st around. Join. (48)
- Rnd 12-13 (AC): Ch 1, hdc in each st around. Join. (48)
- Rnd 14-16 (MC): Ch 1, hdc in each st around. Join. (48)
- Fasten off. Weave in ends. Attach bow.
3-6 Months (Head: 15″-17″, Hat: 15″ circ., 6″ tall)
- Rnd 1-6: Same as 0-3 Months. (48 sts after Rnd 6)
- Rnd 7: Ch 1, hdc in next 11 sts, 2 hdc in next st. Rep around. Join. (52)
- Rnd 8-11: Ch 1, hdc in each st around. Join. (52)
- Rnd 12-14 (AC): Ch 1, hdc in each st around. Join. (52)
- Rnd 15-17 (MC): Ch 1, hdc in each st around. Join. (52)
- Fasten off. Weave in ends. Attach bow.
6-12 Months (Head: 16″-18″, Hat: 16″ circ., 6.5″ tall)
- Rnd 1-6: Same as 0-3 Months. (48 sts after Rnd 6)
- Rnd 7: Ch 1, hdc in next 5 sts, 2 hdc in next st. Rep around. Join. (56)
- Rnd 8-14: Ch 1, hdc in each st around. Join. (56)
- Rnd 15-16 (AC): Ch 1, hdc in each st around. Join. (56)
- Rnd 17-19 (MC): Ch 1, hdc in each st around. Join. (56)
- Fasten off. Weave in ends. Attach bow.
Toddler/Small Child (1-5 yrs, Head: 17″-19″, Hat: 17″ circ., 7″ tall)
- Rnd 1-7: Same as 6-12 Months. (56 sts after Rnd 7)
- Rnd 8: Ch 1, hdc in next 13 sts, 2 hdc in next st. Rep around. Join. (60)
- Rnd 9-15: Ch 1, hdc in each st around. Join. (60)
- Rnd 16-17 (AC): Ch 1, hdc in each st around. Join. (60)
- Rnd 18-20 (MC): Ch 1, hdc in each st around. Join. (60)
- Fasten off. Weave in ends. Attach bow.
Child (5-10 yrs, Head: 18″-20″, Hat: 18″ circ., 7.25″ tall)
- Rnd 1-7: Same as 6-12 Months. (56 sts after Rnd 7)
- Rnd 8: Ch 1, hdc in next 6 sts, 2 hdc in next st. Rep around. Join. (64)
- Rnd 9-15: Ch 1, hdc in each st around. Join. (64)
- Rnd 16-17 (AC): Ch 1, hdc in each st around. Join. (64)
- Rnd 18-21 (MC): Ch 1, hdc in each st around. Join. (64)
- Fasten off. Weave in ends. Attach bow.
Teen/Small Adult (Head: 19″-21″, Hat: 19″ circ., 7.5″ tall)
- Rnd 1-8: Same as Child. (64 sts after Rnd 8)
- Rnd 9: Ch 1, hdc in next 15 sts, 2 hdc in next st. Rep around. Join. (68)
- Rnd 10-16: Ch 1, hdc in each st around. Join. (68)
- Rnd 17-18 (AC): Ch 1, hdc in each st around. Join. (68)
- Rnd 19-22 (MC): Ch 1, hdc in each st around. Join. (68)
- Fasten off. Weave in ends. Attach bow.
Medium Adult (Head: 21″-23″, Hat: 20.5″ circ., 7.75″ tall)
- Rnd 1-8: Same as Child. (64 sts after Rnd 8)
- Rnd 9: Ch 1, hdc in next 7 sts, 2 hdc in next st. Rep around. Join. (72)
- Rnd 10-17: Ch 1, hdc in each st around. Join. (72)
- Rnd 18-19 (AC): Ch 1, hdc in each st around. Join. (72)
- Rnd 20-23 (MC): Ch 1, hdc in each st around. Join. (72)
- Fasten off. Weave in ends. Attach bow.
Large Adult (Head: 22″-24″, Hat: 21.75″ circ., 8″ tall)
- Rnd 1-9: Same as Medium Adult. (72 sts after Rnd 9)
- Rnd 10: Ch 1, hdc in next 17 sts, 2 hdc in next st. Rep around. Join. (76)
- Rnd 11-18: Ch 1, hdc in each st around. Join. (76)
- Rnd 19-20 (AC): Ch 1, hdc in each st around. Join. (76)
- Rnd 21-24 (MC): Ch 1, hdc in each st around. Join. (76)
- Fasten off. Weave in ends. Attach bow.
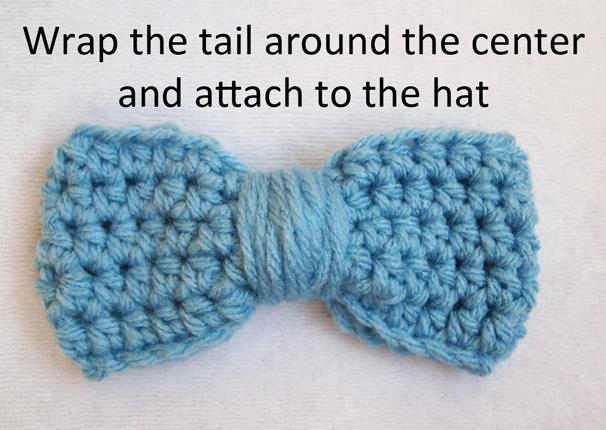
Making the Bow
The final touch! The bow is a simple tube that you pinch in the middle.
For Baby & Toddler Sizes:
- With AC, chain 23.
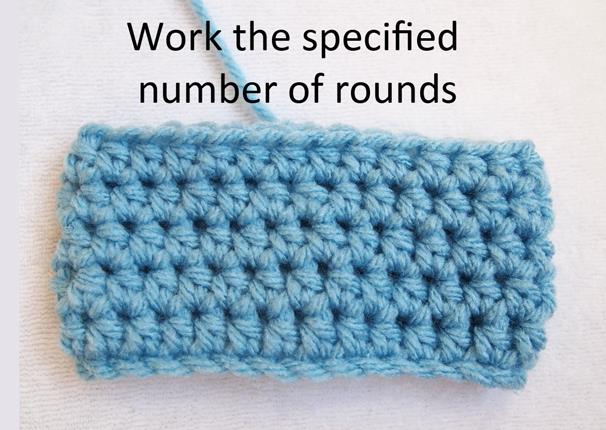
- Hdc in the 2nd ch from the hook and in each ch across. (22 hdc)
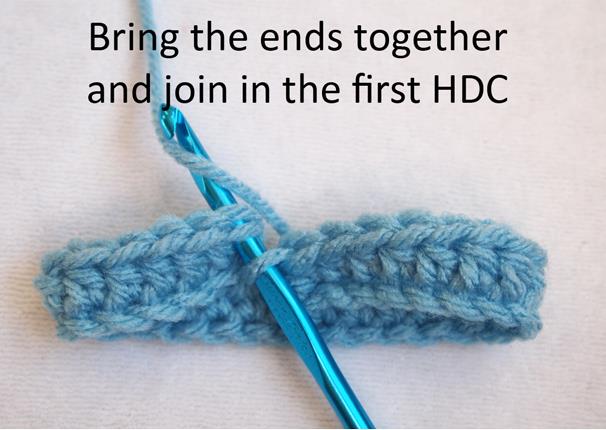
- Sl st to the first hdc to form a circle.
- Ch 1, hdc in each st around. Join. Repeat for 3 more rounds (4 rounds total).
- Fasten off, leaving a very long tail. Use this tail to tightly wrap around the center of the tube to form the bow. Secure the end and use the remaining tail to sew the bow onto the hat over the accent color band.
For Child & Adult Sizes:
- With AC, chain 26.
- Hdc in the 2nd ch from the hook and in each ch across. (25 hdc)
- Sl st to the first hdc to form a circle.
- Ch 1, hdc in each st around. Join. Repeat for 4 more rounds (5 rounds total).
- Fasten off, leaving a very long tail. Wrap the center and attach as above.
You’re Finished
Congratulations! You’ve just created a beautiful, cozy, and thoughtful hat that’s truly wrapped with love. We hope you enjoyed this simple and satisfying pattern. Whether you keep it for yourself or give it as a gift, it’s sure to be cherished