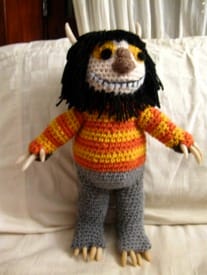
Crochet Your Own “Wild Thing”: A Free Amigurumi Pattern
Hello, creative souls and yarn enthusiasts! Today, we’re embarking on a wonderfully wild creative journey. If you’ve ever wanted to bring a friendly monster to life with just a hook and some yarn, you’ve come to the right place. This pattern is all about letting your imagination run wild and creating a truly one-of-a-kind “Wild Thing” toy.
This isn’t your average, follow-every-step-exactly pattern. Instead, think of it as a creative map. You’re encouraged to play with colors, and tweak the details to make your little wild friend completely unique. The instructions will guide you through making all the pieces, but you are the head artist in charge of bringing its personality to life.
Whether you’re making this as a special gift for a little one, or as a quirky and cuddly companion for your own shelf, this project is a fantastic way to express your creativity. So, grab your hooks and your most colorful yarn, and let’s start this fun adventure together
What You’ll Need: Materials & Tools
Before we begin, let’s gather all our supplies. All the yarn used in the original pattern was worsted weight, but feel free to use whatever you think looks best for your “Wild Thing.”
Yarn & Notions
- H hook
- F hook
- Cream colored yarn
- Black colored yarn
- Orange colored yarn
- Yellow colored yarn
- Gray colored yarn
- Light & dark brown colored yarn
- White clay (for horns and claws)
- White embroidery thread
- Black embroidery thread
- Tapestry needle
- Stitch marker
Abbreviations
This pattern uses standard US crochet terms.
- ch: chain
- dec: decrease
- inc: increase
- rnd(s): round(s)
- sc: single crochet
- sl st: slip stitch
- st(s): stitch(es)
A Few Notes Before We Start
- Remember to place a stitch marker at the end of every round unless the pattern says otherwise.
- This pattern encourages creativity, so feel free to change up the colors to make your “Wild Thing” truly your own.
- The pattern for adding hair is not included, as there are many different ways to do it. You can find lots of great hair tutorials online to choose the method that works best for you.
“Wild Thing” Crochet Pattern
Head
- With your H hook and cream yarn, ch 2. Work 6 sc in the second ch from the hook.
- Rnd 1: inc around.
- Rnd 2: (sc, inc) around.
- Rnd 3: (sc 2, inc) around.
- Rnd 4: (sc 3, inc) around.
- Rnd 5: (sc 4, inc) around.
- Rnd 6: (sc 5, inc) around.
- Rnds 7-12: sc around.
- Rnd 13: (sc 5, dec) around.
- Rnd 14: (sc 4, dec) around.
- Rnd 15: sc around.
- Rnd 16: (sc 3, dec) around.
- Rnd 17: dec around, then fasten off.
Horns
- Using white clay, make two horns. You can make them any width and length you like, but make sure they can fit between two stitches.
- You can attach them by either using a hot glue gun to glue them in place, or by putting a hole at the bottom of each horn and sewing them onto the head.
Nose
- With your F hook and light brown yarn, ch 2. Work 4 sc in the second ch from the hook.
- Rnd 1: inc around, sl st in the last st.
- Rnd 2: sl st, sc 4, ch 2, 3 sc in the second ch from the hook, sc 1, sl st.
- Rnd 3: sl st, sc 1, ch 2, 3 sc in the second ch from the hook, sc 3, turn.
- Row 4: sc 4, ch 1, turn.
- Row 5: sc 4, ch 1, turn.
- Row 6: sc 1, dec, sc 1, then fasten off.
Eyes
- For the yellow part: With your F hook and yellow yarn, ch 2. Work 8 sc in the second ch from the hook. Then, (sc 1, inc) around, sl st, and fasten off.
- For the black part: With black yarn, ch 2. Work 4 sc in the second ch from the hook to make a semi-circle, then fasten off.
Body
- Let’s set our colors: C1 will be orange, and C2 will be yellow.
- With your H hook and gray yarn, ch 2. Work 6 sc in the second ch from the hook.
- Rnd 1: inc around.
- Rnd 2: (sc 1, inc) around.
- Rnd 3: (sc 2, inc) around.
- Rnd 4: (sc 3, inc) around.
- Rnd 5: (sc 4, inc) around.
- Rnd 6: (sc 5, inc) around.
- Rnd 7: (sc 6, inc) around.
- Rnds 8-10: sc around.
- With C1 (orange):
- Rnd 11: sc around.
- Rnd 12: sc around.
- With C2 (yellow):
- Rnd 13: (sc 6, dec) around.
- Rnd 14: sc around.
- With C1 (orange):
- Rnd 15: sc around.
- Rnd 16: (sc 5, dec) around.
- With C2 (yellow):
- Rnd 17: sc around.
- Rnd 18: sc around.
- With C1 (orange):
- Rnd 19: (sc 4, dec) around.
- Rnd 20: sc around.
- With C2 (yellow):
- Rnd 21: sc around.
- Rnd 22: sc around.
- With C1 (orange):
- Rnd 23: (sc 3, dec) around.
- Rnd 24: sc around.
- With C2 (yellow):
- Rnd 25: (sc 2, dec) around, then fasten off.
Arms (make two)
- Do not use a stitch marker for the arms. With your H hook and C2 (yellow), ch 4. Skip 1 ch, sc 3, ch 1, turn.
- inc, sc 1, inc.
- With C1 (orange), sc across, ch 9, sc 5, sc in the chains.
- With C2 (yellow), sc around.
- sc around.
- With C1 (orange), sc around.
- sc around.
- With C2 (yellow), sc around for Rnd 8.
- sc around.
- With C1 (orange), for Rnd 10: sc 6, dec, sc 5.
- sc around.
- With C2 (yellow), sc 6, dec, sc 4.
- inc, sc 1, inc, sc 5, dec, sc 3.
- With C1 (orange), sc 4, ch 1, turn.
- sc 4, sc in the next st, ch 1, turn.
- sc 5, ch 1, sc in the next st, then fasten off.
Palms (make two)
- With your H hook and dark brown yarn, ch 2. Work 6 sc in the second ch from the hook.
- Rnd 1: inc around.
- Rnd 2: (sc 2, inc) 3 times, sl st, then fasten off.
Feet (make two)
- With your H hook and grey yarn:
- Row 1: ch 9, skip 1 ch, sc 7, work 3 sc in the next st, sc across the opposite side of the ch, and place your stitch marker.
- Rnd 2: sc around.
- Rnd 3: sc around, but skip the last st.
- Rnd 4: In the last st and the next 2 sts, dec in 3. Then, sc 2, inc in the next 2 sts, sc 2, dec in 3, and sc in the rest of the sts.
- Rnds 5-7: sc around.
- Rnd 8: sc 3, ch 10, skip 4 sts and sc in the 5th st, then sc in the rest of the sts.
- Rnd 9: sc in all sc and chains.
- Rnd 10: sc 3, ch 1, turn, and take out the stitch marker.
- Row 11: sc 9, ch 1, turn.
- Row 12: sc 9, ch 1, turn.
- Row 13: dec in 3, inc in the next 3 sts, dec in 3, ch 1, turn.
- Row 14: dec across, then fasten off.
- Sew the rows you just made to the chains to create a heel with a hole for the leg.
Legs (make two, one off of each foot)
- Draw a loop through a st by the hole on the foot. Using this as your starting loop, sc around. You should have 18 sts.
- Rnds 2-5: sc around.
- Rnd 6: (sc 8, inc) twice.
- Rnds 7-9: sc around.
- Rnd 10: (sc 8, dec) twice.
- Rnds 11-12: sc around.
- For the right leg:
- sc 15, ch 1, turn.
- sc 7, ch 1, turn.
- dec, sc 3, dec, ch 1, turn.
- sc across, ch 1, turn.
- dec, sc 1, dec, then fasten off.
- For the left leg:
- sc 7, ch 1, turn.
- dec, sc 3, dec, ch 1, turn.
- sc across, ch 1, turn.
- dec, sc 1, dec, then fasten off.
You can add more rounds to the legs to make them longer if you wish.
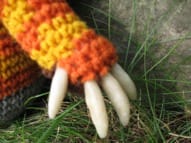
Claws
- The claws for the feet are made the same way as the ones for the hands. You can cut them in half to make them shorter for the feet.
- Attach them in the same way you attached the hand claws.
- To make the hand claws, use the white clay to make four claws. You can make them as long and thick as you want. There are two ways to attach them:
- You can put hot glue into the hole for the claw and then stick the claw in.
- Alternatively, you could put a hole through the claw and sew it to the hand, but the first method is suggested.
Assembly and Finishing
Now it’s time to bring your “Wild Thing” to life
- Stuff all the pieces (head, body, arms, and legs) and sew them together. Attach the arms and head to the body.
- Sew the palms to the orange flap at the end of each arm, making sure to leave spaces for the four claws.
- Sew the pupils to the eyes, then sew the eyes and the nose onto the head.
- Embroider the mouth. You can also use felt for the teeth.